Lexus NX300 (2021 year). Manual in english - page 15
 

  Index      Manuals     Lexus NX300 (2021 year). Manual in english


Search            copyright infringement  


Content      ..     13      14      15      16     ..


Lexus NX300 (2021 year). Manual in english - page 15


252

4-5. Using the driving support systems

The Blind Spot Monitor function uses 
radar sensors to detect vehicles that 
are traveling in an adjacent lane in the 
area that is not reflected in the outside 

rear view mirror (the blind spot), and 
advises the driver of the vehicles exis-
tence via the BSM outside rear view 
mirror indicator.

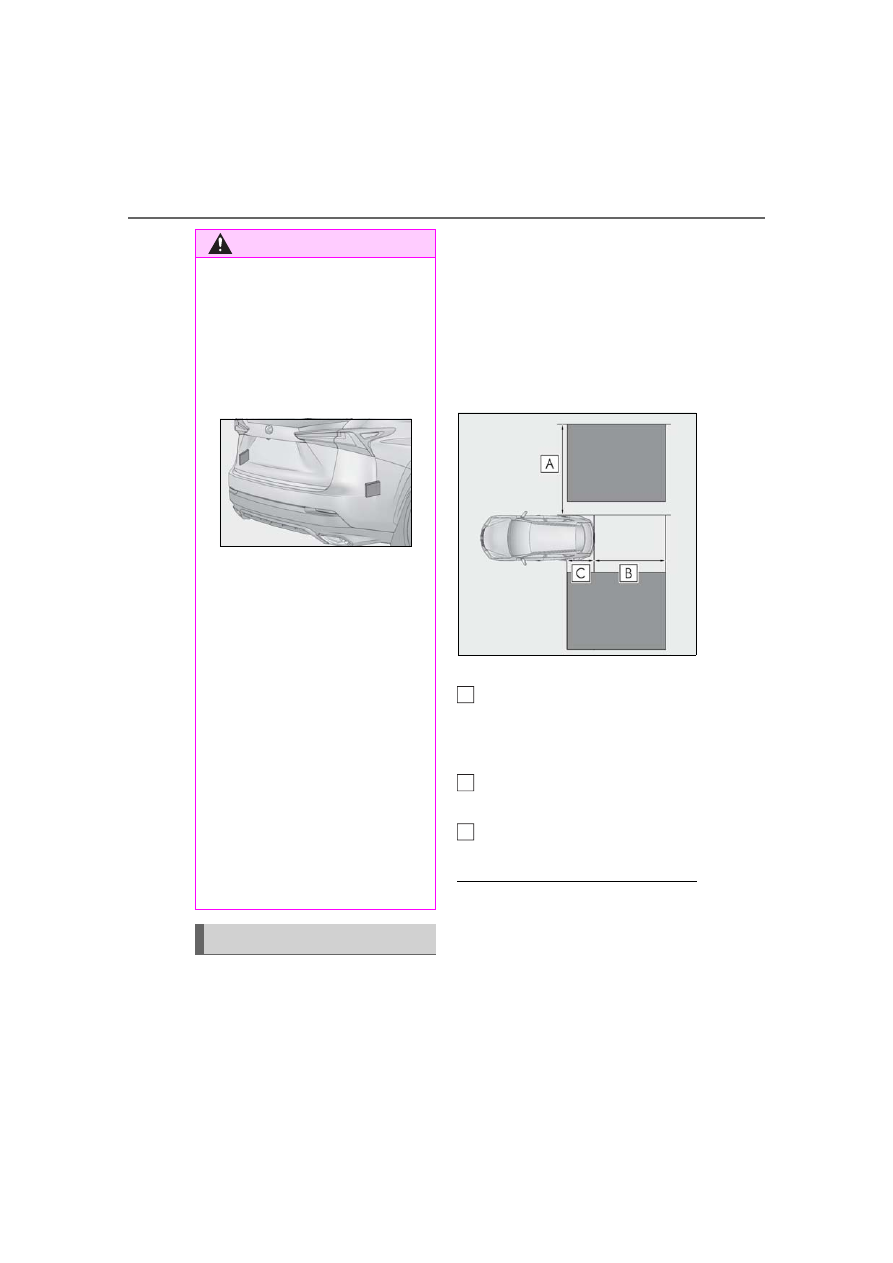
The Blind Spot Monitor function 
detection areas

The areas that vehicles can be 
detected in are outlined below.

The range of the detection area extends to:

Approximately 11.5 ft. (3.5 m) from 
the side of the vehicle

The first 1.6 ft. (0.5 m) from the side of the 
vehicle is not in the detection area

Approximately 9.8 ft. (3 m) from 
the rear bumper

Approximately 3.3 ft. (1 m) forward 
of the rear bumper

The Blind Spot Monitor function is oper-

ational when

The BSM main switch is set to on

Vehicle speed is greater than approxi-

mately 10 mph (16 km/h).

The Blind Spot Monitor function will 

detect a vehicle when

A vehicle in an adjacent lane overtakes 

WARNING

Handling the radar sensor

One Blind Spot Monitor sensor is 

installed inside the left and right side of 

the vehicle rear bumper respectively.

Observe the following to ensure the 

Blind Spot Monitor system can function 

correctly.

Keep the sensor and its surrounding 

area on the bumper clean at all times.

Do not subject the sensor or surround-

ing area on the bumper to a strong 

impact. If the sensor moves even 

slightly off position, the system may 

malfunction and vehicles that enter the 

detection area may not be detected. If 

the sensor or surrounding area is sub-

ject to a strong impact, always have the 

area inspected by your Lexus dealer.

Do not disassemble the sensor.

Do not attach accessories or stickers 

to the sensor or surrounding area on 

the bumper.

Do not modify the sensor or surround-

ing area on the bumper.

Do not paint the rear bumper any 

color other than an official Lexus color.

If the radar sensor needs to be 

replaced, contact your Lexus dealer.

The Blind Spot Monitor function

A

B

C

253

4-5. Using the driving support systems

4

Driving

your vehicle.

Another vehicle enters the detection 

area when it changes lanes.

You overtake a vehicle in adjacent lane 

slowly.

Conditions under which the Blind Spot 

Monitor function will not detect a vehi-

cle

The Blind Spot Monitor function is not 

designed to detect the following types of 

vehicles and/or objects:

Small motorcycles, bicycles, pedestrians, 
etc.

*

Vehicles traveling in the opposite direc-

tion

Guardrails, walls, signs, parked vehicles 
and similar stationary objects

*

Following vehicles that are in the same 
lane

*

Vehicles driving 2 lanes across from your 
vehicle

*

Vehicles which are being overtaken rap-
idly by your vehicle

*

*

: Depending on conditions, detection of a 

vehicle and/or object may occur.

Conditions under which the Blind Spot 

Monitor function may not function cor-

rectly

The Blind Spot Monitor function may not 

detect vehicles correctly in the following 

situations:

• When the sensor is misaligned due to a 

strong impact to the sensor or its sur-

rounding area

• When mud, snow, ice, a sticker, etc. is 

covering the sensor or surrounding area 

on the rear bumper

• When driving on a road surface that is 

wet with standing water during bad 

weather, such as heavy rain, snow, or fog

• When multiple vehicles are approaching 

with only a small gap between each vehi-

cle

• When the distance between your vehicle 

and a following vehicle is short

• When there is a significant difference in 

speed between your vehicle and the vehi-

cle that enters the detection area

• When the difference in speed between 

your vehicle and another vehicle is 

changing

• When a vehicle enters a detection area 

traveling at about the same speed as your 

vehicle

• As your vehicle starts from a stop, a vehi-

cle remains in the detection area

• When driving up and down consecutive 

steep inclines, such as hills, dips in the 

road, etc.

• When driving on roads with sharp bends, 

consecutive curves, or uneven surfaces

• When vehicle lanes are wide, or when 

driving on the edge of a lane, and the 

vehicle in an adjacent lane is far away 

from your vehicle

• When towing a trailer (vehicles with tow-

ing package)

• When items such as a bicycle carrier are 

installed on the rear of the vehicle

• When there is a significant difference in 

height between your vehicle and the 

vehicle that enters the detection area

• Immediately after the Blind Spot Monitor 

function is turned on

Instances of the Blind Spot Monitor func-

tion unnecessarily detecting a vehicle 

and/or object may increase in the follow-

ing situations:

• When the sensor is misaligned due to a 

strong impact to the sensor or its sur-

rounding area

• When the distance between your vehicle 

and a guardrail, wall, etc. that enters the 

detection area is short

• When driving up and down consecutive 

steep inclines, such as hills, dips in the 

road, etc.

• When vehicle lanes are narrow, or when 

driving on the edge of a lane, and a vehi-

cle traveling in a lane other than the adja-

cent lanes enters the detection area

• When driving on roads with sharp bends, 

consecutive curves, or uneven surfaces

• When the tires are slipping or spinning

• When the distance between your vehicle 

and a following vehicle is short

• When a bicycle carrier or other acces-

sory is installed to the rear of the vehicle

• When towing a trailer (vehicles with tow-

ing package)

254

4-5. Using the driving support systems

The Rear Cross Traffic Alert function operates when your vehicle is in reverse. It 
can detect other vehicles approaching from the right or left rear of the vehicle. It 
uses radar sensors to alert the driver of the other vehicle’s existence through flash-
ing the BSM outside rear view mirror indicators and sounding a buzzer.

Approaching vehicles

Detection areas

Rear Cross Traffic Alert icon dis-
play (if equipped)

When a vehicle approaching from the 
right or left at the rear of the vehicle is 
detected, the following will be dis-
played on the navigation/multimedia 

system screen.

Lexus parking assist monitor

A vehicle is approaching from the left 
or right at the rear of the vehicle

WARNING

Cautions regarding the use of the sys-

tem

The driver is solely responsible for safe 

driving. Always drive safely, taking care 

to observe your surroundings.

The Blind Spot Monitor function is a sup-

plementary function which alerts the 

driver that a vehicle is present in the blind 

spot. Do not overly rely on the Blind Spot 

Monitor function. The function cannot 

judge if it is safe to change lanes, there-

fore over reliance could cause an acci-

dent resulting in death or serious injury. 

According to conditions, the system may 

not function correctly. Therefore the 

driver’s own visual confirmation of safety 

is necessary.

The Rear Cross Traffic Alert function

A
B

255

4-5. Using the driving support systems

4

Driving

Panoramic view monitor

A vehicle is approaching from the left 

or right at the rear of the vehicle

The Rear Cross Traffic Alert function detection areas

The areas that vehicles can be detected in are outlined below.

To give the driver a more consistent 
time to react, the buzzer can alert for 
faster vehicles from farther away.
Example:

The Rear Cross Traffic Alert function is 

operational when

The BSM main switch is set to on.

The shift lever is in R.

Vehicle speed is less than approximately 

5 mph (8 km/h).

Approaching vehicle speed is between 

approximately 5 mph (8 km/h) and 18 

mph (28 km/h).

Conditions under which the Rear Cross 

Traffic Alert function will not detect a 

vehicle

The Rear Cross Traffic Alert function is not 

designed to detect the following types of 

vehicles and/or objects.

Small motorcycles, bicycles, pedestrians, 
etc.

*

Vehicles approaching from directly 
behind

*

Guardrails, walls, signs, parked vehicles 
and similar stationary objects

*

Vehicles moving away from your vehicle

Vehicles approaching from the parking 

Approach-

ing vehicle

Speed

 Approxi-

mate alert 

distance

Fast

18 mph (28 

km/h)

65 ft. (20 m)

Slow

5 mph (8 

km/h)

18 ft. (5.5 m)

A

256

4-5. Using the driving support systems

spaces next to your vehicle

*

Vehicles backing up in the parking space 
next to your vehicle

*

*

: Depending on conditions, detection of a 

vehicle and/or object may occur.

Conditions under which the Rear Cross 

Traffic Alert function may not function 

correctly

The Rear Cross Traffic Alert function may 

not detect vehicles correctly in the follow-

ing conditions:

During bad weather such as heavy rain, 

fog, snow, etc.

When ice or mud, etc., is attached to the 

rear bumper

When multiple vehicles approach contin-

uously

Shallow angle parking

When a vehicle is approaching at high 

speed

When backing up on a slope with a sharp 

change in grade

When backing out of a sharp angle park-

ing spot

When parking on a steep incline, such as 

hills, a dip in the road, etc.

Directly after the BSM main switch is set 

to on

Directly after the engine is started with 

the BSM main switch on

Vehicles that the sensors cannot detect 

because of obstacles

Instances of the Rear Cross Traffic Alert 

function unnecessary detecting a vehicle 

and/ or object may increase in the follow-

ing situations:

• When a vehicle passes by the side of your 

vehicle

• When the parking space faces a street 

and vehicles are being driven on the 

street

• When the distance between your vehicle 

and metal objects, such as a guardrail, 

wall, sigh, or parked vehicle, which may 

reflect electrical waves toward the rear of 

the vehicle, is short

257

4-5. Using the driving support systems

4

Driving

Vehicles without Adaptive Variable 
Suspension System

1

Normal mode

For normal driving.
Press the switch to change the driving 
mode to Normal mode when selected to 
Eco mode or Sport mode.

2

Eco mode

In contrast to Normal mode when stepping 
on the accelerator pedal, torque genera-
tion becomes slower, air conditioning 
operations (heating/cooling) are 
restrained, and driving is suited for 
improved fuel consumption.
When not in Eco mode and the driving 
mode select switch is turned to the left, 

WARNING

Cautions regarding the use of the sys-

tem

The driver is solely responsible for safe 

driving. Always drive safely, taking care 

to observe your surroundings.

The Rear Cross Traffic Alert function is 

only an assist and is not a replacement for 

careful driving. Driver must be careful 

when backing up, even when using Rear 

Cross Traffic Alert function. The driver’s 

own visual confirmation of behind you 

and your vehicle is necessary and be sure 

there are no pedestrians, other vehicles, 

etc., before backing up. Failure to do so 

could cause death or serious injury. 

According to conditions, the system may 

not function correctly. Therefore the 

driver’s own visual confirmation of safety 

is necessary.

Driving mode select switch

The driving modes can be selected 
to suit driving condition.

Selecting a driving mode

258

4-5. Using the driving support systems

“Eco” indicator will be shown on the multi-
information display.

3

Sport mode

Assists acceleration response by con-
trolling the engine, transmission and steer-
ing. Suitable for when precise handling is 
desirable, for example when driving on 
mountain roads.
When not in Sport mode and the driving 
mode select switch is turned to the right, 
“Sport” indicator will be shown on the 
multi-information display.

Vehicles with Adaptive Variable 
Suspension System

1

Normal/Custom mode

Press the switch and select Normal mode 
or Custom mode. Each time the switch is 
pressed, the system changes between 
Normal mode and Custom mode. When 
Custom mode is selected, the “Custom” 
indicator comes on.
When in Eco mode or Sport mode, when 
the switch is pressed, the system returns to 
Normal mode. Press the switch to change 
the driving mode to Normal mode when 

selected to Eco mode or Sport mode.
Custom mode can be setup on the naviga-
tion system or multimedia system screen.
• Normal mode
Suitable when driving in the city, for good 
fuel consumption efficiency, silence, and 
drive-ability.
• Custom mode
Driving is possible by setting the desired 
function for power train control, chassis 
control or air conditioning operations.
Custom mode settings can only be 
changed using the Remote Touch. 
(

P.272)

2

Eco mode

In contrast to Normal mode when stepping 
on the accelerator pedal, torque genera-
tion becomes slower, air conditioning 
operations (heating/cooling) are 
restrained, and driving is suited for 
improved fuel consumption.
When not in Eco mode and the driving 
mode select switch is turned to the left, 
“Eco” indicator will be shown on the multi-
information display.

3

Sport mode

• Sport S mode
Assists acceleration response by con-
trolling the engine and transmission. Suit-
able for when powerful acceleration is 
desirable.
When not in Sport S mode and the driving 
mode select switch is turned to the right, 
“Sport S” indicator will be shown on the 
multi-information display.
• Sport  S+  mode
Helps to ensure superior vehicle stability 
by simultaneously controlling the steering 
and suspension in addition to the engine 
and transmission. Suitable for sporty driv-
ing.
When in Sport S mode and the driving 
mode select switch is turned to the right, 

259

4-5. Using the driving support systems

4

Driving

“Sport S+” indicator will be shown on the 
multi-information display.

Operation of the air conditioning sys-

tem in Eco mode

Eco mode controls the heating/cooling 

operations and fan speed of the air condi-

tioning system to enhance fuel efficiency. To 

improve air conditioning performance, 

adjust the fan speed or turn off Eco mode.

When canceling Eco mode/Sport mode

Select another driving mode. Also, Sport 

mode will be canceled automatically 

when the engine switch is turned off.

Normal mode and Eco mode will not be 

canceled automatically until another driv-

ing mode is selected, even if the engine 

switch is turned off.

Operating the ASC (Active Sound 

Control)

If the ASC is ON, an electronic sound plays 

when the Sport S+ mode is selected.

Customization

The Custom mode can be changed. (Cus-

tomizable features: 

P.425)

ABS (Anti-lock Brake System)

Helps to prevent wheel lock when the 
brakes are applied suddenly, or if the 
brakes are applied while driving on a 
slippery road surface

Brake assist

Generates an increased level of brak-
ing force after the brake pedal is 
depressed when the system detects a 
panic stop situation

VSC (Vehicle Stability Control)

Helps the driver to control skidding 
when swerving suddenly or turning on 
slippery road surfaces.

Enhanced VSC (Enhanced Vehi-
cle Stability Control)

Provides cooperative control of the 
ABS, TRAC, VSC and EPS.
Helps to maintain directional stability 
when swerving on slippery road sur-
faces by controlling steering perfor-
mance.

Driving assist systems

To keep driving safety and perfor-
mance, the following systems oper-
ate automatically in response to 
various driving situations. Be aware, 
however, that these systems are 
supplementary and should not be 
relied upon too heavily when oper-
ating the vehicle.

Summary of the driving assist 
systems

260

4-5. Using the driving support systems

Trailer Sway Control

Helps the driver to control trailer sway 
by selectively applying brake pressure 
for individual wheels and reducing 
driving torque when trailer sway is 
detected.

TRAC (Traction Control)

Helps to maintain drive power and pre-
vent the drive wheels from spinning 
when starting the vehicle or accelerat-
ing on slippery roads

Active Cornering Assist (ACA)

Helps to prevent the vehicle from drift-
ing to the outer side by performing 
inner wheel brake control when 
attempting to accelerate while turning

Hill-start assist control

Helps to reduce the backward move-
ment of the vehicle when starting on an 
uphill

EPS (Electric Power Steering)

Employs an electric motor to reduce 
the amount of effort needed to turn the 
steering wheel

Dynamic Torque Control AWD 
system (if equipped)

Automatically switches from front-
wheel drive to all-wheel drive (AWD) 
according to the driving conditions, 
helping to ensure reliable handling and 
stability. Examples of conditions where 
the system will switch to AWD are 
when cornering, going uphill, starting 
off or accelerating, and when the road 
surface is slippery due to snow, rain, 
etc.

AVS (Adaptive Variable Suspen-
sion System) (if equipped)

By independently controlling the 
damping force of the shock absorbers 
for each of the 4 wheels according to 
the road and driving conditions, this 
system helps riding comfort with supe-
rior vehicle stability, and helps good 
vehicle posture. If Sport S+ mode is 
selected using the driving mode select 
switch, the damping force will become 
more suitable for sporty driving. 
(

P.257)

PCS (Pre-Collision System)

P.198

BSM (Blind Spot Monitor) (if 
equipped)

P.249

When the TRAC/VSC/Trailer Sway 

Control systems are operating

The slip indicator light will flash while the 

TRAC/VSC/Trailer Sway Control systems 

are operating.

Disabling the TRAC system

If the vehicle gets stuck in mud, dirt or snow, 
the TRAC system may reduce power from 
the engine to the wheels. Pressing 

 to 

turn the system off may make it easier for 
you to rock the vehicle in order to free it.
To turn the TRAC system off, quickly press 
and release 

.

261

4-5. Using the driving support systems

4

Driving

The “Traction Control Turned Off” will be 
shown on the multi-information display. 
Press 

 again to turn the system back on.

Turning off both TRAC, VSC and Trailer 

Sway Control systems

To turn the TRAC, VSC and Trailer Sway 
Control systems off, press and hold 

 for 

more than 3 seconds while the vehicle is 
stopped. The VSC OFF indicator light will 
come on and the “Traction Control Turned 
Off” will be shown on the multi-information 
display.

*

 Press 

 again to turn the system 

back on.

*

: On vehicles with pre-collision system, 

pre-collision brake assist and pre-colli-
sion braking will also be disabled. The 
PCS warning light will come on and the 
message will be shown on the multi-infor-
mation display. (

P.204)

When the message is displayed on the 
multi-information display showing that 
TRAC has been disabled even if 

 has 

not been pressed

TRAC is temporary deactivated. If the infor-

mation continues to show, contact your 

Lexus dealer.

Sounds and vibrations caused by the 

ABS, brake assist, VSC, Trailer Sway 

Control, TRAC and hill-start assist con-

trol systems

A sound may be heard from the engine 

compartment when the brake pedal is 

depressed repeatedly, when the engine is 

started or just after the vehicle begins to 

move. This sound does not indicate that a 

malfunction has occurred in any of these 

systems.

Any of the following conditions may 

occur when the above systems are oper-

ating. None of these indicates that a mal-

function has occurred.

• Vibrations may be felt through the vehicle 

body and steering.

• A motor sound may be heard also after 

the vehicle comes to a stop.

• The brake pedal may pulsate slightly after 

the ABS is activated.

• The brake pedal may move down slightly 

after the ABS is activated.

Active Cornering Assist operation 

sounds and vibrations

When the Active Cornering Assist is oper-

ated, operation sounds and vibrations may 

be generated from the brake system, but 

this is not a malfunction.

EPS operation sound

When the steering wheel is operated, a 

motor sound (whirring sound) may be 

heard. This does not indicate a malfunction.

Reduced effectiveness of the EPS sys-

tem

The effectiveness of the EPS system is 

reduced to prevent the system from over-

heating when there is frequent steering 

input over an extended period of time. The 

steering wheel may feel heavy as a result. 

Should this occur, refrain from excessive 

steering input or stop the vehicle and turn 

the engine off. The EPS system should 

return to normal within 10 minutes.

Automatic reactivation of TRAC, Trailer 

Sway Control and VSC systems

After turning the TRAC, Trailer Sway Con-

trol and VSC systems off, the systems will 

be automatically re-enabled in the following 

situations:

262

4-5. Using the driving support systems

When the engine switch is turned off

If only the TRAC system is turned off, the 

TRAC will turn on when vehicle speed 

increases

If both the TRAC and VSC systems are 

turned off, automatic re-enabling will not 

occur when vehicle speed increases.

Operating conditions of Active Corner-

ing Assist

The system operates when the following 

occurs.

TRAC/VSC can operate

The driver is attempting to accelerate 

while turning

The system detects that the vehicle is 

drifting to the outer side

The brake pedal is released

Operating conditions of hill-start assist 

control

When the following four conditions are met, 

the hill-start assist control will operate:

The shift lever is in a position other than P 

or N (when starting off forward/back-

ward on an upward incline)

The vehicle is stopped

The accelerator pedal is not depressed

The parking brake is not engaged

Automatic system cancelation of hill-

start assist control

The hill-start assist control will turn off in any 

of the following situations:

The shift lever is shifted to P or N

The accelerator pedal is depressed

The parking brake is engaged

2 seconds at maximum elapsed after the 

brake pedal is released

WARNING

The ABS does not operate effectively 

when

The limits of tire gripping performance 

have been exceeded (such as exces-

sively worn tires on a snow covered 

road).

The vehicle hydroplanes while driving 

at high speed on wet or slick roads.

Stopping distance when the ABS is 

operating may exceed that of normal 

conditions

The ABS is not designed to shorten the 

vehicle’s stopping distance. Always main-

tain a safe distance from the vehicle in 

front of you, especially in the following 

situations:

When driving on dirt, gravel or snow-

covered roads

When driving with tire chains

When driving over bumps in the road

When driving over roads with potholes 

or uneven surfaces

TRAC/VSC may not operate effec-

tively when

Directional control and power may not 

be achievable while driving on slippery 

road surfaces, even if the TRAC/VSC 

system is operating. Drive the vehicle 

carefully in conditions where stability and 

power may be lost.

Active Cornering Assist does not 

operate effectively when

Do not overly rely on Active Corner-

ing Assist. Active Cornering Assist 

may not operate effectively when 

accelerating down slopes or driving on 

slippery road surfaces.

When Active Cornering Assist fre-

quently operates, Active Cornering 

Assist may temporarily stop operating 

to ensure proper operation of the 

brakes, TRAC and VSC.

Hill-start assist control does not oper-

ate effectively when

Do not overly rely on hill-start assist 

control. Hill-start assist control may 

not operate effectively on steep 

inclines and roads covered with ice.

263

4-5. Using the driving support systems

4

Driving

WARNING

Unlike the parking brake, hill-start 

assist control is not intended to hold 

the vehicle stationary for an extended 

period of time. Do not attempt to use 

hill-start assist control to hold the vehi-

cle on an incline, as doing so may lead 

to an accident.

When the TRAC/VSC/ Trailer Sway 

Control is activated

The slip indicator light flashes. Always 

drive carefully. Reckless driving may 

cause an accident. Exercise particular 

care when the indicator light flashes.

When the TRAC/VSC/Trailer Sway 

Control systems are turned off

Be especially careful and drive at a speed 

appropriate to the road conditions. As 

these are the systems to help ensure 

vehicle stability and driving force, do not 

turn the TRAC/VSC/Trailer Sway Con-

trol systems off unless necessary. Trailer 

Sway Control is part of the VSC system 

and will not operate if VSC is turned off 

or experiences a malfunction.

Replacing tires

Make sure that all tires are of the speci-

fied size, brand, tread pattern and total 

load capacity. In addition, make sure that 

the tires are inflated to the recom-

mended tire inflation pressure level. The 

ABS, TRAC, Trailer Sway Control and 

VSC systems will not function correctly if 

different tires are installed on the vehicle. 

Contact your Lexus dealer for further 

information when replacing tires or 

wheels.

Handling of tires and the suspension

Using tires with any kind of problem or 

modifying the suspension will affect the 

driving assist systems, and may cause a 

system to malfunction.

Trailer Sway Control precaution

The Trailer Sway Control system is not 

able to reduce trailer sway in all situa-

tions. Depending on many factors such 

as the conditions of the vehicle, trailer, 

road surface and driving environment, 

the Trailer Sway Control system may not 

be effective. Refer to your trailer owner’s 

manual for information on how to tow 

your trailer properly.

If trailer sway occurs

Observe the following precautions.
Failing to do so may cause death or seri-

ous injury.

Firmly grip the steering wheel. Steer 

straight ahead. Do not try to control 

trailer sway by turning the steering 

wheel.

Begin releasing the accelerator pedal 

immediately but very gradually to 

reduce speed. Do not increase speed. 

Do not apply vehicle brakes.

If you make no extreme correction with 

the steering or brakes, your vehicle and 

trailer should stabilize. (

P.260)

264

4-5. Using the driving support systems

Press the switch.

The torque of the engine is distributed to 
the rear wheels to the maximum extent 
possible in accordance with driving condi-
tions.
Pressing the switch again cancels all-wheel 
drive lock mode and returns the Dynamic 
Torque Control AWD system to normal 
mode. (

P.260)

All-wheel drive lock mode can be oper-

ated when

The engine switch is in IGNITION ON 

mode.

Automatic release for the all-wheel 

drive lock mode

All-wheel drive lock mode is canceled 

when the brakes are applied to ensure 

the ABS and VSC systems operate effec-

tively.

All-wheel drive lock mode is canceled 

when the vehicle speed exceeds 25 mph 

(40 km/h).

All-wheel drive lock switch 
(AWD models)

All-wheel drive lock mode can be 
used when a large amount of drive 
power needs to be applied to all the 
wheels, such as when the vehicle 
gets stuck in mud and you need to 
free it.

Using All-wheel drive lock mode

265

4-6. Driving tips

4

Driving

4-6.Driving tips

Use fluids that are appropriate to 
the prevailing outside temperatures.

• Engine  oil
• Engine coolant
• Washer  fluid

Have a service technician inspect 
the condition of the battery.

Have the vehicle fitted with four 
snow tires or purchase a set of tire 
chains for the front tires

*

.

Ensure that all tires are the same size and 
brand, and that chains match the size of the 
tires.

*

: Tire chains cannot be mounted on the 

225/60R18 tires.
Snow tires should be used instead.

Perform the following according to the 

Winter driving tips

Carry out the necessary prepara-
tions and inspections before driving 
the vehicle in winter. Always drive 
the vehicle in a manner appropriate 
to the prevailing weather condi-
tions.

Preparation for winter

WARNING

Driving with snow tires

Observe the following precautions to 

reduce the risk of accidents.

Failure to do so may result in a loss of 

vehicle control and cause death or seri-

ous injury.

Use tires of the specified size.

Maintain the recommended level of air 

pressure.

Do not drive in excess of 75 mph (120 

km/h), regardless of the type of snow 

tires being used.

Use snow tires on all, not just some 

wheels.

Driving with tire chains

Observe the following precautions to 

reduce the risk of accidents.

Failure to do so may result in the vehicle 

being unable to be driven safely, and may 

cause death or serious injury.

Do not drive in excess of the speed 

limit specified for the tire chains being 

used, or 30 mph (50 km/h), which-

ever is lower.

Avoid driving on bumpy road surfaces 

or over potholes.

Avoid sudden acceleration, abrupt 

steering, sudden braking and shifting 

operations that cause sudden engine 

braking.

Slow down sufficiently before entering 

a curve to ensure that vehicle control is 

maintained.

Do not use LDA (Lane Departure 

Alert with steering control) (if 

equipped).

Do not use LTA (Lane Tracing Assist) 

(if equipped).

NOTICE

Repairing or replacing snow tires

Request repairs or replacement of snow 

tires from Lexus dealers or legitimate tire 

retailers.

This is because the removal and attach-

ment of snow tires affects the operation 

of the tire pressure warning valves and 

transmitters.

Before driving the vehicle

266

4-6. Driving tips

driving conditions:

Do not try to forcibly open a window 
or move a wiper that is frozen. Pour 
warm water over the frozen area to 
melt the ice. Wipe away the water 
immediately to prevent it from 
freezing.

To ensure proper operation of the 
climate control system fan, remove 
any snow that has accumulated on 
the air inlet vents in front of the 
windshield.

Check for and remove any excess 
ice or snow that may have accumu-
lated on the exterior lights, vehicle’s 
roof, chassis, around the tires or on 
the brakes.

Remove any snow or mud from the 
bottom of your shoes before getting 
in the vehicle.

Accelerate the vehicle slowly, keep a 
safe distance between you and the 
vehicle ahead, and drive at a reduced 
speed suitable to road conditions.

Park the vehicle and move the shift 
lever to P without setting the park-
ing brake. The parking brake may 
freeze up, preventing it from being 
released. If the vehicle is parked 
without setting the parking brake, 
make sure to block the wheels.
Failure to do so may be dangerous 
because it may cause the vehicle to 

move unexpectedly, possibly lead-
ing to an accident.

When the parking brake is in automatic 
mode, release the parking brake after shift-
ing the shift lever to P. (

P.171)

If the vehicle is left parked with the 
brakes damp in cold temperatures, 
there is a possibility of the brakes 
freezing.

If the vehicle is parked without set-
ting the parking brake, confirm that 
the shift lever cannot be moved out 
of P

*

.

*

: The shift lever will be locked if it is 

attempted to be shifted from P to any 
other position without depressing the 
brake pedal. If the shift lever can be 
shifted from P, there may be a problem 
with the shift lock system. Have the vehi-
cle inspected by your Lexus dealer 
immediately.

Use the correct tire chain size when 
mounting the tire chains. Chain size is 
regulated for each tire size.

When driving the vehicle

When parking the vehicle

WARNING

When parking the vehicle

When parking the vehicle without apply-

ing the parking brake, make sure to 

chock the wheels. If you do not chock the 

wheels, the vehicle may move unexpect-

edly, possibly resulting in an accident.

Selecting tire chains

267

4-6. Driving tips

4

Driving

Vehicles with 225/65R17 and 
235/55R18 tires

Side chain:

0.12 in. (3 mm) in diameter

0.39 in. (10 mm) in width

0.98 in. (25 mm) in length

Cross chain:

0.16 in. (4 mm) in diameter

0.55 in. (14 mm) in width

0.98 in. (25 mm) in length

Vehicles with 225/60R18 tires

Tire chains cannot be mounted on the 
225/60R18 tires.
Snow tires should be used instead.

Regulations regarding the use of tire 
chains vary depending on location and 
type of road. Always check local regu-
lations before installing chains.

Tire chain installation

Observe the following precautions when 

installing and removing chains:

Install and remove tire chains in a safe 

location.

Install tire chains on the front tires only. 

Do not install tire chains on the rear tires.

Install tire chains on front tires as tightly as 

possible. Retighten chains after driving 

1/4 - 1/2 mile (0.5 - 1.0 km).

Install tire chains following the instruc-

tions provided with the tire chains.

Regulations on the use of tire 
chains

A
B
C

D

E
F

NOTICE

Fitting tire chains

The tire pressure warning valves and 

transmitters may not function correctly 

when tire chains are fitted.


Content      ..     13      14      15      16     ..