LEXUS RX 450HL (2019 year). Instruction - part 10


  Index      Lexus     LEXUS RX 450HL - instruction 2019 year in english


Search            


Content   ..  8  9  10  11   ..


LEXUS RX 450HL (2019 year). Instruction - part 10


160

3-2. Opening, closing and locking the doors

RX450h_RX450hL_U

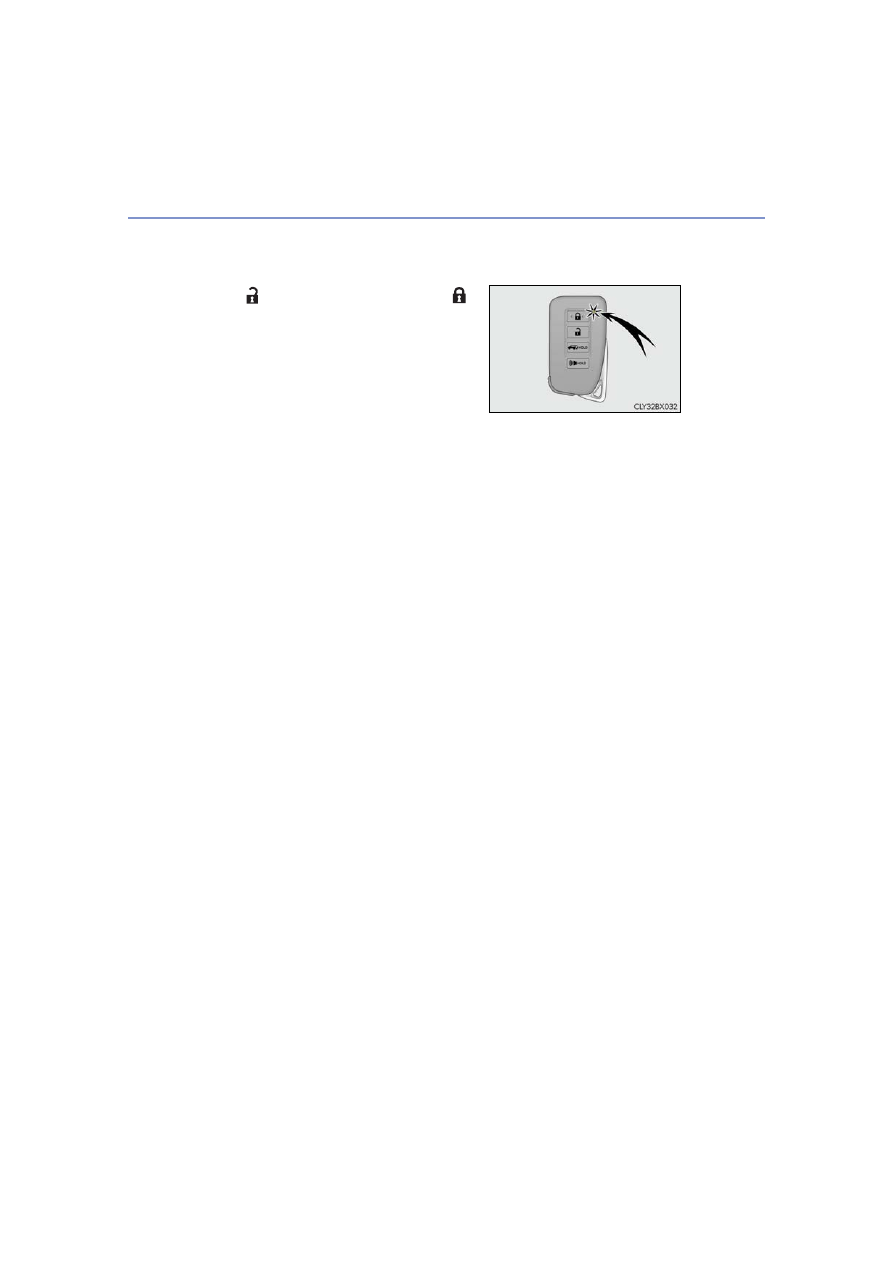
Electronic Key battery-Saving Function
When battery-saving mode is set, battery depletion is minimized by stopping the elec-

tronic key from receiving radio waves.

Conditions affecting operation
The smart access system with push-button start, wireless remote control and immobilizer

system use weak radio waves. In the following situations, the communication between the

electronic key and the vehicle may be affected, preventing the smart access system with

push-button start, wireless remote control and immobilizer system from operating prop-

erly. (Ways of coping: 

P. 692)

When the electronic key battery is depleted

Near a TV tower, electric power plant, gas station, radio station, large display, airport or

other facility that generates strong radio waves or electrical noise

When the electronic key is in contact with, or is covered by the following metallic

objects
• Cards to which aluminum foil is attached

• Cigarette boxes that have aluminum foil inside

• Metallic wallets or bags

• Coins

• Hand warmers made of metal

• Media such as CDs and DVDs

When other wireless keys (that emit radio waves) are being used nearby

When carrying the electronic key together with the following devices that emit radio

waves
• Portable radio, cellular phone, cordless phone or other wireless communication

devices

• Another vehicle’s electronic key, another electronic key of your vehicle, or a wireless

key that emits radio waves

• Personal computers or personal digital assistants (PDAs)

• Digital audio players

• Portable game systems

If window tint with a metallic content or metallic objects are attached to the rear win-

dow

When the electronic key is placed near a battery charger or electronic devices

When the vehicle is parked in a pay parking spot where radio waves are emitted

Press 

 twice while pressing and holding 

.

Confirm that the electronic key indicator flashes

4 times.
While the battery-saving mode is set, the smart

access system with push-button start cannot be

used. To cancel the function, press any of the

electronic key buttons.

161

3-2. Opening, closing and locking the doors

3

Op
era
tio

n of
 ea

ch

 co

m

po

ne

nt

RX450h_RX450hL_U

Note for the entry function

Even when the electronic key is within the effective range (detection areas), the system

may not operate properly in the following cases:
• The electronic key is too close to the window or outside door handle, near the

ground, or in a high place when the doors are locked or unlocked.

• The electronic key is near the ground or in a high place, or too close to the rear

bumper center when the back door is opened.

• The electronic key is on the instrument panel, luggage compartment, floor, or in the

door pockets or glove box when the hybrid system is started or power switch modes

are changed.

Do not leave the electronic key on top of the instrument panel or near the door pockets

when exiting the vehicle. Depending on the radio wave reception conditions, it may be

detected by the antenna outside the cabin and the door will become lockable from the

outside, possibly trapping the electronic key inside the vehicle.

As long as the electronic key is within the effective range, the doors may be locked or

unlocked by anyone.

Even if the electronic key is not inside the vehicle, it may be possible to start the hybrid

system if the electronic key is near the window.

The doors may unlock if a large amount of water splashes on the door handle, such as in

the rain or in a car wash when the electronic key is within the effective range. (The door

will automatically be locked after approximately 60 seconds if the doors are not

opened and closed.)

If the wireless remote control is used to lock the doors when the electronic key is near

the vehicle, there is a possibility that the door may not be unlocked by the entry func-

tion. (Use the wireless remote control to unlock the doors.)

Touching the door lock sensor while wearing gloves may delay or prevent lock opera-

tion. Remove the gloves and touch the lock sensor again.

When the lock operation is performed using the lock sensor, recognition signals will be

shown up to two consecutive times. After this, no recognition signals will be given.

*

If the door handle becomes wet while the electronic key is within the effective range,
the door may lock and unlock repeatedly. In that case, follow the following correction
procedures to wash the vehicle:
• Place the electronic key in a location 6 ft. (2 m) or more away from the vehicle. (Take

care to ensure that the key is not stolen.)

• Set the electronic key to battery-saving mode to disable the smart access system

with push-button start. (

P. 160)

If the electronic key is inside the vehicle and a door handle becomes wet during a car

wash, a message may be shown on the multi-information display and a buzzer will

sound outside the vehicle. To turn off the alarm, lock all the doors.

The lock sensor may not work properly if it comes into contact with ice, snow, mud, etc.

Clean the lock sensor and attempt to operate it again.

A sudden approach to the effective range or door handle may prevent the doors from

being unlocked. In this case, return the door handle to the original position and check

that the doors unlock before pulling the door handle again.

If there is another electronic key in the detection area, it may take slightly longer to

unlock the doors after the door handle is gripped.

162

3-2. Opening, closing and locking the doors

RX450h_RX450hL_U

Fingernails may scrape against the door during operation of the door handle. Be care-

ful not to injure fingernails or damage the surface of the door.

*

: This setting can be customized at your Lexus dealer.

When the vehicle is not driven for extended periods

To prevent theft of the vehicle, do not leave the electronic key within 6 ft. (2 m) of the

vehicle.

The smart access system with push-button start can be deactivated in advance. 

(

P. 736)

Setting the electronic key to battery-saving mode helps to reduce key battery deple-

tion. (

P. 160)

To operate the system properly
Make sure to carry the electronic key when operating the system. Do not get the elec-

tronic key too close to the vehicle when operating the system from the outside of the

vehicle.
Depending on the position and holding condition of the electronic key, the key may not

be detected correctly and the system may not operate properly. (The alarm may go off

accidentally, or the door lock prevention may not operate.)

If the smart access system with push-button start does not operate properly

Locking and unlocking the doors: Use the mechanical key. (

P. 692)

Starting the hybrid system: 

P. 693

Customization
Some functions can be customized. (

P. 736)

If the smart access system with push-button start has been deactivated in a customized

setting

Locking and unlocking the doors:

Use the wireless remote control or mechanical key. (

P. 136, 142, 692)

Starting the hybrid system and changing power switch modes: 

P. 693

Stopping the hybrid system: 

P. 240

163

3-2. Opening, closing and locking the doors

3

Op
era
tio

n of
 ea

ch

 co

m

po

ne

nt

RX450h_RX450hL_U

Certification for the smart access system with push-button start

Except for vehicles sold in Canada

164

3-2. Opening, closing and locking the doors

RX450h_RX450hL_U

For vehicles sold in Canada

165

3-2. Opening, closing and locking the doors

3

Op
era
tio

n of
 ea

ch

 co

m

po

ne

nt

RX450h_RX450hL_U

166

3-2. Opening, closing and locking the doors

RX450h_RX450hL_U

WARNING

Caution regarding interference with electronic devices

People with implantable cardiac pacemakers, cardiac resynchronization therapy-

pacemakers or implantable cardioverter defibrillators should keep away from the

smart access system with push-button start antennas. (

P. 158) 

The radio waves may affect the operation of such devices. If necessary, the entry

function can be disabled. Ask your Lexus dealer for details, such as the frequency of

radio waves and timing of the emitted radio waves. Then, consult your doctor to see if

you should disable the entry function.

Users of any electrical medical device other than implantable cardiac pacemakers,

cardiac resynchronization therapy-pacemakers or implantable cardioverter defibril-

lators should consult the manufacturer of the device for information about its opera-

tion under the influence of radio waves.

Radio waves could have unexpected effects on the operation of such medical

devices.

Ask your Lexus dealer for details on disabling the entry function.

167

3

Op
era
tio

n of
 ea

ch

 co

m

po

ne

nt

RX450h_RX450hL_U

3-3. Adjusting the seats

Seat position adjustment switch
Seat cushion (front) angle adjust-
ment switch
Vertical height adjustment switch
Seatback angle adjustment switch
Lumbar support firmness adjust-
ment switch
Lumbar support height adjustment
switch (if equipped)
Seat cushion length adjustment
switch (if equipped)

Power easy access system
The driver’s seat (on some models) and steering wheel move in accordance with power

switch mode and the driver’s seat belt condition. (

P. 181)

Front seats

Adjustment procedure

1

2

3
4
5

6

7

WARNING

When adjusting the seat position

Take care when adjusting the seat position to ensure that other passengers are not

injured by the moving seat.

Do not put your hands under the seat or near the moving parts to avoid injury. 

Fingers or hands may become jammed in the seat mechanism.

Make sure to leave enough space around the feet so they do not get stuck.

Seat adjustment
To reduce the risk of sliding under the lap belt during a collision, do not recline the seat

more than necessary.

If the seat is too reclined, the lap belt may slide past the hips and apply restraint forces

directly to the abdomen, or your neck may contact the shoulder belt, increasing the risk

of death or serious injury in the event of an accident. 

Adjustments should not be made while driving as the seat may unexpectedly move and

cause the driver to lose control of the vehicle.

168

3-3. Adjusting the seats

RX450h_RX450hL_U

Manual seat

Seatback angle adjustment lever
Seat position adjustment lever

Power seat

Seatback angle adjustment switch
Seat position adjustment lever

Rear seats

Second-row seats (RX450h)

1

2

1

2

169

3-3. Adjusting the seats

3

Op
era
tio

n of
 ea

ch

 co

m

po

ne

nt

RX450h_RX450hL_U

Seatback angle adjustment lever
Seat position adjustment lever
Seatback folding lever

Right seat fold switch
Right seat return switch
Left seat fold switch
Left seat return switch

Second-row seats (RX450hL)

Third-row seats (RX450hL)

1

2
3

1

2
3
4

170

3-3. Adjusting the seats

RX450h_RX450hL_U

Before folding the rear seatbacks

Stow the center seat seat belt buckle.
Lower the rear seat head restraints to the lowest position. (

P. 186)

Folding the rear seatbacks (manual seat)

Using the seatback angle adjustment lever

Pull the lever and fold the rear seat-
back.

Using the lever in the luggage compartment 

Pull the lever and fold the rear seat-
back.

Folding the second-row seat seatbacks (RX450h)

1

2

171

3-3. Adjusting the seats

3

Op
era
tio

n of
 ea

ch

 co

m

po

ne

nt

RX450h_RX450hL_U

Folding the rear seatbacks (power seat)
Press and hold the fold switch until the rear seatback begins to operate.

A buzzer will sound and then the operation will start. When the operation is com-

pleted, the buzzer will sound again.
To stop the operation partway, press either side of the switch for the operating seat.

Any rear seat operation switch for the operating seat, regardless of location, can

be used to stop the operation. (A buzzer may sound depending on the position

that the rear seatback is stopped.)

Returning the rear seatbacks (manual seat)

Lift the rear seatback until it locks
in position.

Check that the plate of the seat
belt is on the front side of the seat-
back.

Using the seatback angle adjust-
ment switch

Using the switch in the luggage
compartment 

When using the seatback angle adjustment switch: If the rear seatback is
reclined, adjust it to the most upright position and then press the switch again.

1

2

172

3-3. Adjusting the seats

RX450h_RX450hL_U

Returning the rear seatbacks (power seat)

Press and hold the return switch until the rear seatback begins to operate.

A buzzer will sound and then the operation will start. When the operation is com-

pleted, the buzzer will sound twice again.
To stop the operation partway, press either side of the switch for the operating seat.

Any rear seat operation switch for the operating seat, regardless of location, can

be used to stop the operation. (A buzzer may sound depending on the position

that the rear seatback is stopped.)

Check that the plate of the seat
belt is on the front side of the seat-
back.

Folding the rear center seatback only 
Pull the lock release lever on the
back side of the seatback and fold
the center seatback.

To return the rear center seatback to

its original position, lift it until it locks

in position.

1

Using the seatback angle adjust-
ment switch

Using the switch in the luggage
compartment 

2

173

3-3. Adjusting the seats

3

Op
era
tio

n of
 ea

ch

 co

m

po

ne

nt

RX450h_RX450hL_U

Before folding the second-row seat seatbacks

To prevent the seat belt from
being damaged, hook it to the
seat belt hanger.

Stow the center seat seat belt buckle.
Lower the second-row seat head restraints to the lowest position. 
(

P. 186)

Folding the second-row seat seatbacks

Pull the seatback angle adjust-
ment lever and tilt the seatback
forward.

Pull the seatback folding lever
and fold the seatback.

Folding the second-row seat seatbacks (RX450hL)

1

2
3

1

2

174

3-3. Adjusting the seats

RX450h_RX450hL_U

Returning the second-row seat seatbacks
Lift the second-row seat seatback
until it locks in position.

Before moving the second-row seat
To prevent the seat belt from being
damaged, hook it to the seat belt
hanger.

When entering/exiting the vehicle
Pull the seatback angle adjustment
lever A or B to tilt the seatback for-
ward and then slide the seat forward.

Make sure that the second-row seat

is free of passengers and obstruc-

tions before operating the seatback

tilt lever.

After passengers have entered/exited the vehicle
Tilt back and slide the second-row seat until it locks in position.

Moving the second-row seat for third-row seat access (RX450hL)

175

3-3. Adjusting the seats

3

Op
era
tio

n of
 ea

ch

 co

m

po

ne

nt

RX450h_RX450hL_U

Before folding the third-row seat seatbacks

To prevent the seat belt from
being damaged, hook it to the
seat belt hanger.

Lower the third-row seat head restraints to the lowest position. (

P. 186)

Folding the third-row seat seatbacks

Press and hold the 

 side of the

switch until the seatback is folded
completely.

A buzzer will sound twice before the

operation begins and twice when the

operation is complete.
If the switch is released while the

seatback is operating, the seatback

will stop and a buzzer will sound con-

tinuously.

Returning the third-row seat seatbacks

Press and hold the 

 side of the

switch until the seatback is fully
upright.

A buzzer will sound twice before the

operation begins and twice when the

operation is complete.
If the switch is released while the

seatback is operating, the seatback

will stop and a buzzer will sound con-

tinuously.

Folding the third-row seat seatbacks (RX450hL)

1

2


Content   ..  8  9  10  11   ..