Lexus SC300 / Lexus SC400. Manual - part 824
 

  Index      Lexus     Lexus SC300 / Lexus SC400 - service repair manual


Search            


Content   ..  822  823  824  825   ..


Lexus SC300 / Lexus SC400. Manual - part 824


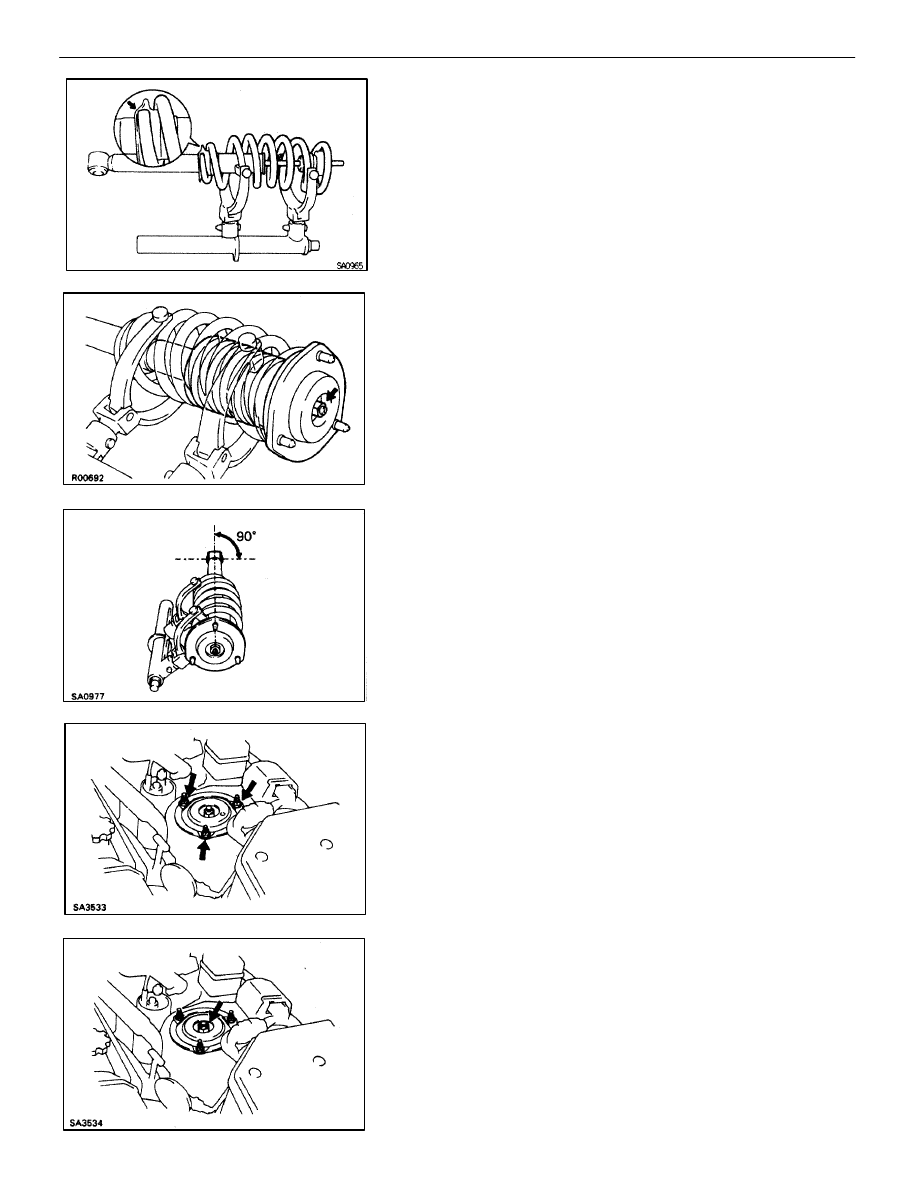
(b)  Install the coil spring to the shock absorber.

HINT: Fit the lower end of the coil spring into the gap of the
spring seat of the shock absorber.

4. 

INSTALL SUSPENSION SUPPORT

(a)  Install the suspension support to the rod.
(b)  Temporarily tighten a new nut.

(c)  Turn the suspension support so that one of the bolts on the

suspension support faces the same direction, as shown in
the illustration.
HINT: Align the bolt so that a line drawn between the rod and
the bolt would be 90

°

 to the direction of the lower bushing.

5. REMOVE 

SST

HINT: After removing the SST, again check the direction of
the suspension support.

FRONT SHOCK ABSORBER
INSTALLATION

SA063–05

1. 

INSTALL SHOCK ABSORBER TO BODY

(a) Install 

the shock absorber with coil spring to the body with the

3 nuts.

Torque: 35 N

m (360 kgf

cm, 26 ft

lbf)

(b)  Torque the temporarily tightened nut in the middle of the

suspension support.

Torque: 29 N

m (300 kgf

cm, 22 ft

lbf)

(c)  Install the plug to the suspension support.

SA–32

SUSPENSION AND AXLE

FRONT SUSPENSION

2. CONNECT  SHOCK  ABSORBER  TO  LOWER

SUSPENSION ARM

(a)  Connect the shock absorber to lower suspension arm.
(b)  Install the bolt from the rear vehicle and temporarily tighten

the nut.

3.  TEMPORARILY CONNECT UPPER SUSPENSION ARM

TO MEMBER

(a) Connect the upper suspension arm to the suspension

member.

(b)  Install the bolt from the front vehicle and temporarily tighten

the bolt and nut.

4. 

CONNECT ABS SPEED SENSOR AND WIRE HARNESS

(a)  Clamp the wire harness to the upper suspension arm and

body with the 3 bolts.

(b)  Connect the speed sensor to the steering knuckle with the

bolt.

Torque: 7.8 N

m (80 kgf

cm, 69 in.

lbf)

5. 

LH side only:
CONNECT WASHER TANK

(a)  Install and tighten the bolt.

SUSPENSION AND AXLE

FRONT SUSPENSION

SA–33

(b)  Install and tighten the bolt.
6. 

INSTALL FRONT FENDER SPLASH SHIELD

7. 

INSTALL DISC BRAKE CALIPER
Install the brake caliper to the steering knuckle with the 2
bolts.

Torque: 118 N

m (1,200 kgf

cm, 87 ft

lbf)

8. STABILIZE 

SUSPENSION

(a)  Install the front wheel and lower vehicle.

Torque: 103 N

m (1,050 kgf

cm, 76 ft

lbf)

(b) Bounce 

the vehicle up and down several times to stabilize the

suspension.

(c)  Jack up vehicle and remove the front wheel.

9. 

TIGHTEN BOLT AND NUT ON LOWER SIDE OF SHOCK
ABSORBER

(a)  Support the lower arm with a jack.
(b)  Tighten the nut to the specified torque.

Torque: 143 N

m (1,460 kgf

cm, 106 ft

lbf)

10. TIGHTEN 

BOLT 

AND NUT OF UPPER SUSPENSION ARM

Tighten the bolt and nut to the specified torque.

Torque: 164 N

m (1,670 kgf

cm, 121 ft

lbf)

11.  INSTALL FRONT WHEEL AND LOWER VEHICLE

Torque: 103 N

m (1,050 kgf

cm, 76 ft

lbf)

12.  CHECK FRONT WHEEL ALIGNMENT

(See page 

SA–5

)

SA–34

SUSPENSION AND AXLE

FRONT SUSPENSION

SA074–06

UPPER SUSPENSION ARM

COMPONENTS

SUSPENSION AND AXLE

FRONT SUSPENSION

SA–35


Content   ..  822  823  824  825   ..