Lexus SC300 / Lexus SC400. Manual - part 811
 

  Index      Lexus     Lexus SC300 / Lexus SC400 - service repair manual


Search            


Content   ..  809  810  811  812   ..


Lexus SC300 / Lexus SC400. Manual - part 811


REAR SHOCK ABSORBER INSPECTION

SA0SD–03

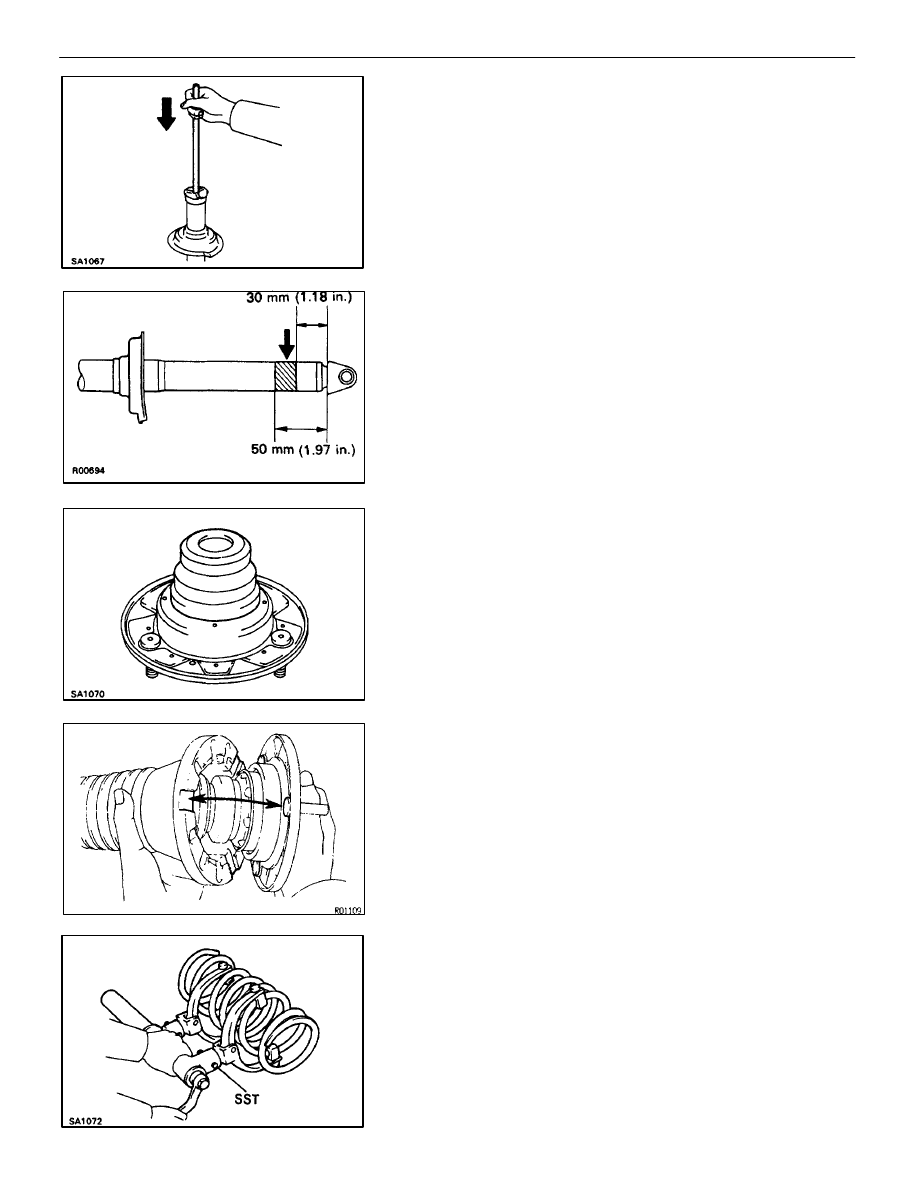
INSPECT SHOCK ABSORBER
Compress and extend the shock absorber rod and check that
there is no abnormal resistance or unusual operation
sounds.
If there is any abnormality, replace the shock absorber with
a new one.
NOTICE: When discarding the shock absorber, use the
following procedure.

REAR SHOCK ABSORBER DISPOSAL

SA0SE–03

1. 

FULLY EXTEND SHOCK ABSORBER ROD

2. 

DRILL HOLE TO REMOVE GAS FROM CYLINDER
Using a drill, make a hole in the cylinder, as shown to remove
the gas inside.
CAUTION: The gas coming out is harmless, but be care-
ful of chips which may fly up when drilling.

REAR SHOCK ABSORBER
INSTALLATION

SA0WB–02

1. 

INSTALL SUSPENSION SUPPORT AND COIL SPRING

(a)  Install the spring bumper to the suspension support.

(b)  Install the insulator to the suspension support.

HINT: Match the bolt of the suspension support with the cut–
off part of the insulator.

(c)  Using SST, compress the coil spring.

SST 09727–30020
NOTICE: Do not use an impact wrench.
It will damage the SST.

SA–110

SUSPENSION AND AXLE

REAR SUSPENSION

(d)  Install the coil spring to the shock absorber.

HINT: Fit the lower end of the coil spring into the gap of the
spring seat of the shock absorber.

(e)  Install the suspension support to the rod and temporarily

tighten a new nut.

(f) 

Rotate the suspension support so that the rod and one of the
bolts on suspension support are aligned with the lower
bushing.

(g)  Remove the SST.

HINT: After removing the SST, again check the direction of
the suspension support.

2.  INSTALL SHOCK ABSORBER WITH COIL SPRING TO

VEHICLE

(a)  Install the shock absorber with the coil spring to the vehicle

with the 3 nuts.

Torque: 25 N

m (260 kgf

cm, 19 ft

lbf)

(b)  Torque the temporarily tightened nut in the middle of the

suspension support.

Torque: 27 N

m (280 kgf

cm, 20 ft

lbf)

SUSPENSION AND AXLE

REAR SUSPENSION

SA–111

3. 

INSTALL SHOCK ABSORBER TO REAR AXLE CARRIER

(a)  Install the bolt from the rear vehicle.
(b)  Temporarily install the nut.

4. 

INSTALL REAR BRAKE CALIPER
Install the brake caliper to the rear axle carrier with the 2 bolts.

Torque: 104 N

m (1,065 kgf

cm, 77 ft

lbf)

5. STABILIZE 

SUSPENSION

(a)  Install the rear wheel and lower vehicle
(b) Bounce 

the vehicle up and down several times to stabilize the

suspension.

(c)  Jack up the vehicle and remove the rear wheel.

6. 

TIGHTEN BOLT AND NUT

(a)  Support the lower arm with a jack.
(b)  Tighten the bolt and nut.

Torque: 143 N

m (1,460 kgf

cm, 106 ft

lbf)

7. 

INSTALL REAR WHEEL AND LOWER VEHICLE

Torqre: 137 N

m (1,050 kgf

cm, 101 ft

lbf)

8. 

CHECK REAR WHEEL ALIGNMENT
(See page 

SA–10

)

SA–112

SUSPENSION AND AXLE

REAR SUSPENSION

UPPER SUSPENSION ARM

COMPONENTS

SA0SG–04

SUSPENSION AND AXLE

REAR SUSPENSION

SA–113


Content   ..  809  810  811  812   ..