Lexus SC300 / Lexus SC400. Manual - part 150
(Nakamichi)
1.
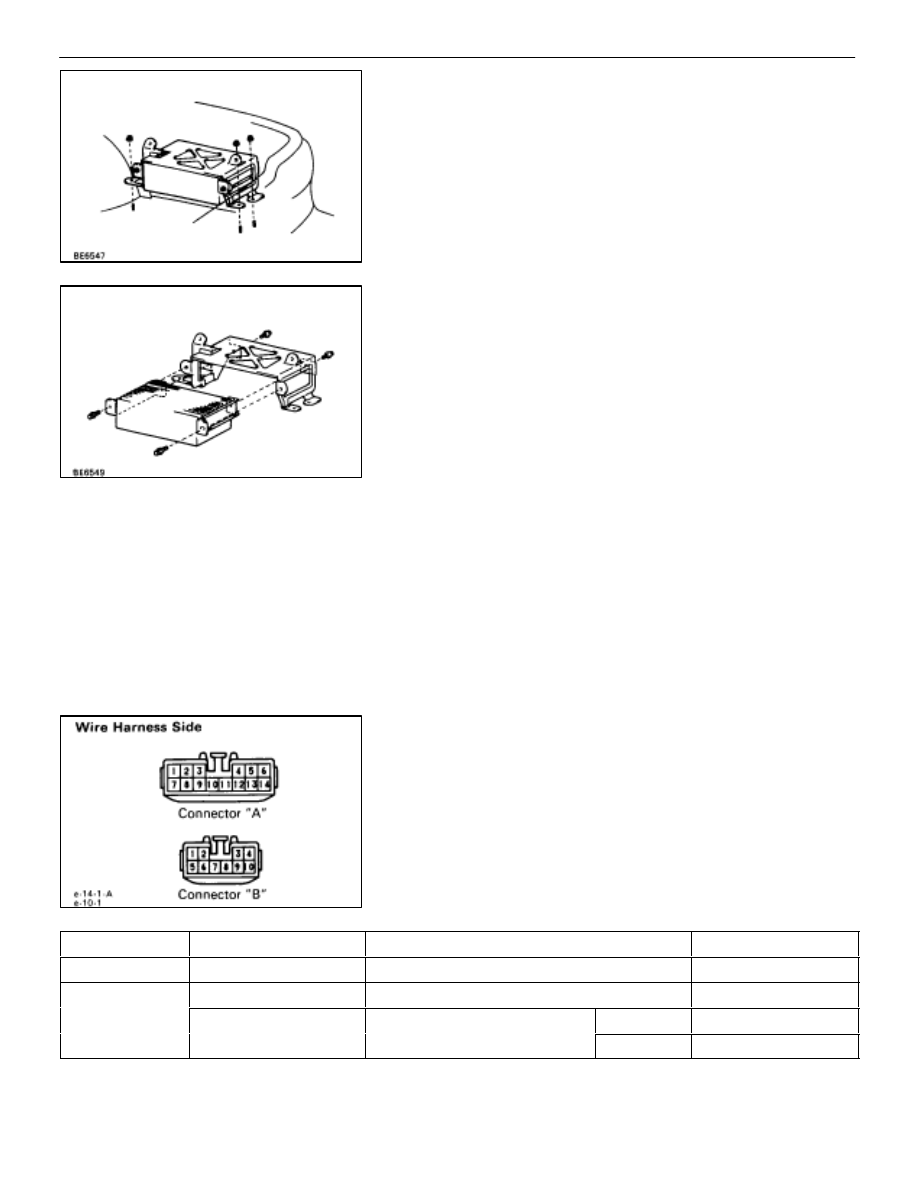
REMOVE POWER AMPLIFIER
(a) Remove the RH side cover.
(b) Remove the CD auto changer (See page
).
(c) Disconnect three connectors and remove three nuts and the
power amplifier with the bracket.
(d) Remove four bolts and the power amplifier.
2.
INSTALL WOOFER AMPLIFIER
For installation follow the removal procedure in reverse.
POWER AMPLIFIER INSPECTION
INSPECT POWER AMPLIFIER
(Circuit)
Disconnect the connector from power amplifier and inspect
the connector on the wire harness side as shown.
(Produced by PIONEER)
ÑÑÑÑÑÑÑ
ÑÑÑÑÑÑÑ
Check for
ÑÑÑÑÑÑÑÑ
ÑÑÑÑÑÑÑÑ
Tester connection
ÑÑÑÑÑÑÑÑÑÑÑÑÑÑÑ
ÑÑÑÑÑÑÑÑÑÑÑÑÑÑÑ
Condition
ÑÑÑÑÑÑÑÑ
ÑÑÑÑÑÑÑÑ
Specified value
ÑÑÑÑÑÑÑ
ÑÑÑÑÑÑÑ
Continuity
ÑÑÑÑÑÑÑÑ
ÑÑÑÑÑÑÑÑ
B7–Ground
ÑÑÑÑÑÑÑÑÑÑÑÑÑÑÑ
ÑÑÑÑÑÑÑÑÑÑÑÑÑÑÑ
Constant
ÑÑÑÑÑÑÑÑ
ÑÑÑÑÑÑÑÑ
Continuity
ÑÑÑÑÑÑÑ
ÑÑÑÑÑÑÑ
Voltage
ÑÑÑÑÑÑÑÑ
ÑÑÑÑÑÑÑÑ
B10–Ground
ÑÑÑÑÑÑÑÑÑÑÑÑÑÑÑ
ÑÑÑÑÑÑÑÑÑÑÑÑÑÑÑ
Constant
ÑÑÑÑÑÑÑÑ
ÑÑÑÑÑÑÑÑ
Battery positive voltage
ÑÑÑÑÑÑÑ
ÑÑÑÑÑÑÑ
ÑÑÑÑÑÑÑÑ
ÑÑÑÑÑÑÑÑ
A14–Ground
A6 G
d
ÑÑÑÑÑÑÑÑÑÑÑ
ÑÑÑÑÑÑÑÑÑÑÑ
Ignition switch position
ÑÑÑÑÑ
ÑÑÑÑÑ
ACC or ON
ÑÑÑÑÑÑÑÑ
ÑÑÑÑÑÑÑÑ
Battery positive voltage
ÑÑÑÑÑÑÑ
ÑÑÑÑÑÑÑ
ÑÑÑÑÑÑÑÑ
ÑÑÑÑÑÑÑÑ
A6–Ground
ÑÑÑÑÑÑÑÑÑÑÑ
ÑÑÑÑÑÑÑÑÑÑÑ
ÑÑÑÑÑ
ÑÑÑÑÑ
LOCK
ÑÑÑÑÑÑÑÑ
ÑÑÑÑÑÑÑÑ
No voltage
If circuit is not as specified, refer to
wiring diagrams
and inspect the circuits connected to other parts.
–
BODY ELECTRICAL SYSTEM
AUDIO SYSTEM
BE–211