Lexus SC300 / Lexus SC400. Manual - part 41
 

  Index      Lexus     Lexus SC300 / Lexus SC400 - service repair manual


Search            


Content   ..  39  40  41  42   ..


Lexus SC300 / Lexus SC400. Manual - part 41


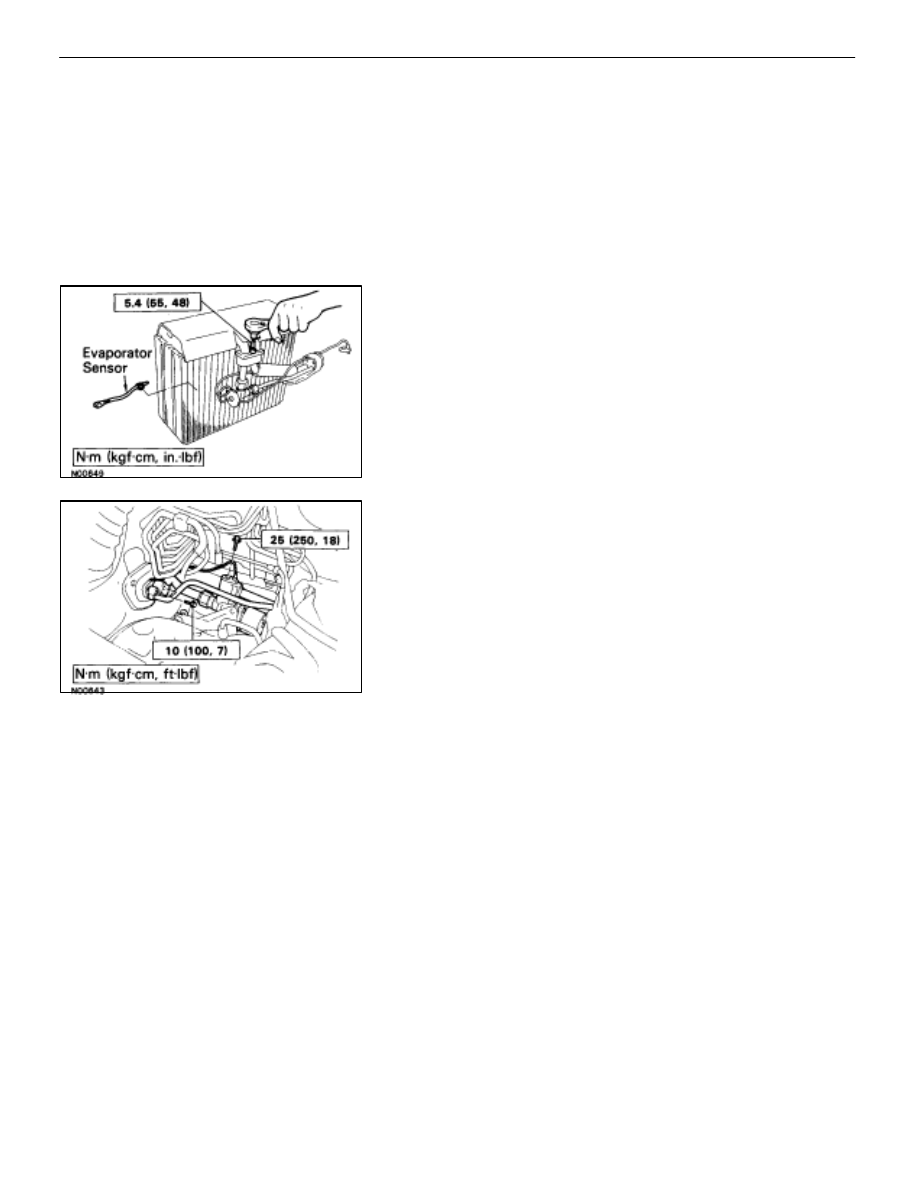
INSTALLATION OF EVAPORATOR

1. INSTALL 

REMOVAL 

PARTS

Install the removal parts in reverse order of removal proce-
dure.
HINT:

The tightening torque for the bolt used to install the
expansion valve on the evaporator is shown below.

Specified torque: 5.4 N

m (55 kgf

cm, 48 ft

lbf)

The tightening torque for the bolts used to install the
liquid tube and suction tube to the cooling is shown
below.

Specified torque: 10 N

m (100 kgf

cm, 7 ft

lbf)

The tightening torque specified for the bolt used to
install the equalizer tube to EPR is shown below.

Specified torque: 25 N

m (250 kgf

cm, 18 ft

lbf)

2. 

IF EVAPORATOR WAS REPLACED, ADD COMPRESSOR
OIL TO EVAPORATOR

Add 40–50 cc (1.4–1.7 fl.oz)

Compressor oil: ND OIL 6,

SUNISO NO. 5 GS or equivalent

3. EVACUATE 

AIR 

IN 

REFRIGERATION 

SYSTEM 

AND

CHARGE WITH REFRIGERANT

Specified amount: 950 

±

 50 g (33.44 

±

 1.76 oz)

4. 

INSPECT FOR LEAKAGE OF REFRIGERANT
Using a gas leak tester, check for leakage of refrigerant.

AC–124

AIR CONDITIONING SYSTEM

Evaporator

HEATER RADIATOR

REMOVAL OF HEATER RADIATOR

1. 

SET TEMPERATURE CONTROL SWITCH TO MAX COOL

2. 

REMOVE A/C UNIT
See page 

AC–107

3. REMOVE 

HATER 

RADIATOR

(a)  Remove the two screws and the plate.
(b)  Remove the two screws and the clamps.
(c)  Pull the radiator out.

INSPECTION OF HEATER RADIATOR

INSPECT FINS FOR BLOCKAGE

If the fins are clogged, clean them with compressed air.

INSTALLATION OF HEATER RADIATOR

1. 

INSTALL HEATER RADIATOR TO A/C UNIT
(a)  Put the radiator in the A/C until.
(b)  Install the clamps with two screws.
(c)  Install the plate with two screws.

2. 

INSTALL A/C UNIT
See page 

AC–108

AIR CONDITIONING SYSTEM

Heater Radiator

AC–125

EXPANSION VALVE

ON–VEHICLE INSPECTION

1.  CHECK QUANTITY OF GAS DURING REFRIGERATION

CYCLE

2. 

INSTALL MANIFOLD GAUGE SET

3. RUN 

ENGINE

Run the engine at 2,000 rpm for at least 5 minutes. Then
check that the high pressure reading is 1,275–1,471 kPa
(13–15 kgf/cm, 185–213 psi).

4. CHECK 

EXPANSION 

VALVE

If the expansion valve is faulty, the low pressure reading will
drop to 0 kPa (0 kgf/cm, 0 psi), otherwise it is OK.
HINT: When the low pressure drops to 0 kPa (0 kgf/cm, 0 psi),
feel the receiver’s IN and OUT sides for no temperature differ-
ence.

REMOVAL OF EXPANSION VALVE

1. REMOVE 

EVAPORATOR

See page 

AC–124

.

2. 

REMOVE EQUALIZER TUBES

3. REMOVE 

EXPANSION 

VALVE

INSTALLATION OF EXPANSION VALVE

1. INSTALL 

EXPANSION 

VALVE

Specified torque:

0.31 inch tube 13 N

m (135 kgf

cm, 10 ft

lbf)

0.50 inch tube 22 N

m (225 kgf

cm, 16 ft

lbf)

2. 

INSTALL EQUALIZER TUBES

3. INSTALL 

EVAPORATOR

See page 

AC–124

AC–126

AIR CONDITIONING SYSTEM

Expansion Valve

WATER VALVE

REMOVAL OF WATER VALVE

1. DISCONNECT 

FOLLOWING 

PARTS 

FROM 

WATER

VALVE

Water hose

acuum hose

Connector

2. REMOVE 

WATER 

VALVE

(a)  Remove the two bolts.

(b)  Loosen the hose band, then pull off the water hose.

INSPECTION OF WATER VALVE VSV

See page 

AC–90

AIR CONDITIONING SYSTEM

Water Valve

AC–127


Content   ..  39  40  41  42   ..