R380 GEARBOX. Manual - part 14


  Index      Land Rover     Range Rover R380 GEARBOX - service manual 1996 year


Search            


Content   ..  12  13  14 


R380 GEARBOX. Manual - part 14


MANUAL GEARBOX

OVERHAUL

35

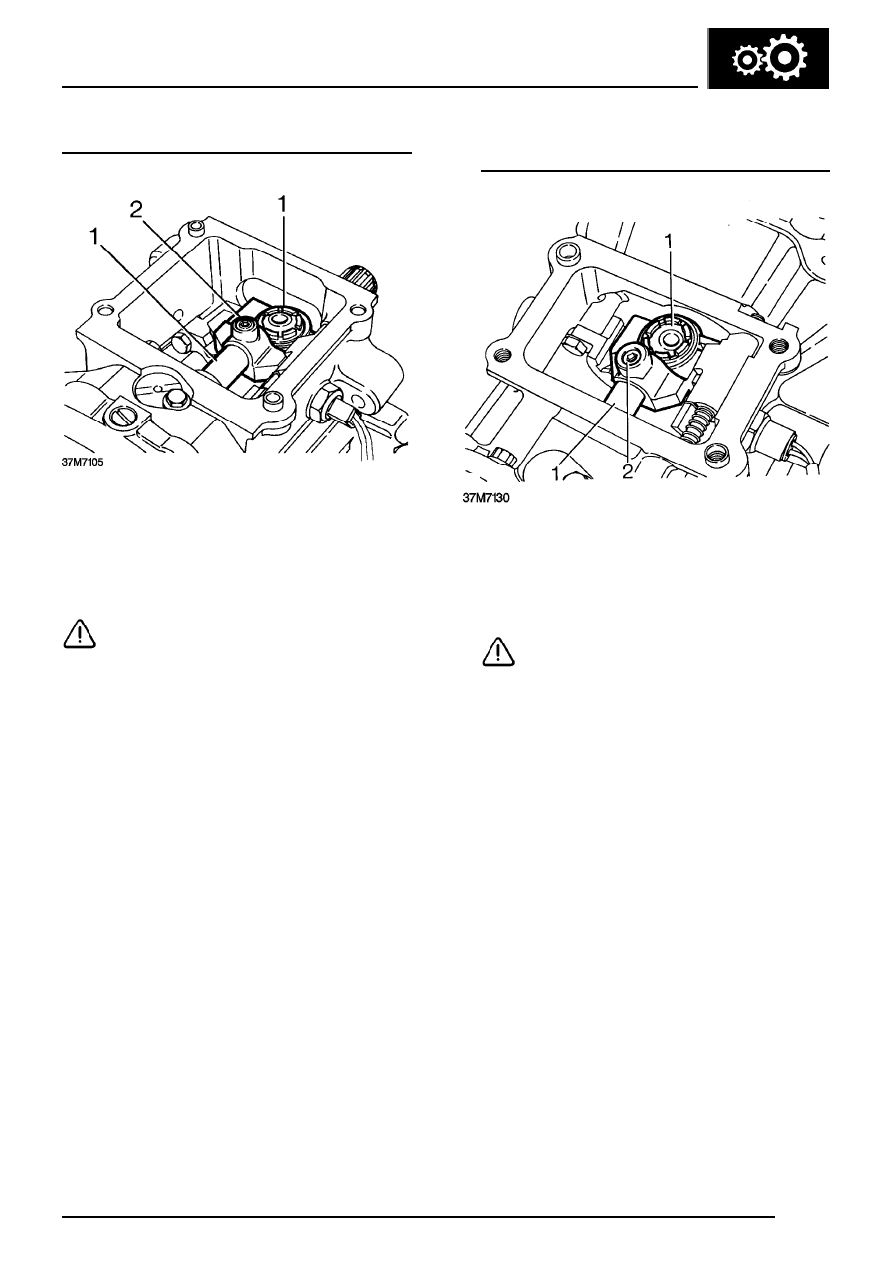
Gear change lever yoke - Type B gearbox - Refit

1. Position gear change lever yoke on selector

shaft with ball facing towards output shaft.

2. Apply Loctite 270 to threads of a new setscrew,

fit and tighten screw to 25 Nm.

CAUTION: Ensure end of setscrew locates
in hole in selector shaft.

Gear change lever yoke - Type D gearboxes -
Refit

1. Position gear lever yoke on selector shaft with

ball facing towards output shaft.

2. Apply Loctite 270 to threads of new setscrew.

Fit and tighten screw to 25 Nm.

CAUTION: Ensure end of setscrew locates
in hole in selector shaft.

MANUAL GEARBOX

36

OVERHAUL

Remote housing - Type A gearbox - Refit

1. Apply Hylosil RTV 102 to mating surfaces and

fit to extension housing.

2. Position remote housing to extension housing

and gearcase ensuring rollers locate in
quadrant.

3. Fit but do not fully tighten 3 bolts in positions

shown.

Transfer box selector housing - Type A gearbox -
Refit

1. Smear a new gasket with grease and fit to

remote housing.

2. Position transfer box selector housing to

remote housing.

3. Fit but do not fully tighten 4 bolts.

Gear change housing - Type A gearbox - Refit

1. Smear a new gasket with grease and fit to

remote housing.

2. Position gear change housing to remote

housing ensuring gear lever ball is correctly
located.

3. Fit but do not fully tighten 4 bolts.
4. Tighten remote housing, transfer box selector

housing and gear change housing bolts to 25
Nm.

Transfer box selector housing - Type B gearbox -
Refit

1. Smear a new gasket with grease and fit to

gearcase.

2. Position transfer box selector housing to

gearcase, fit 4 bolts and tighten to 25 Nm

MANUAL GEARBOX

OVERHAUL

37

Gear change housing - Type B gearbox - Refit

1. Apply Hylosil RTV 102 to mating surfaces of

extension housing.

2. Position gear change housing to extension

housing ensuring that gear lever passes
through centre of gear change lever yoke and
engages in the gate plate.

3. Fit bolts and tighten to 25 Nm.

Remote gear change - Type C gearbox - Refit

1. Apply lithium based grease to selector rod

yoke.

2. Position remote gear change to extension

housing ensuring selector shaft pin is located
in selector rod yoke.

3. Fit bolts, washers and mounting rubbers

securing remote gear change to extension
housing; do not tighten bolts at this stage.

4. Fit bolts, washers and mounting rubbers

securing bracket to extension housing.

5. Tighten all bolts to 30 Nm.

Remote gear change - Type D gearbox - Refit

1. Apply Hylosil RTV 102 to mating surfaces of

extension housing and remote gear change
housing.

2. Position remote gear change housing on

extension housing. Ensure that gear lever ball
is correctly located.

3. Fit bolts and tighten to 25 Nm.

5th gear stop screw adjustment - Type A
gearbox

1. Select reverse gear. While applying light

pressure to gear lever towards left, turn screw
clockwise until it contacts yoke.

2. Turn screw anti-clockwise until 25 mm free

play is felt at knob, ensure 5th gear can be
engaged.

3. Tighten locknut.
4. Check all other gears are selectable.

MANUAL GEARBOX

38

OVERHAUL

Bias spring adjustment - Type A gearbox

NOTE: The purpose of this adjustment is
to set both bolts so that the bias spring
legs apply equal pressure on both ends of

the gear lever cross pin when third or fourth gear
is engaged. This will ensure that when the lever
is in neutral, the gear change mechanism is
automatically aligned for third or fourth gear.

1. Select third or fourth gear.
2. Adjust the two adjusting screws until both legs

of the spring are approximately 0.5 mm clear of
the cross pin in the gear lever.

3. Apply a light load to the gear lever in a left

hand direction and adjust the right hand
adjusting screw downward until the right hand
spring leg just makes contact with the cross
pin.

4. Repeat the same procedure for the left hand

adjusting screw.

5. Lower both adjusting screws equal amounts

until the radial play is just eliminated.

6. Tighten locknuts.
7. Return gear lever to neutral position and rock

across the gate several times. The gear lever
should return to the third and fourth gate.

Bias spring adjustment - Type B gearbox

1. Slacken bias adjustment plate bolts. Select

fourth gear and move lever fully to the right.

2. Tighten adjustment plate bolts.
3. Check adjustment is correct by selecting third

and fourth gears.

4. Fit sealing rubber to gear change housing,

apply Hylogrip 640 to screws and fit cover.


Content   ..  12  13  14