Range Rover Classic. Manual - part 153


  Index      Land Rover     Range Rover Classic - service manual 1995 year


Search            


Content   ..  151  152  153  154   ..


Range Rover Classic. Manual - part 153


CHASSIS AND BODY

35

REPAIR

ASYMMETRIC SPLIT REAR SEAT

Service repair no - 76.70.38

Remove

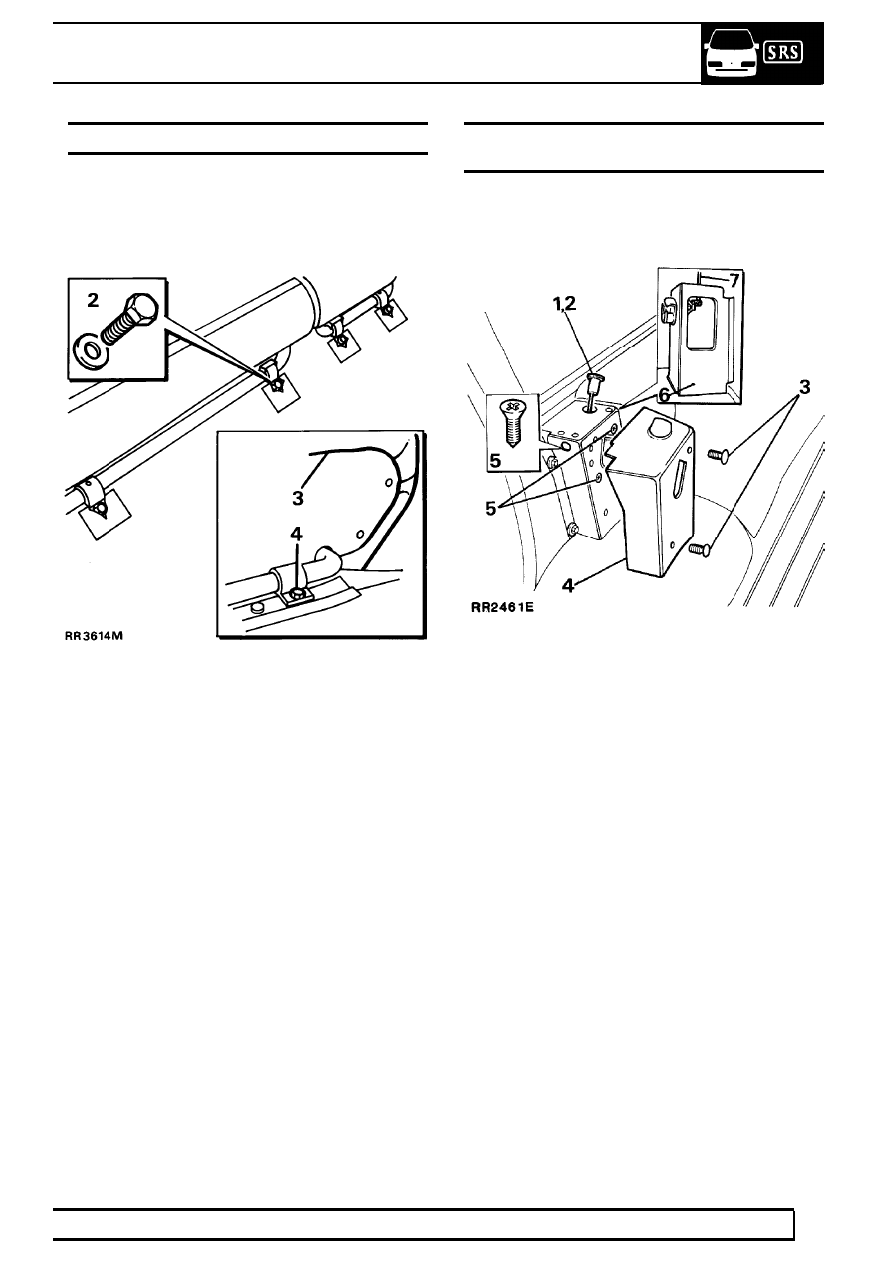
1. Lift footwell carpet to access front hinge bolts.

2. Remove hinge bolts.
3. Fold seat fully forward.
4. Remove rear hinge bolts.
5. Remove seat from vehicle.

Refit

6. Reverse removal procedure. Ensure seat folds

and latches smoothly.

ASYMMETRIC SPLIT REAR SEAT - LOCKING
MECHANISM

Service repair no - 76.70.51

Remove

1. Depress release button and fold seat forward.
2. Unscrew and remove release button.
3. Remove two trim buttons securing trim cover.
4. Remove trim cover.
5. Remove three screws securing latch to tower.

One screw is accessed through hole in tower.

6. Retrieve latch from opening rear of tower.
7. Remove operating rod by releasing plastic clip.

76

CHASSIS AND BODY

36

REPAIR

Refit

8. Reverse removal procedure. When release

button is depressed there must be a gap from 5
to 8 mm between head of button and lip of trim
cover.

FRONT SEAT HEATED CUSHION AND SQUAB

Service repair no - 76.77.05 / 76.77.14

Remove heated cushion.

1. Remove front seat assembly.

See Front Seat

Electrical

2. Remove two screws securing seat control

adjustment unit.

3. Remove two screws securing corner trim.
4. Release seat belt buckle bracket.
5. Release trim from seat frame.

CHASSIS AND BODY

37

REPAIR

6. Disconnect heater wiring at multiplug to seat

squab. Remove cushion and trim from seat
frame.

7. Turn 90

°

two seat trim retention plates and push

through slot in cushion foam.

8. Fold seat trim over cushion to reveal stapled

wire retention rods.

9. Pry open staples and release seat trim from seat

cushion.

Continue for removal of heated squab.

10. Remove headrest.
11. Remove squab panel rear. Three screws at

base. Peel back trim to remove screw from each
top corner.

12. Remove armrest assembly.
13. Release trim from edge of seat frame.
14. Remove squab foam with trim from seat frame.
15. Turn 90

°

two trim retention plates and push

through slot in foam.

16. Fold trim over squab foam to reveal two wire

retention rods.

17. Pry open staples and release trim from squab

cushion.

Refit

18. Reverse removal procedure.

76

CHASSIS AND BODY

38

REPAIR

SEAT BELTS

Introduction

Seat belt assemblies are factory fitted. If removal is
necessary follow procedures in this section. All seat
belt fixings MUST be tightened to correct torque
values.

Seat belt assemblies MUST be replaced after they
have been subjected to loading such as in a collision.

A lamp warning is incorporated to alert user. The
warning lamp will illuminate for eight seconds when
ignition is switched on regardless of seat belt usage.

On American specification vehicles a audible warning
will sound with an high and low note from four to eight
seconds unless driver seat belt is fitted.

A lap belt is provided for occupant of the centre rear
seat.

FRONT SEAT BELT

Service repair no - 76.73.10

Remove

1. Move seat to access belt mountings.
2. Disconnect battery negative lead.
3. Remove seat side trim panel.

See Front seat

4. Remove bolt, plain washer and spacer from belt

to seat base.

5. Remove moulding from adjustable seat belt

mounting.

6. Remove nut and spacer securing seat belt to

’B’post.


Content   ..  151  152  153  154   ..