Range Rover Classic. Manual - part 67


  Index      Land Rover     Range Rover Classic - service manual 1995 year


Search            


Content   ..  65  66  67  68   ..


Range Rover Classic. Manual - part 67


BORG WARNER

7

OVERHAUL

DISMANTLE, INSPECTION AND OVERHAUL

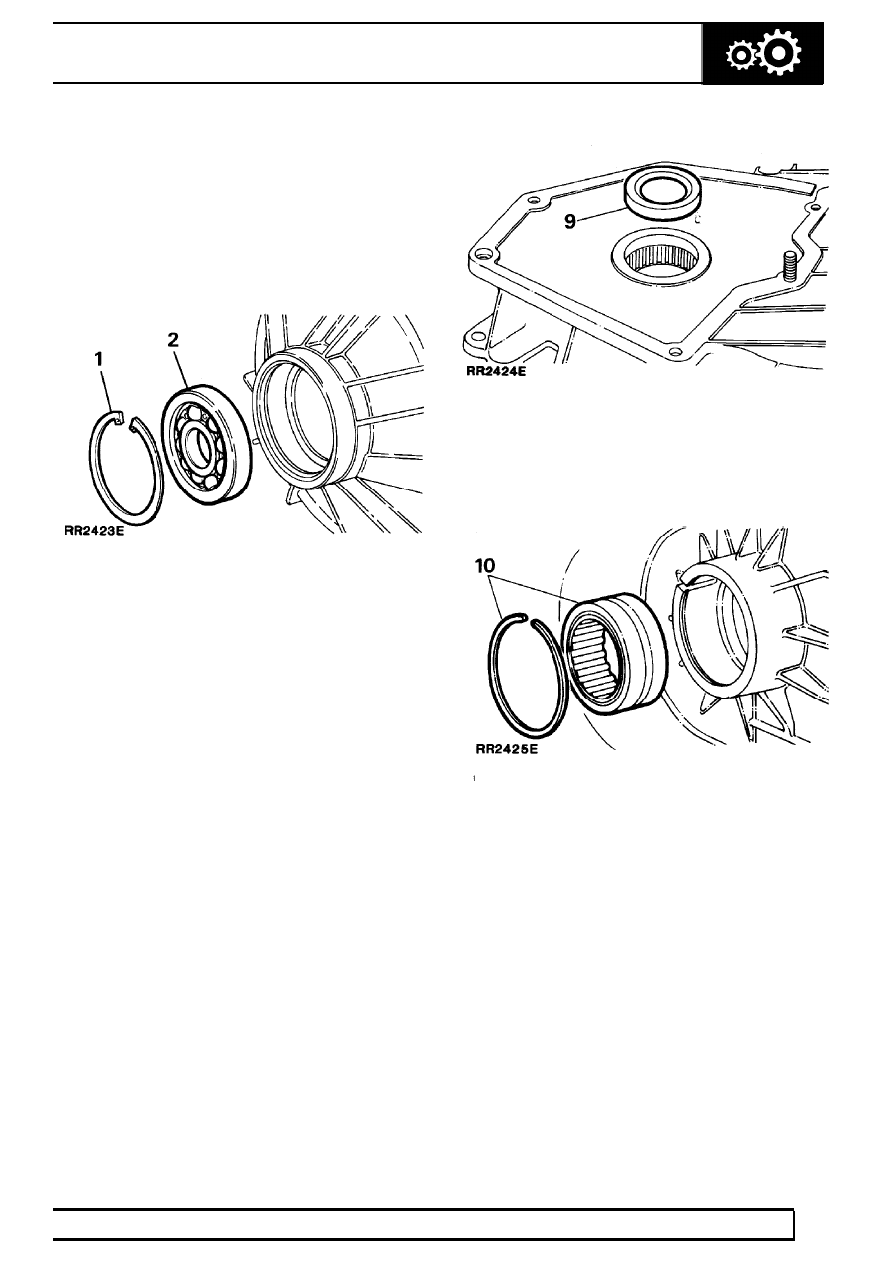
Rear cover main case - Dismantle and inspection

1. Remove the circlip retaining the bearing in the

rear cover.

2. Drive or press the bearing from the cover and

discard the bearing.

3. Remove any previous sealant evident on the

rear cover joint faces.

4. Using a suitable solvent thoroughly clean the

cover.

5. Examine the cover for damage, cracks and

porosity, renew if necessary.

6. Check the selector lever shaft bore, for ovality

and wear. If worn renew the cover.

Rear cover main case - Assemble

7. Drive or press a new bearing into the cover and

secure in position with the circlip.

8. Place the cover aside until the gearbox is ready

to be assembled.

Front cover main case - Dismantle and inspection

9. Prise the input shaft oil seal from the front cover

and discard the oil seal.

10. Remove the snap ring retaining the needle roller

bearing, withdraw the bearing and discard.

11. Remove any previous sealant from the joint

faces of the front cover.

12. Thoroughly clean the cover using a suitable

solvent.

13. Examine the cover for damage, cracks and

porosity, renew if necessary.

14. Check the inside edges of the case for witness

marks which may indicate a chain that has
stretched.

41

TRANSFER GEARBOX

8

OVERHAUL

Front cover main case - Assemble

15. Lubricate a new oil seal. Using service tool LST

550 - 6 in conjunction with bearing and oil seal
replacer 18G134 fit the seal, open side of the
seal leading, until the face of the seal is 1 mm
(0.039 in) below the surface of the boss.

16. Lubricate a new needle roller bearing and drive

or press the bearing into its recess until contact
is made with the shoulder at the bottom of the
bore.

17. Fit the snap ring to retain the bearing.
18. Place the cover aside until the gearbox is ready

to be assembled.

Planetary set (Epicyclic unit) and oil pump -
Dismantle and inspection

NOTE: The Epicyclic unit and oil pump are
serviced as a complete assembly, if after
inspection either of the units is found to

be worn a complete new assembly must be fitted.

1. Remove the annulus from the planetary set.

2. Thoroughly clean all components using a

suitable solvent.

3. Examine the helical teeth of the annulus for wear

or damage. If damage is evident it will be
necessary to renew both the annulus and
planetary set.

4. Examine the planetary gears and high/low gear

teeth for wear or damage. If damaged renew
both the annulus and planetary set.

5. Check the end float of the four planet gears,

between the end of the gear and planetary set
carrier. End float of each planet gear should not
exceed 0.83 mm (0.033 in) if any one of the
planet gears is out of limits renew the planetary
set assembly.

BORG WARNER

9

OVERHAUL

6. Check the end float of the sun gear to the

planetary set carrier by supporting the body of
the assembly on the top of a vice. Using a dial
test indicator attached to a magnetic base,
position the base on top of the assembly and
zero the indicator on the end of the sun gear
shaft, lift the shaft and check the end float. End
float should not exceed 0.83 mm (0.033 in). Fit a
new planetary set assembly if out of limits.

NOTE: If the previous inspection
instructions prove the assembly to be in
an acceptable condition carry out the

following examination of the oil pump.

Oil pump and filter
- Dismantle and inspection

7. To aid re - assembly mark an identification line

on the edges of the oil pump plates. Remove the
four bolts securing the pump front and rear
plates, separate the pump by removing the
plungers, spring and bearing plate.

NOTE: The front plate of the oil pump is
stamped ’TOP’, the centre bearing plate is
stamped ’REAR’ and the rear plate is

stamped ’TOP REAR’. The fixing holes of the
plates and body are also offset to ensure correct
re - assembly of the pump.

8. Depress the retaining clips, remove the oil pick -

up pipe and rubber connection tubes. Examine
the tubes and pipe for damage or fractures,
renew as necessary.

9. Clean the pump components and check for

damage and wear, ie: blueing of the pump
plungers, scoring of the centre bearing plate, if
any wear is evident a new planetary set must be
fitted, as the pump is part of the complete
assembly.

10. Thoroughly clean the oil pick - up filter, examine

the filter screen for damage and blockage, renew
or clean the filter as necessary.

41

TRANSFER GEARBOX

10

OVERHAUL

Oil pump and filter - Assemble

11. Clean the sealant from the oil pump securing

screws.

12. Prior to assembly lubricate the pump

components with clean oil.

13. Fit the plate stamped ’TOP’ to the sun gear shaft

with the word ’TOP’ facing the planetary
assembly.

14. Fit the plungers and spring noting that the flats

on the plungers must be uppermost to enable
the ’TOP REAR’ plate to be fitted.

15. Compress the plungers and fit the middle

bearing plate with the word ’REAR’ uppermost.
Align the offset fixing holes and also noting the
previously marked identification line.

16. Fit the top rear plate with the words ’TOP REAR’

uppermost.

17. Apply Loctite 242 to the threads of the four

screws and fit the screws, tighten to the
specified torque.

18. Fit the rubber connection tube and oil pick - up

pipe to the oil pump, fit the retaining clip. Note
that the clip securing the tube to the pick - up
pipe is positioned in front of the flare on the pipe.

19. Fit the rubber connection tube to the filter end of

the pipe, fit the clip ensuring that the tube is
clamped by the clip in front of the flare on the
pipe.

20. Push the filter into the tube. The radial position

of the filter to pipe at this stage is unimportant.

Planetary set and annulus - assemble

21. Lubricate the planetary set and annulus with

clean oil.

22. Position the annulus around the planetary set, fit

the assembly to the rear cover locating the oil
pump inlet port in the groove at the bottom of the
planetary set housing, the sun gear shaft in the
bearing and the lugs on the outer edge of the
annulus in the anti - rotation lugs. It may be
necessary to tap the sun gear shaft into the
bearing to enable the large ring gear snap ring to
be fitted.


Content   ..  65  66  67  68   ..