Range Rover Classic. Manual - part 22


  Index      Land Rover     Range Rover Classic - service manual 1995 year


Search            


Content   ..  20  21  22  23   ..


Range Rover Classic. Manual - part 22


12

ENGINE

12

REPAIR

FRONT COVER/TIMING GEAR HOUSING GASKET

Service repair no - 12.65.10

Remove

1. Remove timing belt and gears.

See Camshaft

Drive Belt and Gears

2. Remove fuel injection pump.

See FUEL

SYSTEM, Repair, Fuel Injection Pump and
Timing

3. Remove engine oil sump.

See Oil Sump

4. Remove oil pick up strainer.

See Oil Pick-Up

Strainer

5. Remove bolts securing timing gear housing to

block.

6. Withdraw timing gear housing complete with

gasket.

7. Clean all gasket material from mating faces.

Refit

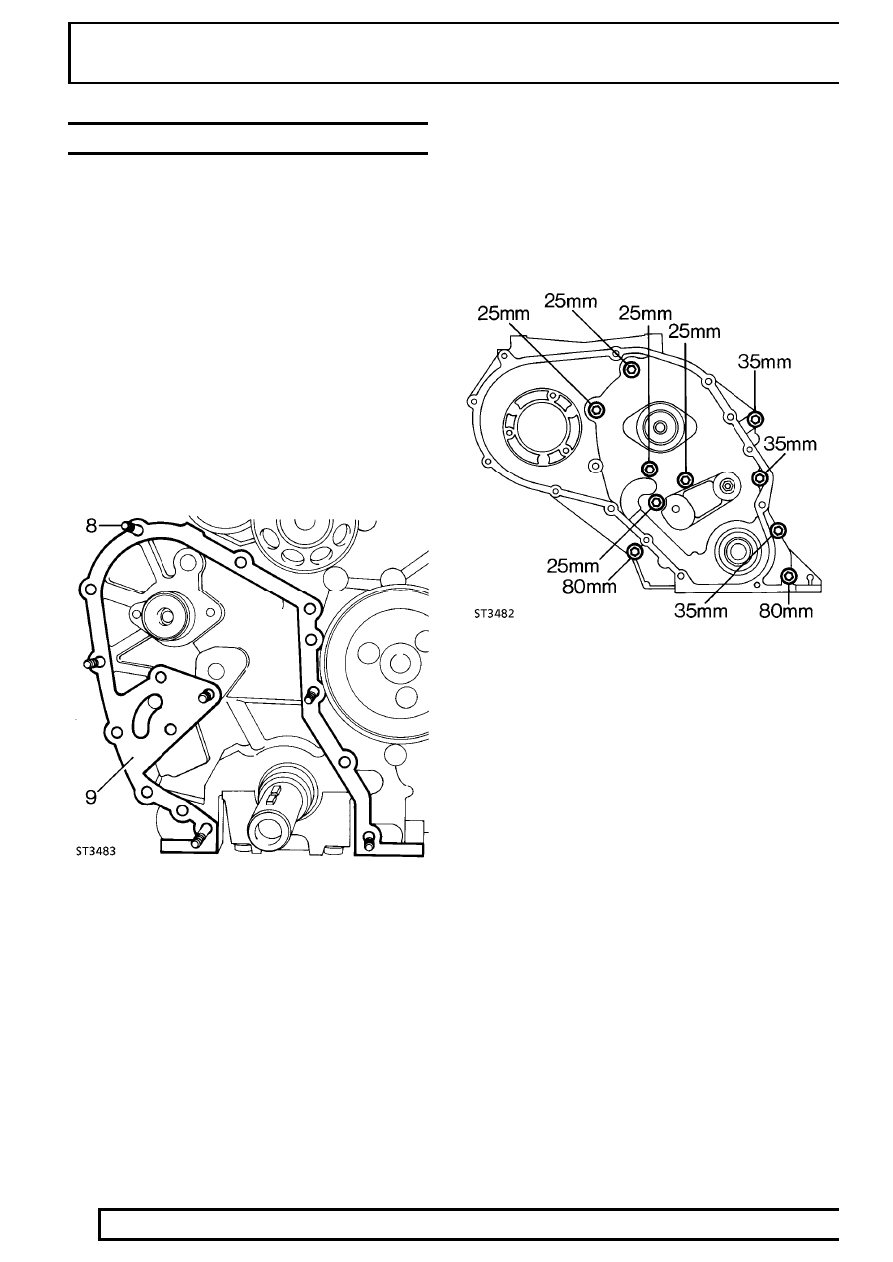
8. Fit slave guide studs to locate gasket.
9. Fit new gasket, over slave studs, to cylinder

block.

10. Align flats on oil pump with flats on crankshaft.
11. Fit front cover to block taking care not to damage

oil seal.

12. Secure with bolts of correct length in locations

where slave studs are not fitted (ST3482).

13. Remove slave studs and fit correct length bolts.
14. Tighten to

25 Nm.

15. Fit oil pick-up strainer.

See Oil Pick-Up

Strainer

16. Fit oil sump.

See Oil Sump

17. Refit fuel injection pump.

See FUEL SYSTEM,

Repair, Fuel Injection Pump and Timing

Tdi

13

REPAIR

OIL SUMP

Service repair no - 12.60.44

Remove

1. Disconnect battery negative lead.
2. Drain engine oil.
3. Slacken sump securing bolts and, using a sharp

knife, break sealant around sump flange.

4. Remove bolts and withdraw sump.

Refit

5. Clean mating faces of sump, timing gear housing

and cylinder block.

6. Apply a 2,0 mm bead of ’Hylosil RTV102’ to the

sump flange, ensuring bead is applied inboard of
the bolt holes.

7. Secure sump to block with bolts. Tighten to

25

Nm.

8. Refill engine oil.

See LUBRICANTS, FLUIDS

AND CAPACITIES, Information,
Recommended Lubricants and Fluids

9. Reconnect battery negative lead.

OIL PICK-UP STRAINER

Service repair no - 12.60.20

Remove

1. Disconnect battery negative lead.
2. Drain engine oil.
3. Remove engine oil sump.

See Oil Sump

4. Remove bolts securing pipe support bracket.
5. Remove bolts from pipe flanges.
6. Withdraw pick-up strainer assembly.

Refit

7. Refit pick-up strainer assembly, fitting a new ’O’

ring seal at oil pump connection.

8. Apply Loctite 242E to the two screws at the

bearing cap. Tighten to

9 Nm.

9. Fit bolts to pipe flanges. Tighten to

25 Nm.

10. Refit engine oil sump.

See Oil Sump

11. Reconnect battery negative lead.

12

ENGINE

14

REPAIR

FLYWHEEL

Service repair no - 12.53.07

Remove

1. Disconnect battery negative lead.
2. Remove gearbox.

See MANUAL GEARBOX,

Repair, R380 Manual Gearbox

3. Remove clutch.

See CLUTCH, Repair, Clutch

Assembly

4. Fit two long 8mm bolts into the clutch bolt holes,

diametrically opposite, to use as handles when
lifting the flywheel off the crankshaft.

5. Remove fan cowl
6. Fit crankshaft pulley retainer LRT-12-080 and

secure with four bolts, to restrain crankshaft
while removing flywheel retaining bolts.

7. Remove the bolts and lift off flywheel.

NOTE: To prevent excessive flywheel
run-out, ensure that the mating faces of
the flywheel and crankshaft are clean.

Refit

8. Locate the flywheel on the crankshaft and

secure with new patched retaining bolts,
progressively tighten to

147 Nm.

9. Check the flywheel for possible run-out by

mounting a dial test indicator with the stylus in a
loaded condition resting on the flywheel face at a
radius of 114mm from the centre.

10. Turn the flywheel and check that run-out does

not exceed 0,05 to 0,07mm. Should run-out be
excessive, remove the flywheel and check again
for irregularities on the crankshaft and flywheel
mating faces and the dowel.

11. Reverse removal procedure. 1 to 6.

Tdi

15

REPAIR

CRANKSHAFT REAR OIL SEAL

Service repair no - 12.21.20

Remove

NOTE: The crankshaft rear oil seal is
retained in its own housing, if the seal
requires replacing the housing and seal

assembly (1) must be renewed complete with the
housing seal (3). Housing and seal assemblies are
supplied with their own former/seal guide (2)
already fitted. This former must not be removed
before fitting the assembly to the engine. If a seal
and housing assembly is received without a
former/guide fitted it must be returned to the
supplier. Used formers/guides must be discarded
immediately after use, under no circumstances
should they be reused on other assemblies.

1. Disconnect battery negative lead.
2. Remove gearbox.

See MANUAL GEARBOX,

Repair, R380 Manual Gearbox

3. Remove clutch.

See CLUTCH, Repair, Clutch

Assembly

4. Remove flywheel.

See Flywheel

5. Remove five bolts and withdraw seal housing

and seal assembly complete with gasket.

Refit

6. Insert slave studs to seal housing mounting face.
7. Position new seal housing gasket over slave

studs and crankshaft flange onto cylinder block.


Content   ..  20  21  22  23   ..