Range Rover. Manual - part 237


  Index      Land Rover     Range Rover P38 - service manual 1995 year


Search            


Content   ..  235  236  237  238   ..


Range Rover. Manual - part 237


CHASSIS AND BODY

43

REPAIR

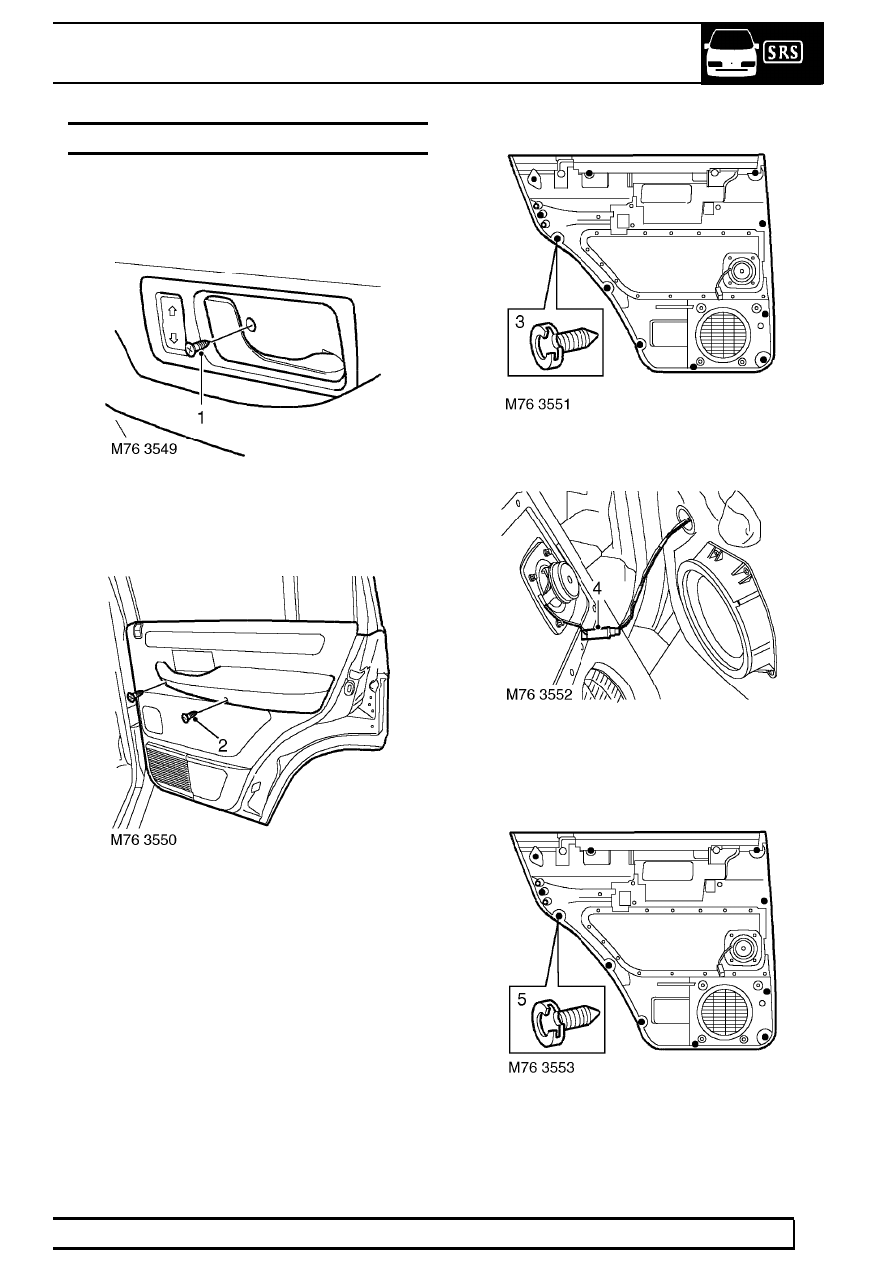
TRIM CASING - REAR DOOR

Service repair no - 76.34.04

Remove

1. Remove screw securing remote handle

escutcheon and remove escutcheon.

2. Remove 2 screws securing trim casing to door.

3. Release 11 door trim casing retaining studs.

4. Disconnect rear door speaker and remove door

trim.

5. Remove 11 trim casing retaining studs from trim

casing.

76

CHASSIS AND BODY

NEW RANGE ROVER

44

REPAIR

6. Remove 4 speed nuts securing speaker to trim

casing and remove speaker.

7. Remove 4 Torx bolts securing speaker grille to

trim casing and remove grille.

8. Remove 4 speed nuts securing arm rest to trim

casing and remove arm rest.

9. Remove 3 nuts securing door trim finisher to

door trim and remove finisher.

10. Remove screw securing door lock button

escutcheon to door trim and remove
escutcheon.

Refit

11. Fit door lock button escutcheon to door trim and

secure with screw.

12. Fit door trim finisher to door trim and secure with

nuts.

13. Fit arm rest to door trim and secure with speed

nuts.

14. Fit speaker grille to door trim and secure with

Torx bolts.

15. Fit speaker to trim casing and secure with speed

nuts.

16. Fit trim casing retaining studs.
17. Position door trim to rear door and connect

multiplug to speaker.

18. Fit door trim to rear door and secure with screws

and retaining studs.

19. Fit door handle escutcheon to door and secure

with screw.

CHASSIS AND BODY

45

REPAIR

OUTER WAIST SEAL - REAR DOOR

Service repair no - 76.31.54

Remove

1. Remove screw securing seal finisher to forward

edge of door.

2. Release seal finisher from clip at rear edge of

door.

3. Remove seal and finisher assembly.
4. Remove screw and securing clip.

Refit

5. Fit clip to door, secure with screw.
6. Fit seal and finisher assembly to door. Align at

forward edge, secure with screw.

RUBBING STRIPS & DOOR FINISHERS

Remove

CAUTION: When removing exterior trim,
NEVER lever directly against body panels.
Use an approved trim fork. Protect body

panel with suitable material, such as fabric
covered hardboard.

Rubbing Strip - Front Fender

1. Remove relevant wheel arch liner.

See this

section.

2. Remove nut securing forward edge of rubbing

strip.

3. Remove rubbing strip from single clip.

Rubbing Strip - Rear Quarter Panel

4. Release 5 clips securing rubbing strip. Remove

strip.

NOTE: Rearmost clip is unique.

Rubbing Strips - Front & Rear Doors

5. Remove nut securing rear of rubbing strip.
6. Front Door Rubbing Strip: Release 5 clips

securing rubbing strip.

7. Rear Door Rubbing Strip: Release 3 clips

securing rubbing strip.

8. Remove rubbing strips.

Lower Door Finishers

9. Remove screw securing rear of finisher.

10. Front Door Finisher: Release 5 clips securing

rubbing strip.

11. Rear Door Finisher: Release 3 clips securing

rubbing strip.

12. Remove finishers.

Refit

13. Reverse removal procedure.

76

CHASSIS AND BODY

NEW RANGE ROVER

46

REPAIR

GLOVE BOX AND LID

Service repair no - 76.52.03 - Glove Box
Service repair no - 76.52.02 - Glove Box Lid
Service repair no - 76.52.13 - Glove Box Lid - Align

Remove

1. Remove centre screw from 2 scrivet fasteners.

Release closing panel for access to glove box
hinge fixings. Collect outer parts of fasteners
from closing panel.

2. Remove 2 bolts securing glove box hinges to

fascia frame.

3. Open glove box lid, remove 5 screws securing

glove box. Release glove box from fascia.

4. Disconnect glove box lamp multiplug.

5. Disconnect cable latch, remove glove box

assembly.

Glove Box Lid

6. Remove split pin, disengage gas strut from lid.

7. Remove 2 bolts and square nuts, remove lid

from glove box.


Content   ..  235  236  237  238   ..