Range Rover. Manual - part 228


  Index      Land Rover     Range Rover P38 - service manual 1995 year


Search            


Content   ..  226  227  228  229   ..


Range Rover. Manual - part 228


CHASSIS AND BODY

7

REPAIR

CHASSIS CROSS MEMBER

Service repair no - 76.10.92
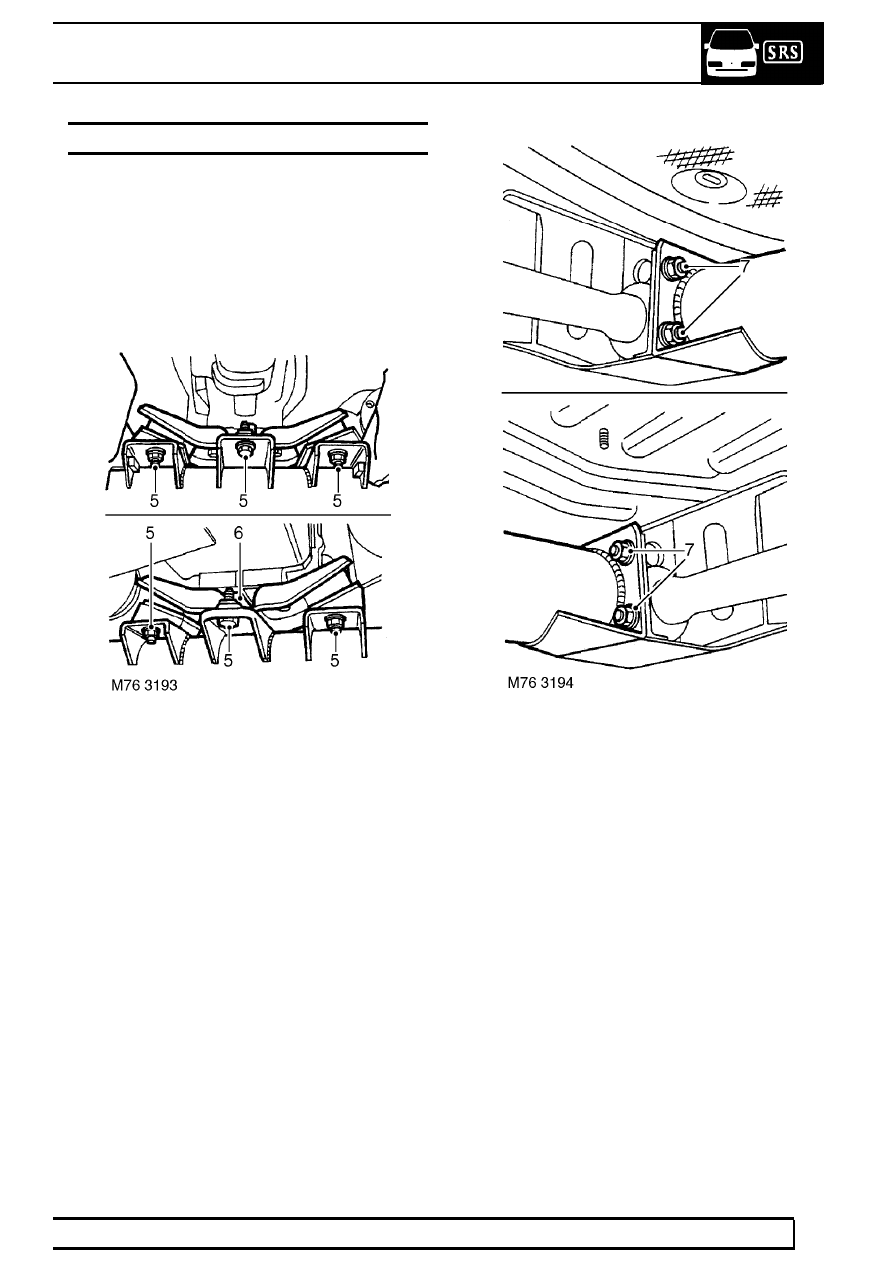
Remove

1. Release fixings and remove battery cover.
2. Disconnect battery earth lead.
3. Raise vehicle on 4 post ramp.
4. Support gearbox on a suitable jack.

5. Remove 4 nuts and 2 bolts securing gearbox

mounting to crossmember and discard nuts.

6. Remove gearbox snubber bar.

7. Remove 3 of 4 nuts and bolts securing each side

of crossmember to chassis.

8. With assistance, remove 2 remaining nuts and

bolts securing crossmember and remove
crossmember.

Refit

9. With assistance, fit crossmember and tighten

nuts and bolts to

45 Nm (33 lbf.ft).

10. Fit gearbox snubber bar and tighten bolts to

45

Nm (33 lbf.ft).

11. Fit new nuts securing gearbox mounting to

crossmember and tighten to

45 Nm (33 lbf.ft).

12. Remove support from gearbox.
13. Lower vehicle.
14. Connect battery earth lead.
15. Fit battery cover and secure with fixings.

76

CHASSIS AND BODY

NEW RANGE ROVER

8

REPAIR

ENGINE ACOUSTIC COVER

Service repair no - 76.11.06

Remove

1. Raise front of vehicle.

WARNING: Support on safety stands.

2. Release 4 threaded fasteners securing engine

acoustic cover to chassis brackets.

3. Release acoustic cover from brackets and

manoeuvre past steering gear.

Refit

4. Fit acoustic cover to brackets and secure with

threaded fasteners.

GEARBOX LOWER ACOUSTIC COVER

Service repair no - 76.11.13

Remove

1. Raise front of vehicle.

WARNING: Support on safety stands.

2. Release 6 threaded fasteners securing lower

acoustic cover to side acoustic covers.

3. Remove lower acoustic cover.

Refit

4. Fit acoustic cover to side acoustic covers.
5. Tighten threaded fasteners securing lower cover

to side covers.

6. Remove stand(s) and lower vehicle.

CHASSIS AND BODY

9

REPAIR

GEARBOX ACOUSTIC COVER - RH

Service repair no - 76.11.14

Remove

1. Raise front of vehicle.

WARNING: Support on safety stands.

2. Remove gearbox lower acoustic cover.

See this

section.

3. Remove bolt securing RH acoustic cover to

crossmember.

4. Remove bolt securing RH acoustic cover to

chassis member.

5. Remove gearbox RH acoustic cover.

Refit

6. Fit acoustic cover to chassis and secure with

bolts.

7. Fit gearbox lower acoustic cover.

See this

section.

GEARBOX ACOUSTIC COVER - LH

Service repair no - 76.11.15

Remove

1. Raise front of vehicle.

WARNING: Support on safety stands.

2. Remove gearbox lower acoustic cover.

See this

section.

3. Remove bolt securing LH acoustic cover to

crossmember.

4. Remove bolt securing LH acoustic cover to

chassis member.

5. Remove gearbox LH acoustic cover.

Refit

6. Fit acoustic cover to chassis and secure with

bolts.

7. Fit gearbox lower acoustic cover.

See this

section.

76

CHASSIS AND BODY

NEW RANGE ROVER

10

REPAIR

FRONT BUMPER VALANCE

Service repair no - 76.22.72

Remove

1. Raise the vehicle.

WARNING: Support on safety stands.

2. Remove battery cover for access to RH fog

lamp.

3. Disconnect fog lamp multiplugs and breather

hoses.

4. Release 2 clips securing bumper ends to

mounting brackets.

CAUTION: Loosen bolts securing bumper
end mounting brackets to chassis frame to
avoid damage to sealing rubber during

bumper remove and refit.


Content   ..  226  227  228  229   ..