Range Rover. Manual - part 208


  Index      Land Rover     Range Rover P38 - service manual 1995 year


Search            


Content   ..  206  207  208  209   ..


Range Rover. Manual - part 208


ABS

19

REPAIR

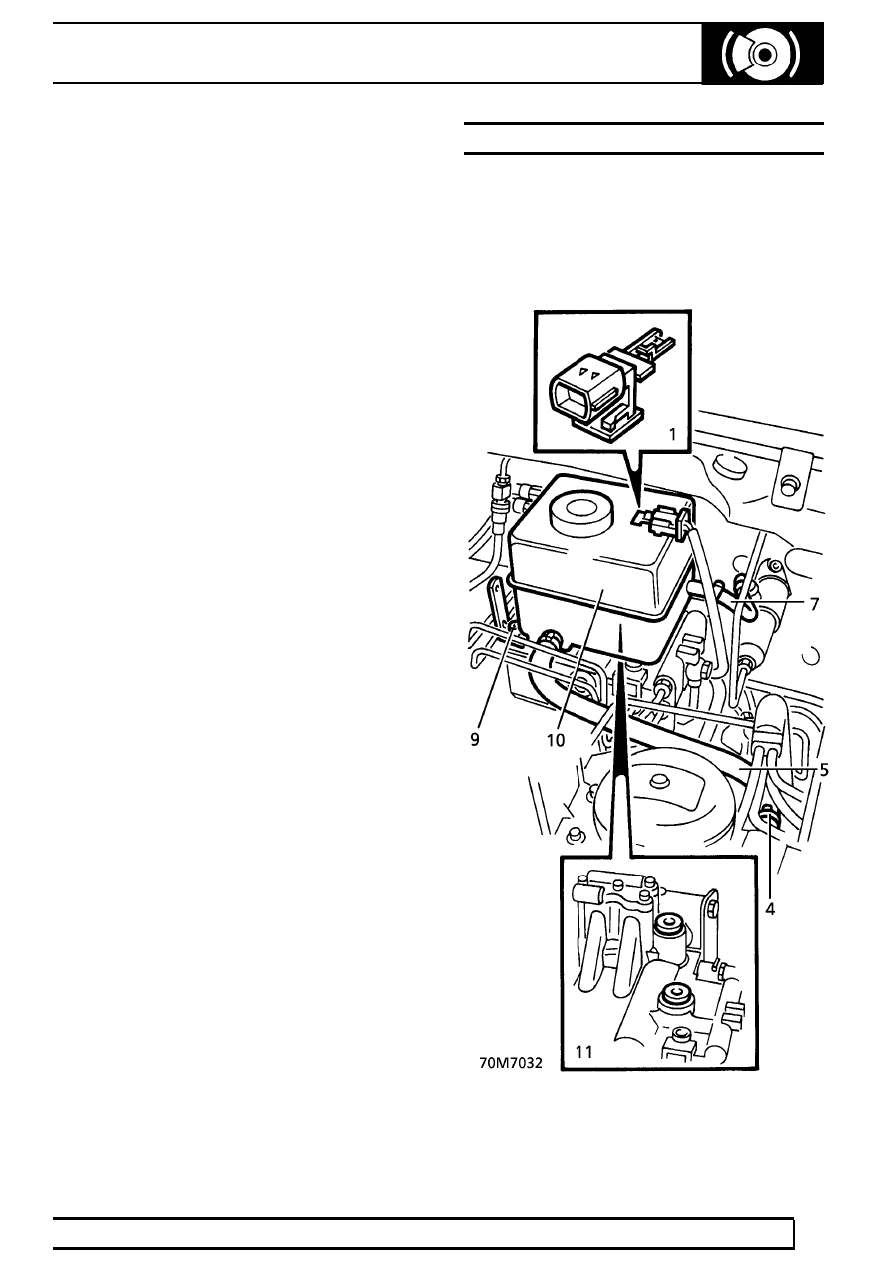
7. Disconnect multiplugs from motor and pressure

switch.

8. Remove 3 nuts securing pump/motor assembly

to valance. Remove assembly.

9. Collect rubber mountings and inserts from pump

brackets.

10. Remove and discard ABS pump relay.

Refit

11. Fit rubbers and inserts to pump mountings.
12. Position pump/motor assembly to valance.

Secure with nuts. Tighten to

8 Nm. (6 lbf.ft)

13. Connect motor and pressure switch multiplugs.
14. Remove plugs from high pressure hose and

pump.

15. Position high pressure hose to pump, ensuring

correct location of the banjo timing peg into the
slot. Secure with banjo bolt and new sealing
washers. Tighten to

24 Nm. (18 lbf.ft)

16. Remove plugs from reservoir hose and pump.

Connect hose. Secure with clip.

17. Fit accumulator.

See this section.

18. Fit replacement ABS pump relay.
19. Reconnect battery negative lead.

RESERVOIR AND SEALS

Service repair no - 70.65.22

Remove

1. Disconnect fluid level switch multiplug. Remove

fluid filler cap.

70

BRAKES

NEW RANGE ROVER

20

REPAIR

2. Position container to collect fluid.
3. Position cloth beneath pump to catch spillage.
4. Release clip securing reservoir hose to pump.
5. Release reservoir hose from pump. Drain

reservoir into container.

Manual Vehicles only.

6. Reposition container beneath clutch reservoir

hose.

7. Disconnect clutch master cylinder hose. Drain

fluid into container.

All Vehicles.

8. Plug pipes and connections.
9. Remove bolt. Collect reservoir securing bracket.

10. Remove reservoir from 2 seals.
11. Remove reservoir seals from booster unit.

CAUTION: Do not allow seal debris to
enter booster ports.

12. Plug reservoir and booster ports.
13. Release 2 clips securing fluid level switch to

reservoir. Remove switch.

Refit

14. Fit fluid level switch to reservoir.
15. Remove plugs from booster ports and reservoir.
16. Lubricate new reservoir seals with clean brake

fluid. Fit to booster ports.

17. Position reservoir. Engage fully into seals.
18. Position reservoir bracket. Secure with bolt.

Tighten to

10 Nm. (7 lbf.ft)

Manual Vehicles only.

19. Remove plug from clutch master cylinder hose.

Connect hose to reservoir. Secure with clip.

All Vehicles.

20. Remove plug from reservoir hose and pump.

Connect hose to pump. Secure with clip.

21. Connect fluid level switch multiplug.
22. Fill reservoir.

See LUBRICANTS, FLUIDS AND

CAPACITIES, Information.

23. Bleed brake system.

See this section.

Manual Vehicles only.

24. Bleed clutch system.

See CLUTCH, Repair.

ABS SENSORS - FRONT

Service repair no - 70.65.30

WARNING: If a sensor is removed for any
reason, a NEW sensor bush must be fitted.

Remove

1. Raise the vehicle.

WARNING: Support on safety stands.

2. Remove road wheel.
3. Release sensor harness multiplug from clip.

Disconnect multiplug.

4. Release sensor harness from 3 brackets.

ABS

21

REPAIR

5. Release sensor harness from brake hose clip.
6. Clean area around sensor to prevent ingress of

dirt.

7. Using a suitable lever, prise sensor from bush.
8. Remove sensor/harness assembly.
9. Remove sensor bush.

10. Clean sensor location.

Refit

11. Lubricate new sensor bush with silicone grease.

See LUBRICANTS, FLUIDS AND
CAPACITIES, Information.

12. Fit sensor bush.
13. Lubricate sensor with silicone grease.
14. Push sensor fully into bush until it contacts

reluctor ring. Correct sensor position will be
gained when vehicle is driven.

15. Engage sensor harness to brackets and brake

hose clip.

16. Connect multiplug. Secure plug in clip.
17. Fit road wheel, tighten nuts to

108 Nm

(80 lbf.ft).

18. Remove safety stands. Lower vehicle.
19. Clear ECU error code using TestBook .
20. Carry out short road test to ensure that ABS

warning light remains extinguished.

ABS SENSORS - REAR

Service repair no - 70.65.33

WARNING: If a sensor is removed for any
reason, a NEW sensor bush must be fitted.

Remove

1. Raise the vehicle.

WARNING: Support on safety stands.

2. Remove road wheel.
3. Release sensor harness multiplug from clip.

Disconnect multiplug.

4. Release sensor harness grommets from bracket.

Withdraw sensor harness.

5. Remove 2 bolts securing sensor harness guard

to axle. Release 2 harness clips from brake pipe.

70

BRAKES

NEW RANGE ROVER

22

REPAIR

6. Clean area around sensor to prevent ingress of

dirt.

7. Using a suitable lever, prise sensor from bush.

8. Remove sensor/harness assembly.
9. Remove seal and bush.

10. Clean sensor location.

Refit

11. Lubricate new sensor bush with silicone grease.

See LUBRICANTS, FLUIDS AND
CAPACITIES, Information.

12. Fit sensor bush and seal.
13. Lubricate sensor with silicone grease.
14. Push sensor fully into bush until it contacts

reluctor ring. Correct sensor position will be
gained when vehicle is driven.

15. Position sensor harness guard. Secure with

bolts.

16. Engage sensor harness guard clips to brake

pipe.

17. Thread sensor harness through grommets.

Engage grommets in bracket.

18. Connect multiplug. Secure in clip.
19. Fit road wheel, tighten nuts to

108 Nm (80

lbf.ft).

20. Remove safety stands. Lower vehicle.
21. Clear ECU error code using TestBook .
22. Carry out short road test to ensure that ABS

warning light remains extinguished.


Content   ..  206  207  208  209   ..