Range Rover. Manual - part 187


  Index      Land Rover     Range Rover P38 - service manual 1995 year


Search            


Content   ..  185  186  187  188   ..


Range Rover. Manual - part 187


ELECTRONIC AIR SUSPENSION

9

REPAIR

BUMP STOP

Service repair no - 60.30.10

Remove

1. Raise the vehicle.

WARNING: Support on safety stands.

2. Pull bump stop from body.

Refit

3. Fit bump stop.
4. Remove safety stands. Lower vehicle.

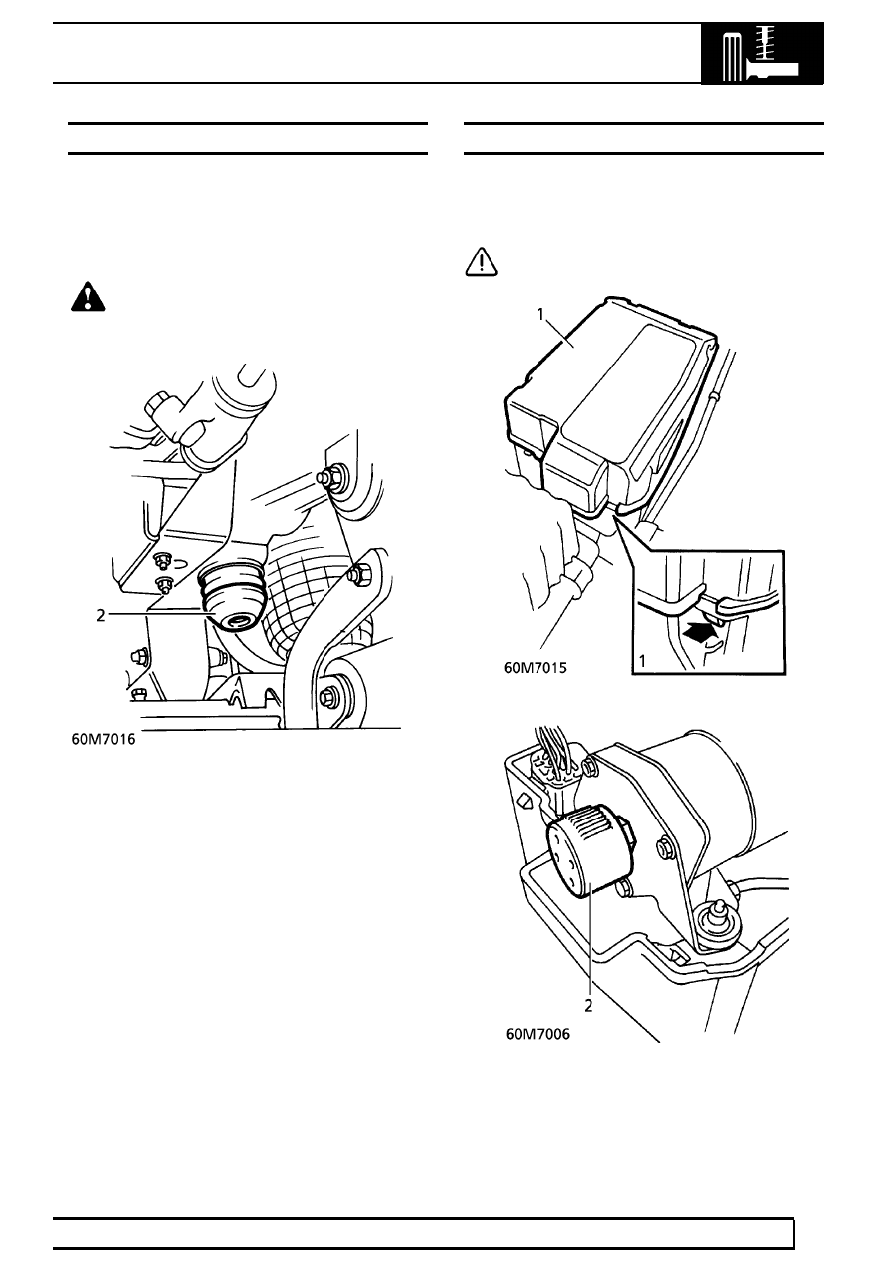
COMPRESSOR INLET FILTER

Service repair no - 60.50.12

Remove

CAUTION: Dirt or grease must not enter
the system.

1. Remove cover from air supply unit.
2. Remove inlet filter from compressor.

Refit

3. Apply Loctite 572 to filter threads.
4. Fit filter Tighten to

1.0 Nm. (0.74 lbf.ft). Refit

cover.

60

FRONT SUSPENSION

NEW RANGE ROVER

10

REPAIR

DELAY TIMER UNIT

Service repair no - 60.50.46

Remove

1. Raise LH front seat cushion to full extent to

improve access to timer unit.

2. Remove timer unit from terminal block.

Refit

3. Reverse removal procedure.

AIR DRIER

Service repair no - 60.50.09

Remove

WARNING: The air suspension is
pressurised up to 10 bar (150 psi). Dirt or
grease must not enter the system. Wear

hand, ear and eye safety standard protection
when servicing the system.

1. Disconnect 2 pipes from air drier.
2. Seal pipes. Seal drier to prevent moisture

ingress.

3. Remove air drier fixing, remove drier.

Refit

4. Fit drier, tighten fixing to

12 Nm (9 lbf.ft).

5. Remove seals, clean end of pipes.
6. Connect hoses to drier.
7. Leak test connections.

See this section.

ELECTRONIC AIR SUSPENSION

11

REPAIR

ELECTRONIC CONTROL UNIT (ECU)

Service repair no - 60.50.04

Remove

1. Move front left hand seat fully rearwards.
2. Disconnect battery negative lead.

3. Remove 3 trim fixings, remove trim from seat

base.

4. Remove 2 screws from ECU cover (automatic

only), remove cover.

5. Release multiplug from ECU.
6. Remove 2 screws, remove ECU.

Refit

7. Reverse removal procedure.

60

FRONT SUSPENSION

NEW RANGE ROVER

12

REPAIR

HEIGHT SENSOR

Service repair no - 60.36.01

Remove

1. Raise the vehicle.

WARNING: Support on safety stands.

2. Remove scrivet from rear lower edge of front

wheel arch liner. Lift liner for access to height
sensor multiplug.

3. Disconnect multiplug.
4. Release sensor link from radius arm.

5. Remove 2 bolts and remove sensor and sensor

cover.

6. Remove cover from sensor.

Refit

7. Fit cover to sensor.
8. Fit sensor, tighten bolts to

12 Nm. (9 lbf.ft)

CAUTION: Ensure bolts pass through
cover and sensor.

9. Fit sensor link to radius arm. Tighten to

8 Nm.

(6 lbf.ft)

10. Reverse removal procedure.
11. Recalibrate system if a new sensor has been

fitted

See this section.


Content   ..  185  186  187  188   ..