Range Rover. Manual - part 120


  Index      Land Rover     Range Rover P38 - service manual 1995 year


Search            


Content   ..  118  119  120  121   ..


Range Rover. Manual - part 120


BMW DIESEL

5

REPAIR

VISCOUS COUPLING AND FAN ASSEMBLY

Service repair no - 26.25.19

Remove

1. Disconnect battery negative lead.
2. Raise the vehicle.

WARNING: Support on safety stands.

3. Drain cooling system.

See this section.

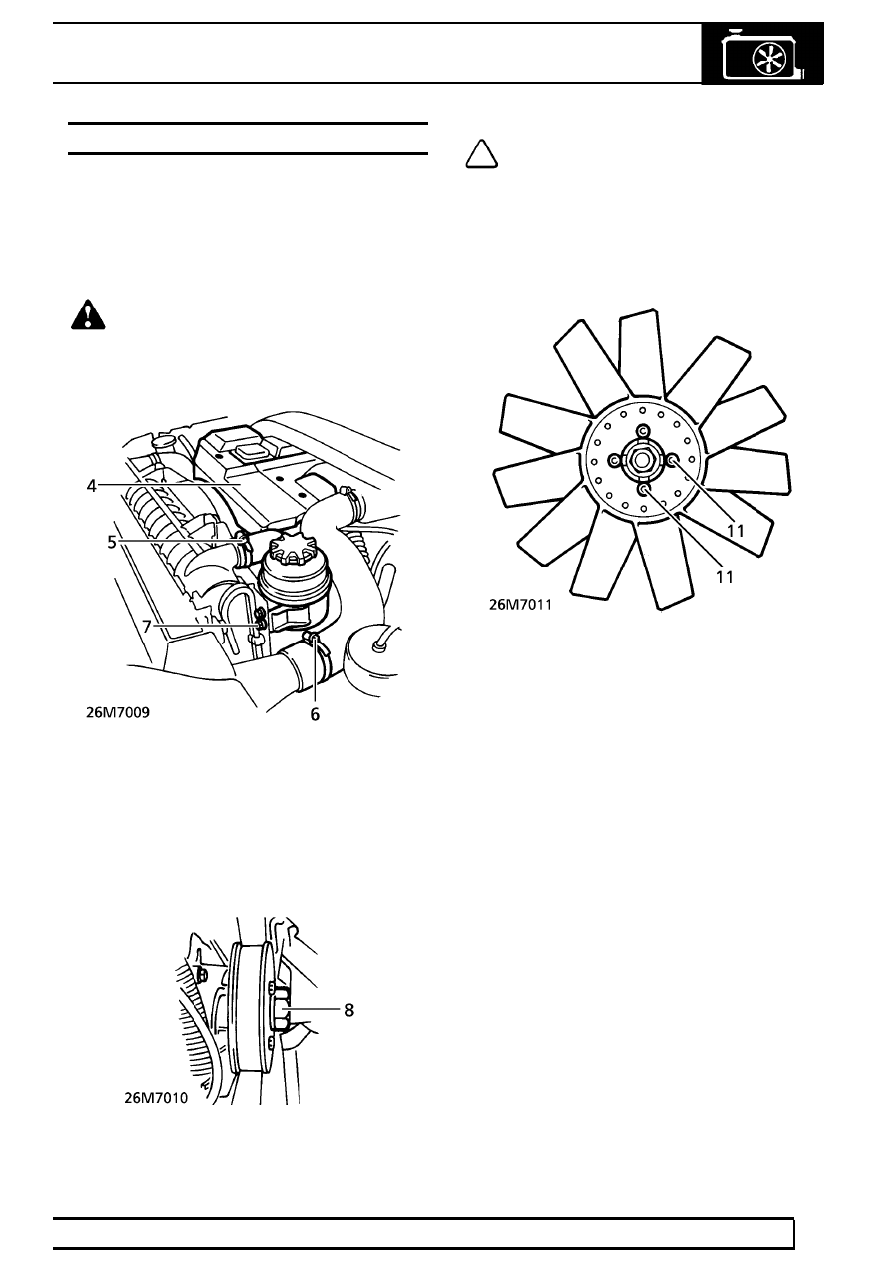
4. Remove 3 bolts securing upper fan cowl.

Remove cowl.

5. Release top hose from radiator. Position hose

aside.

6. Release outlet hose from intercooler. Position

hose aside.

7. Remove 2 bolts securing power steering

reservoir to radiator bracket. Position reservoir
aside.

8. Using special tools LRT-12-093 and LRT-12-094

unscrew viscous coupling.

NOTE: Viscous coupling is fitted with a LH
thread.

9. Remove viscous coupling assembly from LH

side of radiator.

10.

Do not carry out further dismantling if
component is removed for access only.

11. Remove 4 bolts securing fan to coupling.

Remove coupling.

Refit

12. Ensure mating faces are clean.
13. Fit fan to coupling. Secure with bolts. Tighten to

10 Nm (7 lbf.ft)

14. Position viscous coupling assembly.
15. Engage to pump. Using special tools

LRT-12-093 and LRT-12-094. Tighten to
40 Nm (29 lbf.ft)

16. Connect hoses to intercooler and radiator.

Secure with clips.

17. Position power steering fluid reservoir to radiator

bracket. Secure with bolts.

18. Position upper fan cowl. Secure with bolts.
19. Refill cooling system.

See this section.

20. Remove safety stands. Lower vehicle.
21. Reconnect battery negative lead.

26

COOLING SYSTEM

NEW RANGE ROVER

6

REPAIR

THERMOSTAT

Service repair no - 26.45.01

Remove

1. Disconnect battery negative lead.
2. Raise the vehicle.

WARNING: Support on safety stands.

3. Remove cooling fan cowl.

See this section.

4. Release intake hose from ducting.

5. Release turbocharger intake hose from ducting.
6. Release breather valve from intake ducting

grommet.

NOTE: Collect grommet. Refit to ducting.

7. Disengage 2 clips securing intake ducting.

Remove ducting.

8. Remove 3 bolts securing intake ducting bracket

and exhaust manifold heat shield to camshaft
cover. Collect bracket.

9. Disconnect heater hose from coolant connecting

pipe.

10. Remove bolt securing coolant connecting pipe to

engine front cover.

BMW DIESEL

7

REPAIR

11. Remove coolant pipe. Remove ’O’ ring and

discard.

12. Remove top hose from thermostat housing.
13. Remove 3 bolts securing thermostat housing to

engine front cover.

14. Remove thermostat housing.
15. Collect thermostat. Remove ’O’ ring and discard.

Refit

16. Lubricate new ’O’ ring with clean coolant

solution. Fit to thermostat.

17. Locate thermostat in housing.

CAUTION: Ensure that ball valve is
correctly located.

18. Position thermostat and housing assembly.

Secure with bolts. Tighten to

10 Nm (7 lbf.ft)

19. Fit top hose to thermostat. Secure with clip.
20. Using a new ’O’ ring, position coolant pipe.

Engage to engine front cover.

21. Secure connecting pipe to front cover with bolt.

Tighten to

10 Nm (7 lbf.ft)

22. Connect heater hose. Secure with clip.
23. Align exhaust manifold heat shield. Position

intake ducting bracket.

24. Secure ducting bracket and heat shield with

bolts.

25. Position intake ducting. Engage clips.
26. Engage breather valve into ducting grommet.
27. Connect ducting to turbocharger intake hose.

Secure with clip.

28. Connect intake hose to ducting. Secure with clip.
29. Fit cooling fan cowl.

See this section.

30. Remove safety stands. Lower vehicle.
31. Reconnect battery negative lead.

COOLING FAN COWL

Service repair no - 26.25.11

Remove

1. Disconnect battery negative lead.
2. Raise the vehicle.

WARNING: Support on safety stands.

3. Remove viscous coupling and fan assembly.

See this section.

4. Disconnect bottom hose from radiator.
5. Remove 2 clips securing cowl to radiator.
6. Remove cooling fan cowl from radiator.

Refit

7. Reverse removal procedure.


Content   ..  118  119  120  121   ..