Range Rover. Manual - part 100


  Index      Land Rover     Range Rover P38 - service manual 1995 year


Search            


Content   ..  98  99  100  101   ..


Range Rover. Manual - part 100


LAND ROVER V8

1

REPAIR

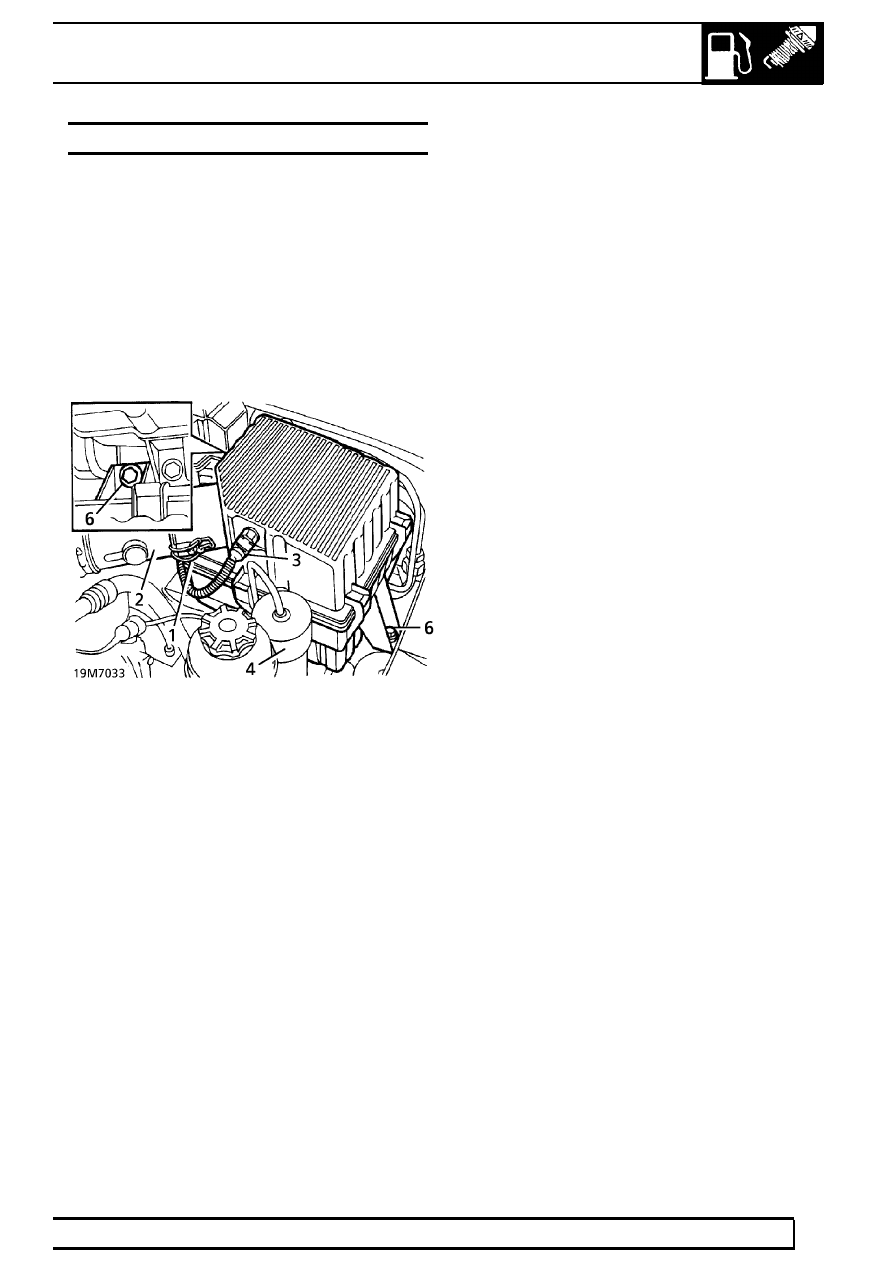
AIR CLEANER ASSEMBLY - up to 97MY

Service repair no - 19.10.01

Remove

1. Release 2 clips securing air flow meter to air

cleaner.

2. Release air flow meter. Remove ’O’ ring and

discard.

3. Disconnect intake air temperature sensor.

4. Remove bolt securing air suspension dryer to air

cleaner.

5. Release dryer pipes from 2 clips. Position dryer

aside.

6. Remove 2 bolts securing air cleaner to valance.
7. Release air cleaner lug from valance grommet.

Remove air cleaner.

8. If necessary, remove intake air temperature

sensor.

9. Remove seal.

Refit

10. If removed, refit intake air temperature sensor

with seal to air cleaner. Tighten to

8 Nm (6

lbf.ft)

11. Position air cleaner assembly. Engage lug to

valance grommet. Secure with bolts.

12. Position air suspension dryer to air cleaner.

Secure with bolt. Tighten to

8 Nm (6 lbf.ft)

13. Engage dryer pipes to clips.
14. Connect multiplug to intake air temperature

sensor.

15. Fit new ’O’ ring to air flow meter.
16. Secure air flow meter to air cleaner with clips.

19

FUEL SYSTEM

NEW RANGE ROVER

2

REPAIR

AIR CLEANER ASSEMBLY - from 97MY

Service repair no - 19.10.01

Remove

1. Release 2 clips securing mass air flow (MAF)

meter to air cleaner.

2. Release MAF meter from air cleaner. Remove

and discard ’O’ ring from MAF sensor.

3. Disconnect multiplug from air temperature

sensor.

4. Remove bolt securing air suspension air dryer to

air cleaner.

5. Release air dryer from air cleaner and position

aside.

6. Release air cleaner from 2 valance grommets.
7. Remove air cleaner from inner wing grommet.

Do not carry out further dismantling if
component is removed for access only.

8. Remove air temperature sensor from air cleaner.
9. Remove and discard air temperature sensor

seal.

10. Fit new seal to air cleaner.
11. Fit air temperature sensor to air cleaner and

tighten to

8 Nm (6 lbf.ft)

Refit

12. Fit air cleaner lugs to inner wing and valance

grommets. Ensure lugs are fully engaged to
grommets.

13. Position air dryer to air cleaner, fit bolt and

tighten to

8 Nm (6 lbf.ft)

14. Connect multiplug to air temperature sensor.
15. Fit new ’O’ ring seal to MAF meter.
16. Engage MAF meter to air cleaner and secure

with clips.

LAND ROVER V8

3

REPAIR

ELEMENT - AIR CLEANER - from 99MY

Service repair no - 19.10.10

Remove

1. Release 3 fixings and remove battery cover.
2. Disconnect battery earth lead.

3. Release 2 clips securing air flow meter to air

cleaner assembly.

4. Release air flow meter and position aside.
5. Release 2 clips securing air cleaner top cover

and remove cover.

6. Remove air cleaner element.

Refit

7. Clean inside of air cleaner case and cover.
8. Fit new air cleaner element.
9. Fit air cleaner cover and secure with clips.

10. Connect air flow meter to air cleaner assembly

and secure with clips.

11. Connect battery earth lead.
12. Fit battery cover and secure with fixings.

AIR INTAKE HOSE - up to 99MY

Service repair no - 19.10.17

Remove

1. Loosen 2 clips securing intake hose to plenum

chamber and mass air flow sensor.

2. Release harness from intake hose clip.
3. Release intake hose from plenum chamber.
4. Remove intake hose from mass air flow sensor.
5. Remove 2 clips from intake hose.

Refit

6. Fit clips to intake hose.
7. Fit intake hose to mass air flow sensor.
8. Connect intake hose to plenum chamber.
9. Tighten clips securing intake hose to plenum

and MAF sensor.

10. Engage harness to intake hose clip.

19

FUEL SYSTEM

NEW RANGE ROVER

4

REPAIR

CAMSHAFT POSITION (CMP) SENSOR - up to
99MY

Service repair no - 18.30.24

Remove

1. Disconnect battery negative lead.
2. Release 2 clips securing upper fan cowl.

Remove cowl.

3. Release tension from auxiliary belt. Remove belt

from crankshaft pulley.

4. Release CMP sensor connector from bracket.

Disconnect multiplug.

5. Remove bolt securing CMP sensor to front

cover.

6. Remove CMP sensor.

Refit

7. Ensure mating surfaces are clean.
8. Engage CMP sensor in front cover location.

Secure with bolt. Tighten to

8 Nm (6 lbf.ft)

9. Secure CMP sensor connector to bracket.

Connect multiplug.

10. Turn auxiliary belt tensioner. Refit belt to

crankshaft pulley.

11. Fit upper fan cowl. Secure with clips.
12. Reconnect battery negative lead.


Content   ..  98  99  100  101   ..