Range Rover. Manual - part 40


  Index      Land Rover     Range Rover P38 - service manual 1995 year


Search            


Content   ..  38  39  40  41   ..


Range Rover. Manual - part 40


BMW DIESEL

51

REPAIR

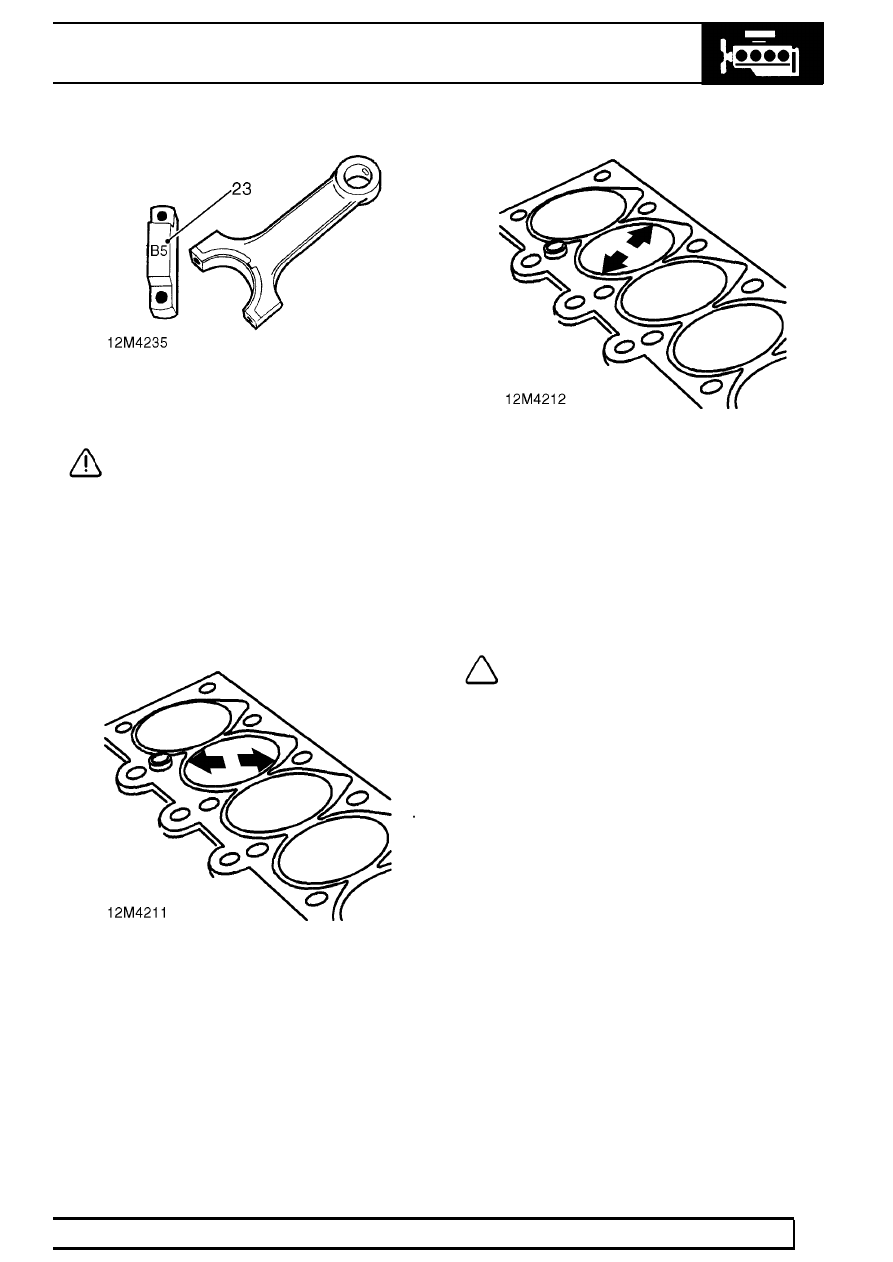
23. Replace connecting rods as necessary, do not

attempt to straighten distorted rods.

CAUTION: replacement connecting rods
must be of the same weight classification,
the classification is embossed on the main

bearing caps.

Cylinder bores - inspection

24. De-glaze cylinder bores, check bores for scoring.
25. Remove all traces of cylinder head gasket and

carbon deposits from cylinder block.

26. Check and record cylinder bore diameter at

bottom, centre and top of bore ensuring that
measurements are taken at the angle shown.

27. Compare figures obtained with the following and

determine cylinder bore size:
Standard = 80.00 to 80.04 mm (3.150 to 3.151
in)
Intermediate = 80.08 to 80.12 mm (3.153 to
3.154 in)
1st oversize = 80.25 to 80.29 mm (3.20 to 3.21
in)

28. Repeat procedure at angle shown and from the

2 sets of measurements obtained, calculate
cylinder bore ovality and taper:
Maximum ovality = 0.04 mm (0.002 in)
Maximum taper = 0.04 mm (0.002 in)

29. Compare piston diameter with cylinder bore size

and determine piston to bore clearance:
Piston to bore clearance = 0.031 to 0.063 mm
(0.0012 to 0.002 in)

NOTE: For engines which have been ’run
in,’ the above clearance may be increased
to 0.213 mm (0.008 in).

30. Standard and intermediate size cylinder bores

which are worn in excess of limits given may be
rebored to next oversize and the appropriate
oversize pistons fitted.

12

ENGINE

NEW RANGE ROVER

52

REPAIR

Piston rings - check

CAUTION: Ensure that replacement piston
rings are the correct size for the pistons to
be fitted.

31. Lubricate cylinder bores and new piston rings

with engine oil.

32. Insert 1 set of piston rings in turn into No. 1

cylinder bore.

33. Check piston ring gaps using feeler gauges:

Piston ring gap - 1st, 2nd and oil control rings =
0.2 to 0.4 mm (0.008 to 0.020 in)

CAUTION: If ring gaps are too wide, it will
be necessary to rebore cylinder(s) to next
size and fit appropriate size pistons and

rings.

34. Suitably identify the piston rings with No.1

cylinder and retain with the piston and
connecting rod for that cylinder.

35. Repeat above procedures for remaining

cylinders.

36. Lubricate pistons and ring grooves with engine

oil.

37. Fit oil control, 2nd and 1st compression rings to

piston.

NOTE: 1st and 2nd rings are marked TOP.

38. Using feeler gauges, measure clearance

between piston ring groove and 2nd
compression and oil control rings.
Ring to groove clearance:
1st compression - not checked
2nd compression = 0.040 to 0.072 mm ( 0.002
to0.004 in)
Oil control = 0.030 to 0.065 mm (0.001 to 0.003
in)

39. Check that 1st compression ring is free to move

in groove.

40. Repeat above procedures for remaining pistons

and rings.

BMW DIESEL

53

REPAIR

Pistons and connecting rods - assembling

41. Assemble each piston to its connecting rod

ensuring that the number on the rod is
positioned relative to the arrow on the piston
crown as shown.

42. Lubricate gudgeon pins and bushes with engine

oil, fit pins and retain with new snap rings.

NOTE: Position snap ring gaps opposite
recess in piston.

Pistons and connecting rods - refit

43. Lubricate pistons, rings and cylinder bores with

engine oil.

44. Position piston ring gaps at 120

°

to each other

ensuring that they are not over gudgeon pin.

45. Compress piston rings using LRT-12-519.

46. Fit each piston and connecting rod to its

respective cylinder in turn ensuring that arrow on
piston crown is pointing towards front of engine.

CAUTION: Fit pistons using hand pressure
only.

47. Fit big-end bearings.

See this section.

48. Fit cylinder head.

See this section.

12

ENGINE

NEW RANGE ROVER

54

REPAIR

CRANKSHAFT AND MAIN BEARINGS

Service repair no - 12.21.33/01

Remove

1. Remove engine and gearbox.

See this section.

2. Remove oil pump.

See this section.

3. Remove crankshaft rear oil seal.

See this

section.

4. Remove pistons and connecting rods.

See this

section.

5. Using sequence shown, progressively slacken

then remove main bearing cap bolts.

NOTE: Do not discard bolts at this stage.

6. Ensure that main bearing caps 1 to 5 are

suitably identified on the exhaust manifold side
of the engine.

NOTE: Main bearing caps 6 and 7 are not
marked on production, ensure that they
are suitably identified to their fitted

positions. Bearing cap 6 carries the integral
thrust/main bearing shell.

7. Remove main bearing caps.
8. Remove and discard main bearing shells from

caps.

9. Lift out crankshaft.

10. Remove and discard main bearing shells from

cylinder block.

11. Clean crankshaft, ensure all oilways are clear.
12. Clean main bearing caps and bearing shell

locations in cylinder block; ensure bearing cap
bolt holes are clean and dry.

13. Clean original bearing cap bolts and lightly oil

threads.


Content   ..  38  39  40  41   ..