Freelander Body Repair Manual - part 52


  Index      Land Rover     Freelander Body Repair Manual 1998 year


Search            


Content   ..  50  51  52  53   ..


Freelander Body Repair Manual - part 52


BODY

SUNROOF

5

SUN ROOF ASSEMBLY - 5 DOOR

Service repair no - 76.84.01
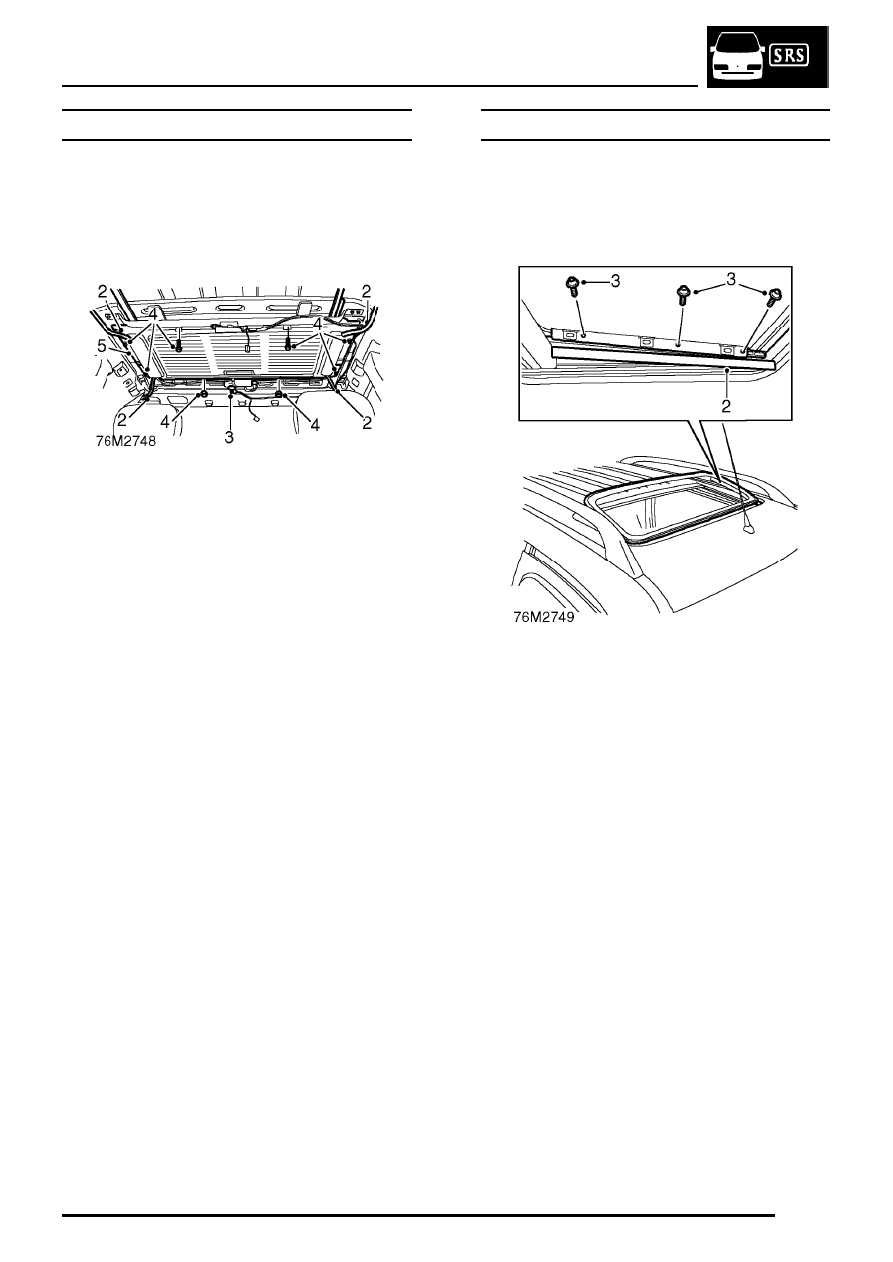
Remove

1. Remove headlining.

See Interior trim

components.

2. Disconnect drain tubes from sun roof.
3. Disconnect multiplug from sun roof motor.
4. With assistance, remove 6 nuts and 2 bolts

securing sun roof.

5. Remove sun roof assembly.

Refit

1. Ensure plastic washers and tray seal are in

position.

2. With assistance position sun roof assembly, fit

and tighten nuts and bolts.

3. Connect multiplug to sun roof.
4. Connect drain tubes to sun roof and secure

with cable ties.

5. Fit headlining.

See Interior trim components.

PANEL GLASS - SUN ROOF - 5 DOOR

Service repair no - 76.84.03

Remove

1. Open sun roof blind.

2. Remove covers from glass securing screws.
3. Remove 6 screws securing glass.
4. Remove glass.

Refit

1. Position glass, fit screws but do not tighten at

this stage.

2. Align glass to roof and tighten screws.
3. Fit screw covers.
4. Operate sun roof to check alignment.
5. Close sun roof blind.

BODY

6

SUNROOF

SEAL - PANEL GLASS - SUN ROOF - 5 DOOR

Service repair no - 76.84.05

Remove

1. Remove glass panel.

See this section.

2. Release ends of seal from glass and remove

seal .

Refit

1. Clean adhesive from glass.
2. Position seal; apply adhesive to ends of seal

and secure to glass panel.

3. Fit glass panel.

See this section.

MOTOR - SUN ROOF

Service repair no - 76.84.07

Remove

1. Remove front roof lamp.

See ELECTRICAL,

Repairs.

2. Remove headlining to sun roof finisher.

See

Repairs.

3. Carefully lower front of headlining to access

motor.

4. Remove 3 Torx screws securing motor.
5. Release motor from gearbox, lower through

headlining, disconnect 4 Lucars and remove
motor.

Refit

1. Position motor, connect Lucars and fit motor to

gearbox.

2. Position sun roof in tilt mode, power motor

forward to the first stop (motor and lifting
assemblies are then timed together).

3. Fit and tighten Torx screws.
4. Carefully reposition headlining.
5. Fit sun roof finisher.

See Repairs.

6. Fit roof lamp.

See ELECTRICAL, Repairs.

BODY

SUNROOF

7

DRIVE CABLES & SLIDE ASSEMBLIES

Service repair no - 76.84.09

Remove

1. Remove sun roof motor.

See this section.

2. Remove glass panel.

See this section.

3. Open sun roof.
4. Release and remove wind deflector.
5. Position sun roof in tilt mode.

6. Remove 4 Torx screws securing lifting

assembly to roof.

7. Collect rear cam guide.
8. Slide assembly forward, remove cable guide

clamp.

9. Remove lifting assembly and cable.

Refit

1. Ensure cable tubes are in position, lightly

grease the end of cable tube.

2. Engage cable in tube and fit lifting assembly to

roof.

3. Fit cable guide clamp, place lifting assembly in

tilt mode.

4. Fit rear cam guide.
5. Fit and tighten Torx screws.
6. Fit sun roof motor.

See this section.

7. Open sun roof.
8. Position wind deflector and secure to sun roof.
9. Fit glass panel.

See this section.

BODY

8

SUNROOF

DRAIN TUBE - SUN ROOF - FRONT - 5 DOOR

Service repair no - 76.84.20

Remove

1. Remove headlining.

See Interior trim

components.

2. Remove 5 Torx screws securing carpet

retainer and remove retainer.

3. Release drain tube from wheel arch grommet.

4. Disconnect drain tube from sun roof, discard

cable tie.

5. Attach draw string and remove drain tube.

Refit

1. Attach draw string to NEW drain tube and pull

into position.

2. Connect drain tube to sun roof and secure with

NEW cable tie.

3. Connect drain tube to wheel arch grommet.
4. Secure wheel arch grommet.
5. Position carpet retainer, fit and tighten Torx

screws.

6. Fit headlining.

See Interior trim components.


Content   ..  50  51  52  53   ..