Freelander 1. Manual - part 216


  Index      Land Rover     Freelander 1 - service manual 2002 year


Search            


Content   ..  214  215  216  217   ..


Freelander 1. Manual - part 216


INTERIOR TRIM COMPONENTS

REPAIRS 76-3-15

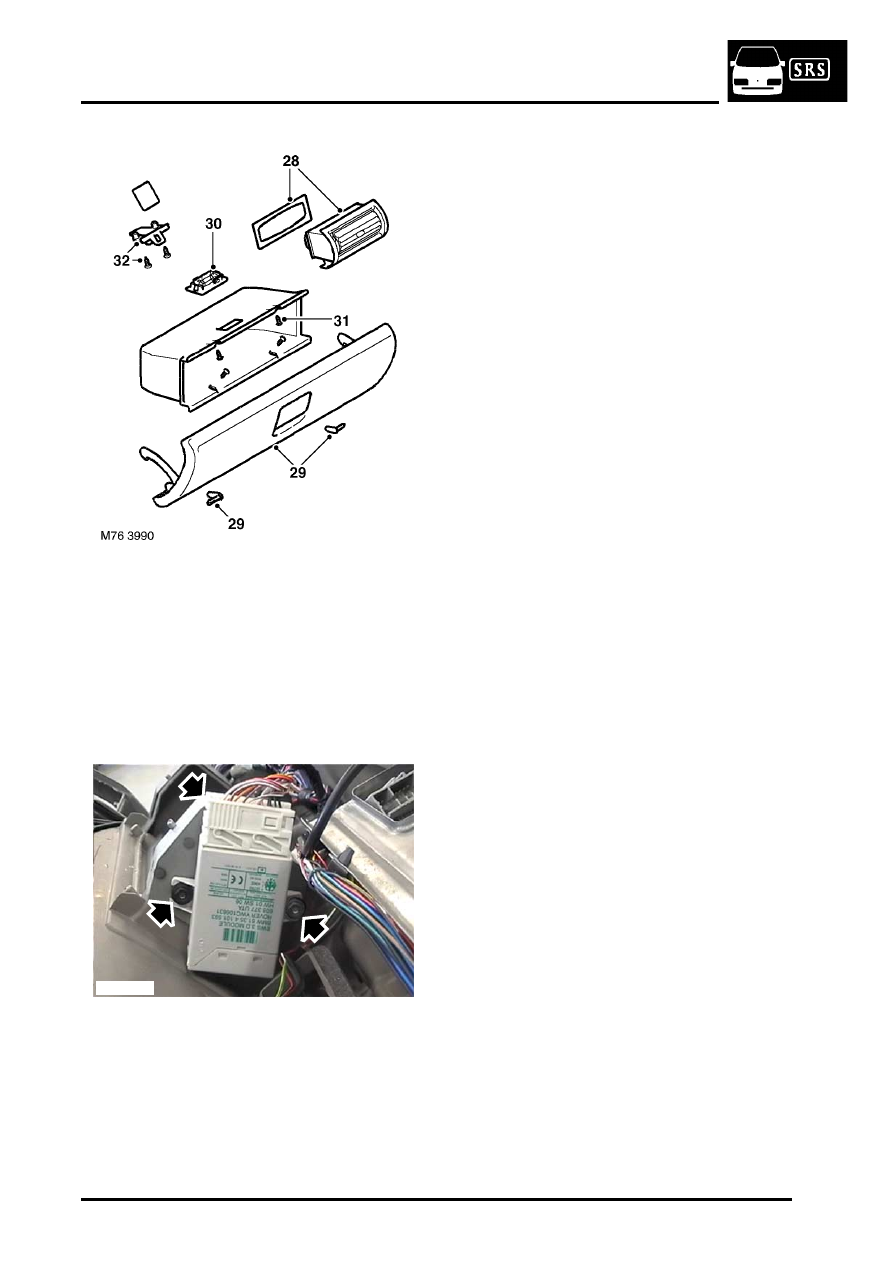
28. Remove 4 face level vents and collect seals.
29. Remove glove box hinge pins and remove 

glove box lids.

30. Remove glove box lamp and mat.
31. Remove 4 screws from glove box and remove 

glove box.

32. Remove 2 screws from each glove box lock and 

remove locks.

33. Remove switch blank.

34. Disconnect multiplug from immobilisation ECU.
35. Remove 2 nuts securing immobilisation ECU to 

fascia and remove ECU.

36. Remove fascia and coin tray mats.

Refit

1. Fit fascia and coin tray mats.
2. Fit immobilisation ECU to fascia and secure 

with nuts.

3. Connect multiplug to immobilisation ECU.
4. Fit switch blank.
5. Fit glove box locks to fascia and secure with 

screws.

6. Fit glove box and secure with screws.
7. Fit glove box lamp and mat.
8. Fit glove box lids and secure hinge pins.
9. Fit face level vents and seals to fascia.

10. Fit centre bracket and secure with screws.
11. Models without passenger airbag: Fit grab 

handle and secure with nuts.

12. Fit instrument pack lower cover and secure with 

screws.

13. Fit instrument pack to fascia and secure with 

screws.

14. Fit fascia harness to fascia and secure with 

clips.

15. Connect Lucars to glove box lamp and switch.
16. Connect multiplugs to mirror switch and 

headlamp levelling switch.

17. Fit mirror switch and headlamp levelling switch.
18. Connect multiplugs to instrument pack.
19. Fit instrument pack upper cover and secure 

with screws.

20. Connect multiplugs to switches on instrument 

bezel finisher, fit bezel and secure with screws.

21. With assistance fit fascia to vehicle and secure 

with bolts.

22. Connect fascia harness multiplugs to main 

harness.

23. Models with passenger airbag: Fit passenger 

airbag.
 

 + 

 RESTRAINT SYSTEMS, REPAIRS, 

Air bag - fascia - passenger.

24. Models without passenger airbag: Fit fascia 

stowage box.
 

 + 

 INTERIOR TRIM COMPONENTS, 

REPAIRS, Stowage box - fascia.

25. Fit 'A' post upper trim finishers.


 + 

 INTERIOR TRIM COMPONENTS, 

REPAIRS, Trim finisher - 'A' post - upper - 
renew.

26. Fit clock.


 + 

 INSTRUMENTS, REPAIRS, Clock.

27. Open drivers glove box lid and remove fuse box 

cover.

28. Connect multiplugs to fusebox.
29. Fit fusebox cover and close glove box lid.
30. Fit steering column lower cover and secure with 

screws.

31. Fit wiper/indicator switch and tighten clamping 

screw.

32. Connect multiplugs to wiper/indicator switch.

M76 3995

INTERIOR TRIM COMPONENTS

76-3-16 REPAIRS

33. Fit rotary coupler.


 + 

 RESTRAINT SYSTEMS, REPAIRS, 

Rotary coupler - (SRS) air bag system.

34. Fit front console.


 + 

 INTERIOR TRIM COMPONENTS, 

REPAIRS, Console - front.

Cup holder assembly - fascia

$% 76.46.41

Remove

1. Open cup holder and remove both rubber 

matts.

2. Remove 2 screws securing cup holder 

assembly and remove assembly.

Refit

1. Position cup holder assembly and secure with 

screws.

2. Fit rubber matts and close cup holder.

M76 4400

INTERIOR TRIM COMPONENTS

REPAIRS 76-3-17

Stowage box - fascia

$% 76.46.45

Remove

1. Remove mat from stowage box to access 

screws.

2. Remove 2 screws.
3. Remove stowage box from fascia.

Refit

1. Position stowage box and secure with screws.
2. Fit mat to stowage box.

Carpet - luggage compartment

$% 76.49.04

Remove

1. Remove both rear quarter lower trim casings.


 + 

 INTERIOR TRIM COMPONENTS, 

REPAIRS, Trim casing - rear quarter - lower 
- 3 door.
 

 + 

 INTERIOR TRIM COMPONENTS, 

REPAIRS, Trim casing - rear quarter - lower 
- 5 door.

2. Open lid on security box.
3. Remove 6 screws securing lid to body and 

remove lid.

4. Remove 4 screws securing lid latch strikers to 

body and remove strikers.

INTERIOR TRIM COMPONENTS

76-3-18 REPAIRS

5. Remove 4 buckles from rear carpet.
6. Release carpet from rear seat strikers and 

lashing eyes and remove carpet.

Refit

1. Fit rear carpet in loadspace and secure with 

buckles.

2. Fit lid latch strikers and secure with screws.
3. Fit security box lid and secure with screws.
4. Close security box lid.
5. Fit rear quarter lower trim casings.


 + 

 INTERIOR TRIM COMPONENTS, 

REPAIRS, Trim casing - rear quarter - lower 
- 5 door.
 

 + 

 INTERIOR TRIM COMPONENTS, 

REPAIRS, Trim casing - rear quarter - lower 
- 3 door.

Glove box

$% 76.52.03

Remove

1. Open glove box and remove glove box mat.

2. Release illumination lamp from glove box.
3. Remove 4 screws from glove box and remove 

glove box.

Refit

1. Fit glove box and secure with screws.
2. Fit illumination lamp.
3. Fit glove box mat.
4. Close glove box.


Content   ..  214  215  216  217   ..