Freelander 1. Manual - part 87


  Index      Land Rover     Freelander 1 - service manual 2002 year


Search            


Content   ..  85  86  87  88   ..


Freelander 1. Manual - part 87


ENGINE - K SERIES KV6

REPAIRS 12-3-39

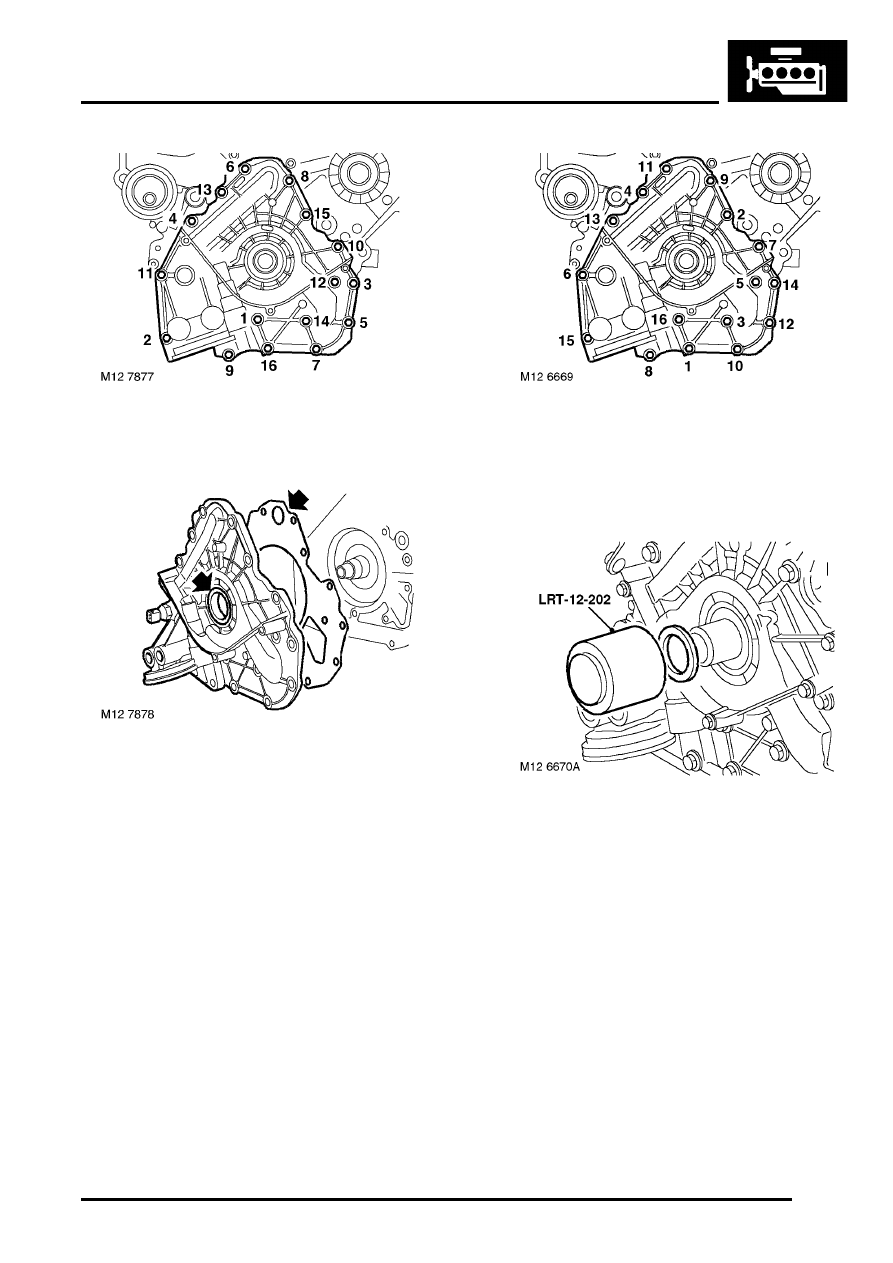
8. Using sequence shown, remove and discard 16 

bolts securing oil pump to cylinder block.

9. Remove oil pump.

10. Remove and discard oil pump gasket.
11. Remove and discard crankshaft front oil seal 

from oil pump housing.

Refit

1. Clean oil pump and mating face on cylinder 

block ensure bolt holes are clean and dry.

2. Clean oil seal recess in oil pump and running 

surface on crankshaft.

3. Fit new oil pump gasket, dry, to cylinder block.
4. Fit oil seal guide, from seal kit, over end of 

crankshaft.

5. Position oil pump, aligning flats on oil pump 

drive to flats on crankshaft. Fit new Patchlok 
bolts and tighten progressively in sequence 
shown to:

l

Stage 1 - 5 Nm (4 lbf.ft)

l

Stage 2 - 9 Nm (7 lbf.ft)

6. Position new seal on crankshaft up against oil 

pump housing. Drift seal into place using tool 
LRT-12-202. 

CAUTION: Oil seal must be fitted dry.

7. Remove oil seal guide from crankshaft.
8. Connect multiplug to oil pressure switch.
9. Fill canister of replacement oil filter with clean 

engine oil.

10. Lubricate oil filter sealing ring with clean engine 

oil.

11. Fit oil filter and tighten by hand until it seats 

then tighten a further half turn.

12. Lubricate new 'O' rings with clean engine oil 

and fit to oil cooler pipe unions.

13. Connect oil cooler pipes to oil filter housing and 

tighten unions to 26 Nm (19 lbf.ft).

14. Clean crankshaft gear and wipe end of 

crankshaft.

15. Fit crankshaft gear.

ENGINE - K SERIES KV6

12-3-40 REPAIRS

16. Fit camshaft timing belt.


 + 

 ENGINE - K SERIES KV6, REPAIRS, 

Camshaft timing belt.

17. Fill engine with oil.


 + 

 MAINTENANCE, MAINTENANCE, 

Engine Oil and Filter – KV6.

18. Connect battery earth lead.

Sump - reseal

$% 12.60.38

Remove

1. Disconnect battery earth lead.
2. Remove engine acoustic cover.


 + 

 ENGINE - K SERIES KV6, REPAIRS, 

Cover - engine acoustic.

3. Drain engine oil. 


 + 

 MAINTENANCE, MAINTENANCE, 

Engine Oil and Filter – KV6.

4. Remove 3 bolts securing RH splash shield to 

body and remove shield.

5. Remove 4 nuts securing engine oil cooler to 

mounting bracket and position oil cooler aside.

M12 6614

M12 7916

ENGINE - K SERIES KV6

REPAIRS 12-3-41

6. Remove bolt securing dipstick tube to cylinder 

block.

7. Depress and hold down dipstick collar, remove 

dipstick tube from sump.

8. Remove 3 bolts securing IRD support bracket 

to sump.

9. Using sequence shown and noting their fitted 

position, remove 10 bolts securing sump to 
lower crankcase.

10. Using a mallet, gently tap sump sideways to 

break sealant bond, remove sump.

CAUTION: Do not lever between sump and 
lower crankcase.

Refit

1. Using a suitable cleaning solvent, clean sump 

and mating face on lower crankcase. DO NOT 
use a metal scraper on sealing surfaces.

2. Apply a 2 mm (0.1 in) bead of sealant, Part No. 

STC 4600 along centre of sump flange, then 
spread to an even film using a roller.

CAUTION: To avoid contamination, 
assembly must be completed immediately 
after application of sealant.

3. Position sump, fit bolts and tighten 

progressively in the sequence shown to 35 Nm 
(26 lbf.ft).

4. Fit bolts securing IRD support bracket to sump 

and tighten to 45 Nm (33 lbf.ft).

5. Position engine oil cooler to mounting bracket, 

fit and tighten nuts to 25 Nm (18 lbf.ft).

6. Position dipstick tube to sump and cylinder 

block, fit bolt and tighten to 9 Nm (7 lbf.ft).

7. Fit splash shield and secure with bolts.
8. Fill engine with correct quantity and grade of oil.


 + 

 MAINTENANCE, MAINTENANCE, 

Engine Oil and Filter – KV6.

9. Fit engine acoustic cover.


 + 

 ENGINE - K SERIES KV6, REPAIRS, 

Cover - engine acoustic.

10. Connect battery earth lead.

M12 6672

M12 6675

10

9

1

3

5

8

4

7

2

6

ENGINE - K SERIES KV6

12-3-42 REPAIRS

Switch - oil pressure 

$% 12.60.50

Remove

1. Disconnect battery earth lead.
2. Remove underbelly panel.


 + 

 EXTERIOR FITTINGS, REPAIRS, 

Panel - underbelly.

3. Remove RH front road wheel.

4. Remove 3 bolts securing RH splash shield to 

body and remove shield.

5. Place container below oil pressure switch to 

collect spillage.

6. Disconnect multiplug from oil pressure switch.
7. Remove oil pressure switch and discard 

sealing washer.

Refit

1. Ensure oil pressure switch and mating face is 

clean.

2. Fit oil pressure switch using a new sealing 

washer and tighten to 14 Nm (10 lbf.ft).

3. Connect multiplug to oil pressure switch.
4. Remove oil container from underneath of 

engine.

5. Fit splash shield and secure with bolts.
6. Fit RH road wheel and tighten nuts to 115 Nm 

(85 lbf.ft).

7. Fit underbelly panel.


 + 

 EXTERIOR FITTINGS, REPAIRS, 

Panel - underbelly.

8. Check engine oil level, top-up if  necessary.
9. Connect battery earth lead.

M12 6614


Content   ..  85  86  87  88   ..