Freelander 1. Manual - part 62


  Index      Land Rover     Freelander 1 - service manual 2002 year


Search            


Content   ..  60  61  62  63   ..


Freelander 1. Manual - part 62


ENGINE - K SERIES 1.8

REPAIRS 12-2-21

Valve stem oil seal

$% 12.30.26

Remove

1. Disconnect battery earth lead.
2. Remove camshafts.


 + 

 ENGINE - K SERIES 1.8, REPAIRS, 

Housing - camshafts - reseal & renew oil 
seals.

3. Using a stick magnet, remove tappet from valve 

to be worked on.

CAUTION: Store tappet(s) upright and in 
their fitted order.

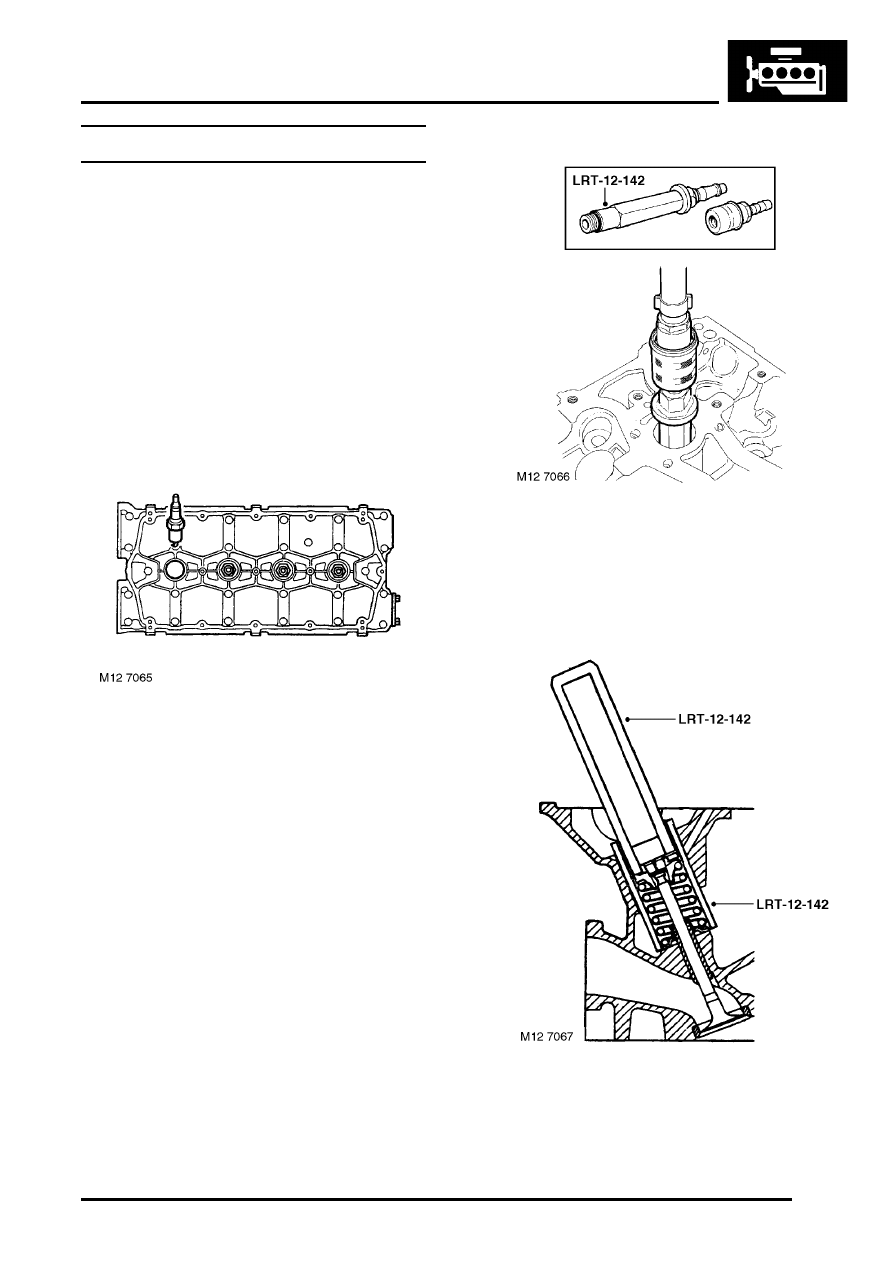
4. Using a 16 mm spark plug socket, remove 

spark plug.

5. Fit and tighten air line adapter tool LRT-12-142 

into spark plug hole.

6. Connect an airline to adaptor and apply air 

pressure.

7. Fit sleeve part of tool LRT-12-142 over valve 

spring.

8. Fit tool LRT-12-142 to valve spring cap and 

strike head of tool firmly with hammer to release 
valve spring collets.

ENGINE - K SERIES 1.8

12-2-22 REPAIRS

9. Remove collets from magnetic end of tool.

10. Remove sleeve.
11. Remove valve spring cap and valve spring.

12. Remove valve stem oil seal using LRT-12-071. 

Discard stem seal.

Refit

1. Lubricate new valve stem oil seal with engine 

oil.

2. Using tool LRT-12-071 fit new valve stem oil 

seal.

3. Fit valve spring and cap.

4. Assemble tool LRT-12-139 over valve.
5. Locate valve spring cap with compressor tool 

LRT-12-139.

6. Compress valve spring until valve stem collet 

groove is level with top face of spring cap.

7. Attach collets to end of a small flat screwdriver 

with grease and locate collets in valve stem 
groove.

8. Release valve spring compressor ensuring 

collets are correctly located in valve spring cap.

9. Remove tool LRT-12-139.

10. Clean tappet and tappet bore.
11. Lubricate tappet and tappet bore with clean 

engine oil.

12. Fit tappet.
13. Disconnect air line and remove adapter tool 

LRT-12-142.

14. Clean spark plug and set gap to 1.00 mm.
15. Fit spark plug and tighten to 25 Nm (18 lbf.ft).
16. Fit camshafts.


 + 

 ENGINE - K SERIES 1.8, REPAIRS, 

Housing - camshafts - reseal & renew oil 
seals.

17. Connect battery earth lead.

ENGINE - K SERIES 1.8

REPAIRS 12-2-23

Engine and gearbox 

$% 12.37.01.99

Remove

1. Disconnect battery earth lead.
2. Remove bonnet.


 + 

 EXTERIOR FITTINGS, REPAIRS, 

Bonnet.

3. Drain cooling system


 + 

 COOLING SYSTEM - K SERIES 1.8, 

ADJUSTMENTS, Coolant - drain & refill.

4. Drain gearbox oil. 


 + 

 MANUAL GEARBOX - PG1, 

ADJUSTMENTS, Gearbox oil - drain and 
refill.

5. Drain fluid from IRD. 


 + 

 INTERMEDIATE REDUCTION 

DRIVE, ADJUSTMENTS, Intermediate 
reduction drive (IRD) fluid - drain & refill - 
Non NAS.

6. If required, drain engine oil.


 + 

 MAINTENANCE, MAINTENANCE, 

Engine Oil and Filter – K1.8.

7. Remove 6 bolts securing RH and LH front 

splash shields and remove shields.

8. Loosen nuts securing lower arm rear 

mountings.

9. Remove 2 bolts securing each lower arm rear 

bush housing.

10. Remove lower arm pivot bush bolts.
11. Release lower arms from beam.

12. Secure LRT-54-026,  to inner joint. Using 

suitable lever, release drive shafts from IRD 
unit and gearbox.

M12 7183

M12 7140

ENGINE - K SERIES 1.8

12-2-24 REPAIRS

13. Remove and discard circlips from drive shafts.

14. Remove 2 nuts securing exhaust front pipe to 

exhaust manifold, release exhaust from 
manifold and discard gasket.

15. Reference mark front propeller shaft for 

reassembly.

16. Remove 6 nuts and bolts securing propeller 

shaft to IRD drive flange.

17. Release propeller shaft from IRD drive flange 

and tie shaft aside.

CAUTION: Care must be taken to support 
the Tripode joint when removed from the 
IRD unit. To avoid damage to gaiter or steel 
can, the joint should not be allowed to fully 
extend or be dropped.

18. Release gear change rod roll pin cover, remove 

and discard roll pin.

19. Release gear change rod from gearbox 

selector shaft.

20. Remove bolt securing gear change steady rod 

to mounting bracket on IRD unit, release steady 
rod from bracket.

21. Remove bolt securing lower engine steady to 

sump mounting bracket.

22. Loosen bolt securing lower engine steady to 

rear beam and pivot engine steady away from 
sump mounting bracket.

M30 1061

M12 7142

M12 7143

M12 7144


Content   ..  60  61  62  63   ..