Discovery 2. Manual - part 719


  Index      Land Rover     Land Rover Discovery 2 - service manual 1999 year


Search            


Content   ..  717  718  719  720   ..


Discovery 2. Manual - part 719


AIR CONDITIONING

REPAIRS

82-39

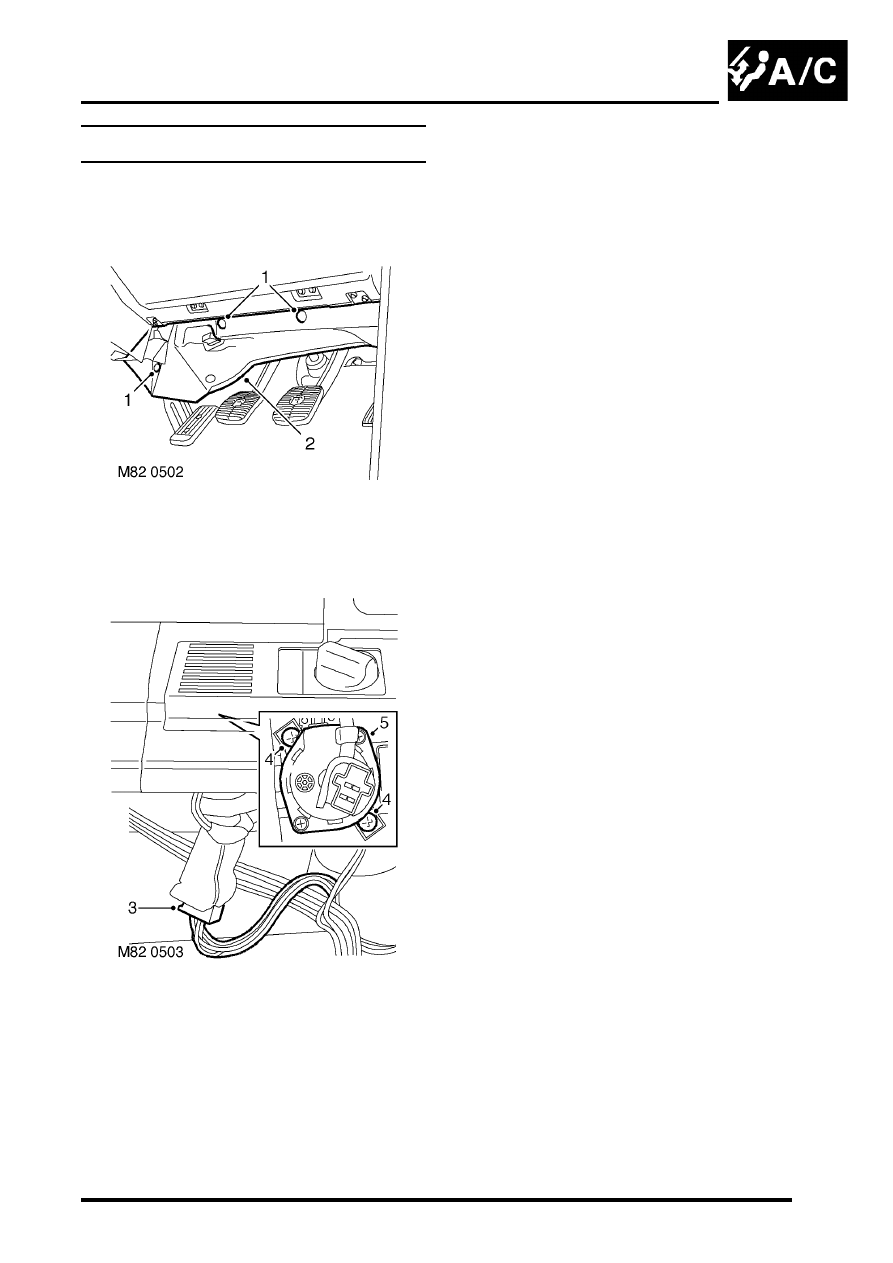
Sensor - air temperature    

$% 82.20.93 

Remove

1. Release 2 quarter turn screws to release fascia 

access panel. 

2. Lower fascia access panel. 

3. Disconnect multiplug from air  temperature 

sensor. 

4. Remove 2 screws securing air temperature  

sensor to fascia. 

5. Remove air temperature sensor from  fascia. 

Refit

1. Position air temperature sensor to  fascia and 

secure with screws. 

2. Connect multiplug to air temperature 
3. Position and secure fascia access panel  with 

quarter turn screws. 

AIR CONDITIONING

82-40

REPAIRS

Evaporator, evaporator thermistor and 
thermal expansion valve (TXV) 

$% 82.25.20 

Remove

1. Remove heater assembly.


 + 

 HEATING AND VENTILATION, 

REPAIRS, Heater assembly - models with 
air conditioning.

2. Remove bulkhead and evaporator pipe seals. 

3. Disconnect multiplug from evaporator 

thermistor. 

4. Remove 2 screws securing temperature control 

servos to evaporator casing. 

5. Remove 2 screws securing coolant pipe 

support bracket to casing. 

6. Remove screws securing coolant pipe saddle 

clamp to casing and remove saddle. 

7. Remove heater matrix. 

8. Remove 5 screws securing casings. 

AIR CONDITIONING

REPAIRS

82-41

9. Remove 12 spring clips securing casings. 

10. Remove evaporator casing and collect  

insulation. 

11. Remove evaporator assembly. 

12. Remove evaporator thermistor. 

AIR CONDITIONING

82-42

REPAIRS

13. Remove covering from TX valve, release 2 

clips securing TX valve to pipe. 

14. Release 2 unions securing TX valve,  remove 

TX valve, remove and discard 'O'  rings. 

15. Release pipe union, remove pipe and  discard 

'O' ring.  

Refit

1. Using a new 'O' ring, position pipe to  

evaporator and tighten union.  

2. Using new 'O' rings, position TX valve. Connect 

pressure pipe union and tighten to 22 Nm (16 
lbf. ft). Connect evaporator pipe and tighten to 
32 Nm (24 lbf.ft).

3. Position TX valve sensor to pipe and  secure 

with clips. 

4. Fit sensor covering. 
5. Fit evaporator thermistor. 
6. Fit evaporator assembly. 
7. Fit insulation to evaporator casing and  fit 

casing. 

8. Secure spring clips. 
9. Fit and tighten casing screws. 

10. Fit heater matrix, ensuring matrix  temperature 

is correctly positioned. 

11. Fit coolant pipe saddle, fit and tighten screws 

securing saddle and pipe bracket. 

12. Fit and tighten temperature servo screws. 
13. Connect multiplug to evaporator thermistor. 
14. Clean any bulk head seal from casing. 
15. Fit bulkhead and evaporator pipe seals. 
16. Fit heater assembly.


 + 

 HEATING AND VENTILATION, 

REPAIRS, Heater assembly - models with 
air conditioning.

Expansion valve - (TXV) - rear

$% 82.26.01 

Remove

1. Depressurise air conditioning system.  


 AIR CONDITIONING, REFRIGERANT 

RECOVERY, RECYCLING AND 
RECHARGING, Refrigerant recovery, 
recycling and recharging.

2. Remove rear lower trim casing.  


 INTERIOR TRIM COMPONENTS, 

REPAIRS, Trim casing - side - loadspace.

3. Remove 5 bolts securing seat support  bracket 

and remove bracket. 

4. Release insulation from TXV pipe unions  and 

sensor. 

5. Remove clip securing sensor to pipe and  

release sensor. 


Content   ..  717  718  719  720   ..