Discovery 2. Manual - part 708


  Index      Land Rover     Land Rover Discovery 2 - service manual 1999 year


Search            


Content   ..  706  707  708  709   ..


Discovery 2. Manual - part 708


HEATING AND VENTILATION

REPAIRS

80-27

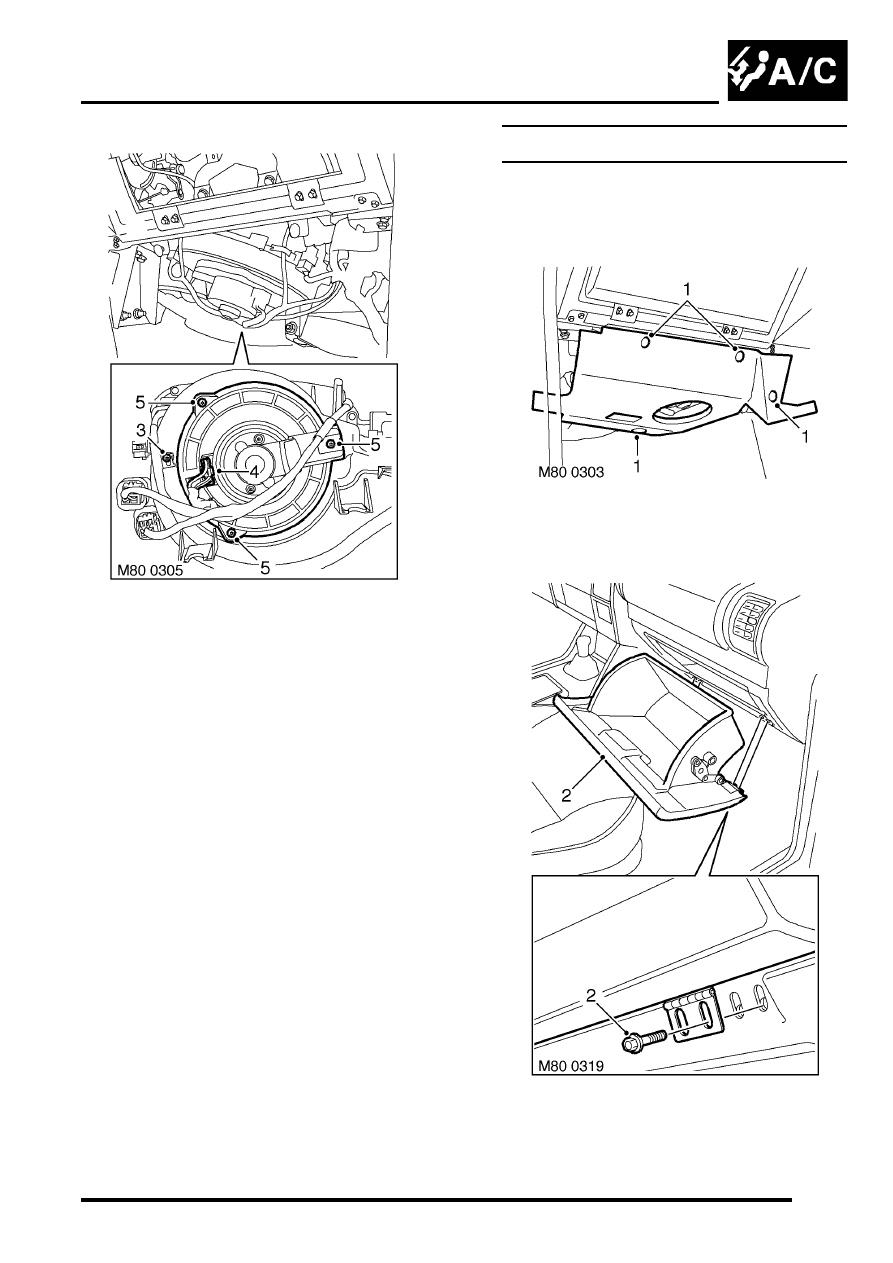
3. Remove screw securing harness to blower  

motor and release harness. 

4. Disconnect multiplug from blower motor. 
5. Remove 3 screws securing blower motor to  

casing and remove blower motor. 

Refit

1. Position blower motor to casing and  secure 

with screws. 

2. Connect multiplug to blower motor. 
3. Position harness and secure clip with  screw. 
4. Fit glove box, align hinges and tighten  screws. 
5. Position toe board and secure with  studs. 

Resistor pack - power resistor A/C  

$% 80.20.17 

Remove

1. Remove 4 studs securing toe board and 

remove toe  board. 

2. Remove 4 screws securing glove box,  release 

catch and remove glove box. 

HEATING AND VENTILATION

80-28

REPAIRS

3. Disconnect multiplug from resistor. 
4. Remove screws securing resistor, release and 

remove resistor. 

Refit

1. Position resistor and secure with screw. 
2. Connect multiplug to resistor. 
3. Position glove box, fit and tighten  screws. 
4. Position toe board and secure with  studs. 

Heater matrix  

$% 80.20.29 

Remove

1. Remove heater assembly.


 HEATING AND VENTILATION, 

REPAIRS, Heater assembly - models with 
air conditioning.

2. Remove 2 screws securing coolant pipe  

saddles and remove saddles. 

3. Loosen screws securing coolant pipes to  

matrix, release clamps and remove coolant  
pipes.  

4. Remove and discard 'O' rings.
5. Remove heater matrix. 

Refit

1. Position heater matrix, using new 'O'  rings fit 

coolant pipes and align clamps. 

2. Fit saddle clamps and secure with screws  
3. Tighten coolant pipe clamp screws. 
4. Fit heater assembly.


 + 

 HEATING AND VENTILATION, 

REPAIRS, Heater assembly - models with 
air conditioning.

HEATING AND VENTILATION

REPAIRS

80-29

Pipe - Heater - Feed 

$% 80.25.07

Remove

1. Remove heater return pipe. 


 + 

 HEATING AND VENTILATION, 

REPAIRS, Pipe - Heater - Return.

2. Release clip securing heater feed hose to 

heater feed pipe and disconnect hose from 
pipe.

3. Remove nut securing heater feed pipe to 

plenum chamber.

4. Press quick release connector and release 

heater feed pipe from plenum chamber.

5. Remove and discard 'O' ring from pipe.

Refit

1. Fit new 'O' ring to heater feed pipe and lubricate 

with castor oil.

2. Secure heater feed pipe to plenum chamber.
3. Fit and tighten nut securing heater feed pipe to 

plenum chamber.

4. Connect heater feed hose to heater feed pipe 

and secure with clip.

5. Fit heater return pipe


 + 

 HEATING AND VENTILATION, 

REPAIRS, Pipe - Heater - Return.

Pipe - Heater - Return 

$% 80.25.12

Remove

1. Drain engine coolant. 


 COOLING SYSTEM - V8, 

ADJUSTMENTS, Drain and refill.

2. Release clip securing heater return hose  to 

heater return pipe and disconnect hose from 
pipe.

3. Remove bolt securing heater return pipe to 

heater feed pipe.

4. Release clips securing engine harness and 

vacuum pipe to heater return pipe.

5. Remove bolt securing heater return pipe to 

cylinder head.

6. Release clip securing engine coolant hose to 

heater return pipe.

7. Release engine coolant hose from heater 

return pipe and collect pipe.

M80 0435

2

3

4

M80 0437

M80 0438

4

4

6

7

5

HEATING AND VENTILATION

80-30

REPAIRS

Refit

1. Connect engine coolant hose to heater return 

pipe and secure with clip.

2. Position heater return pipe to cylinder block and 

secure with bolt.

3. Secure engine harness and vacuum pipe to  

heater return pipe and secure with clips.

4. Fit and tighten bolt securing heater return pipe 

to heater feed pipe.

5. Connect heater return hose to heater return 

pipe and secure with clip.

6. Refill engine coolant. 


 + 

 COOLING SYSTEM - V8, 

ADJUSTMENTS, Drain and refill.

Fuel burning heater - (FBH) - Td5

$% 80.40.01.99

Remove

1. Release fixings and remove battery cover.
2. Disconnect battery earth lead.
3. Clamp feed and return coolant hoses at FBH.
4. Position container to collect spillage.

5. Release clips, disconnect coolant feed and 

return hoses from FBH.

CAUTION: Before disconnecting or 
removing components, ensure the 
immediate area around joint faces and 
connections are clean. Plug open 
connections to prevent contamination.

6. Disconnect 2 multiplugs from FBH.


Content   ..  706  707  708  709   ..