Discovery 2. Manual - part 436


  Index      Land Rover     Land Rover Discovery 2 - service manual 1999 year


Search            


Content   ..  434  435  436  437   ..


Discovery 2. Manual - part 436


ENGINE - V8

REPAIRS 12-2-37

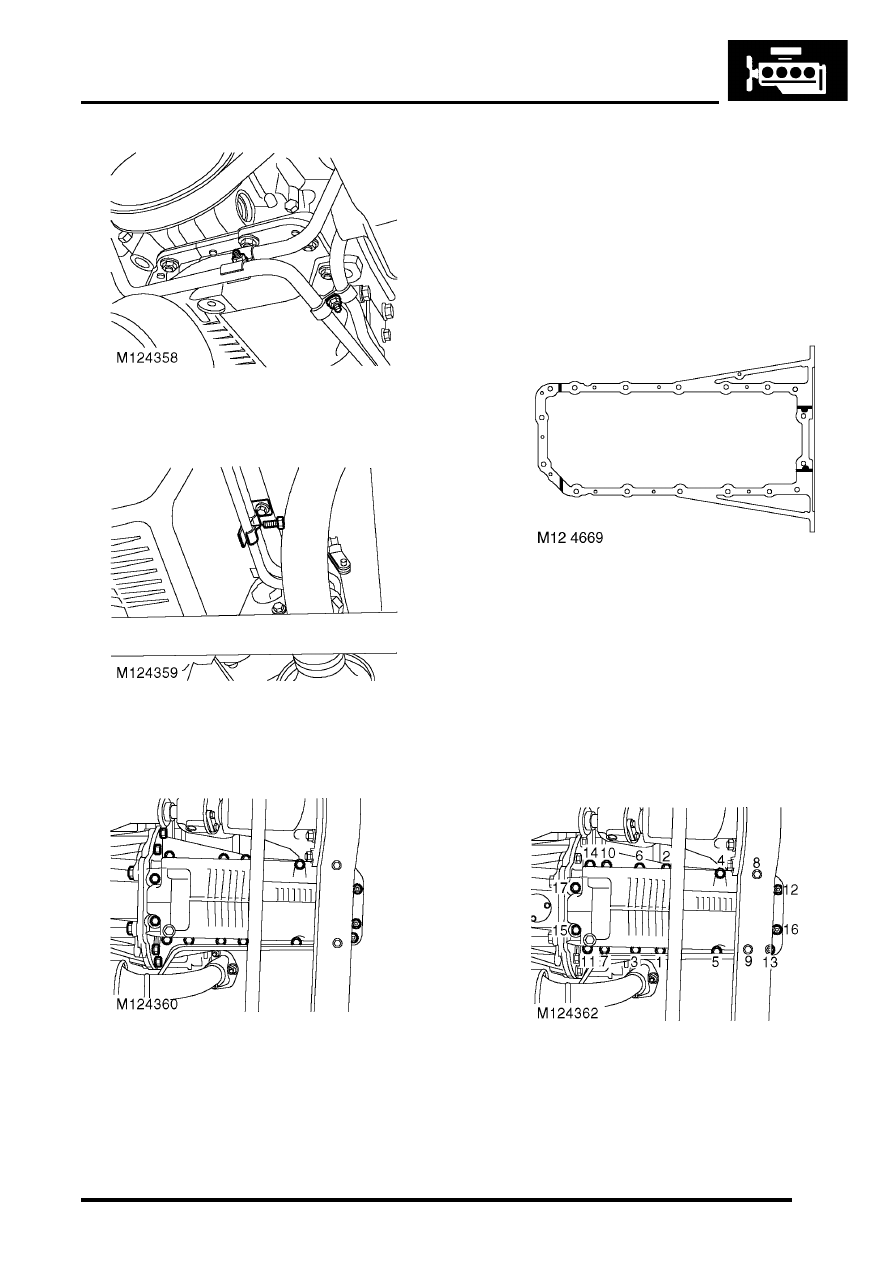
9. Remove 2 clips securing oil cooler  pipes at 

front of sump. 

10. Remove clip securing oil cooler pipes  to side of 

sump. 

11. Remove clip bracket. 

12. Remove 2 forward facing bolts securing  sump 

to bell housing. 

13. Remove 4 rear facing bolts securing sump  to 

bell housing. 

14. Remove 2 bolts in sump recess. 
15. Remove 3 nuts securing front of sump. 

16. Remove 12 bolts securing sump flange  to 

engine. 

17. Manoeuvre sump over front axle and  remove 

sump. 

18. Discard sump gasket. 

Refit

1. Clean all traces of sealant from the sump and 

sump mating faces using a plastic scraper or 
solvent.

2. Apply a 5 mm wide bead of sealant, Part No. 

STC 50550, across the cylinder block to front 
cover joint and across the cylinder block to rear 
main bearing joint. Apply a globule of sealant to 
cover the end of the cruciform seal, (see 
illustration).

3. Fit new gasket, dry, to sump, ensuring that  

locating tags are correctly positioned. 

4. Manoeuvre sump into position, fit and lightly 

tighten 2  bolts to retain sump in place, then fit 
and lightly tighten remainder of bolts.

5. Working in the sequence illustrated, tighten the 

sump bolts to 22 Nm (16 lbf.ft). 

6. Position side clip bracket, fit and  tighten bolt. 
7. Position oil cooler pipe clips, fit and  tighten 

nuts. 

ENGINE - V8

12-2-38 REPAIRS

8. Clean gearbox oil cooler pipe 'O' ring recess  

and mating face. 

9. Lubricate and fit new 'O' ring to gearbox oil 

cooler pipe. 

10. Position pipe and tighten nut. 
11. Lower front of vehicle. 
12. Position cross member to chassis, fit bolts and  

tighten to 25 Nm (18 lbf.ft). 

13. Refill engine oil and fit dipstick. 
14. Connect battery earth lead.
15. Fit battery cover and retain with fixings. 

Switch - oil pressure 

$% 12.60.50 

Remove

1. Release fixings and remove battery  cover. 
2. Disconnect battery earth lead.
3. Raise front of vehicle.

WARNING: Do not work on or under a 
vehicle supported only by a jack. Always 
support the vehicle on safety stands.

4. Remove fixings and remove underbelly  panel. 

5. Disconnect multiplug from oil pressure  switch. 
6. Position container below switch to catch  oil 

spillage. 

7. Remove oil pressure switch and discard  

sealing washer. 

Refit

1. Clean oil pressure switch threads. 
2. Fit new sealing washer to switch. 
3. Fit oil pressure switch and  tighten to 15 Nm (11 

lbf.ft) . 

4. Connect multiplug to oil pressure switch. 
5. Fit underbelly panel and secure with  fixings. 
6. Remove stand(s) and lower vehicle.
7. Connect battery earth lead.
8. Fit battery cover and retain with fixings. 
9. Top up engine oil. 

ENGINE - V8

REPAIRS 12-2-39

Cooler - engine oil 

$% 12.60.68 

Remove

1. Release fixings and remove battery cover. 
2. Release fixings and remove cooling fan cowl. 
3. Remove front grille. 


 + 

 EXTERIOR FITTINGS, REPAIRS, 

Grille - front - up to 03MY.

4. Remove 6 scrivets and remove LH and RH  air 

deflectors from front panel. 

5. Remove nut and move LH horn aside. 

6. Remove 2 bolts securing radiator LH and   RH 

upper mounting brackets to body panel  and 
remove brackets. 

7. Remove 4 screws securing air  conditioning 

condenser LH and RH upper  mounting 
brackets to condenser. 

8. Remove condenser upper mounting brackets  

with rubber mounts from radiator extension  
brackets. 

9. Remove 2 bolts securing LH and RH extension 

brackets to radiator and remove  brackets. 

10. Position absorbent cloth under each  oil cooler 

hose connection to collect oil spillage. 

ENGINE - V8

12-2-40 REPAIRS

11. Push against coupling release rings and  

disconnect both hoses from oil  cooler. 

CAUTION: Always fit plugs to open 
connections to prevent contamination.

12. Remove screw securing oil cooler to  radiator. 
13. Release cooler from its location on  radiator. 
14. Release radiator lower mountings from  

location in chassis and carefully move  radiator 
towards engine sufficiently only  to release 
engine oil cooler  from radiator. 

15. Remove engine oil cooler. 

Refit

1. Fit engine oil cooler to radiator,  engage in 

location and secure with  screw. 

2. Fit radiator to location in chassis. 
3. Ensure connections are clean, then secure  

hoses to oil cooler. 

4. Fit extension brackets to radiator and secure 

with bolts. 

5. Fit brackets with rubber mounts to  extension 

brackets and secure to air  conditioning 
condenser with screws. 

6. Fit radiator upper mounting brackets  and 

secure to body with bolts. 

7. Fit LH horn and secure with nut. 
8. Fit LH and RH air deflectors to front  panel and 

secure with scrivets. 

9. Fit front grille.


 + 

 EXTERIOR FITTINGS, REPAIRS, 

Grille - front - up to 03MY.

10. Fit cooling fan cowl and secure with fixings. 
11. Fit battery cover and secure with fixings. 
12. Top up engine oil. 

Gasket - timing gear cover  

$% 12.65.04 

Remove

1. Remove oil pick-up strainer.


 ENGINE - V8, REPAIRS, Strainer - 

oil pick-up.

2. Remove timing gear cover oil seal.  


 ENGINE - V8, REPAIRS, Seal - cover 

- timing gears.

3. Remove engine oil filter. 


 ENGINE - V8, REPAIRS, Filter - oil.

4. Remove and discard 3 bolts securing coolant 

pump  pulley and remove pulley. 

5. Remove 3 bolts securing PAS pump pulley  and 

remove pulley. 

6. Drain cooling system.


 COOLING SYSTEM - V8, 

ADJUSTMENTS, Drain and refill.


Content   ..  434  435  436  437   ..