Discovery 2. Manual - part 227


  Index      Land Rover     Land Rover Discovery 2 - service manual 1999 year


Search            


Content   ..  225  226  227  228   ..


Discovery 2. Manual - part 227


DOORS

REPAIRS

76-1-3

Door - tail

$% 76.28.19.99 

Remove

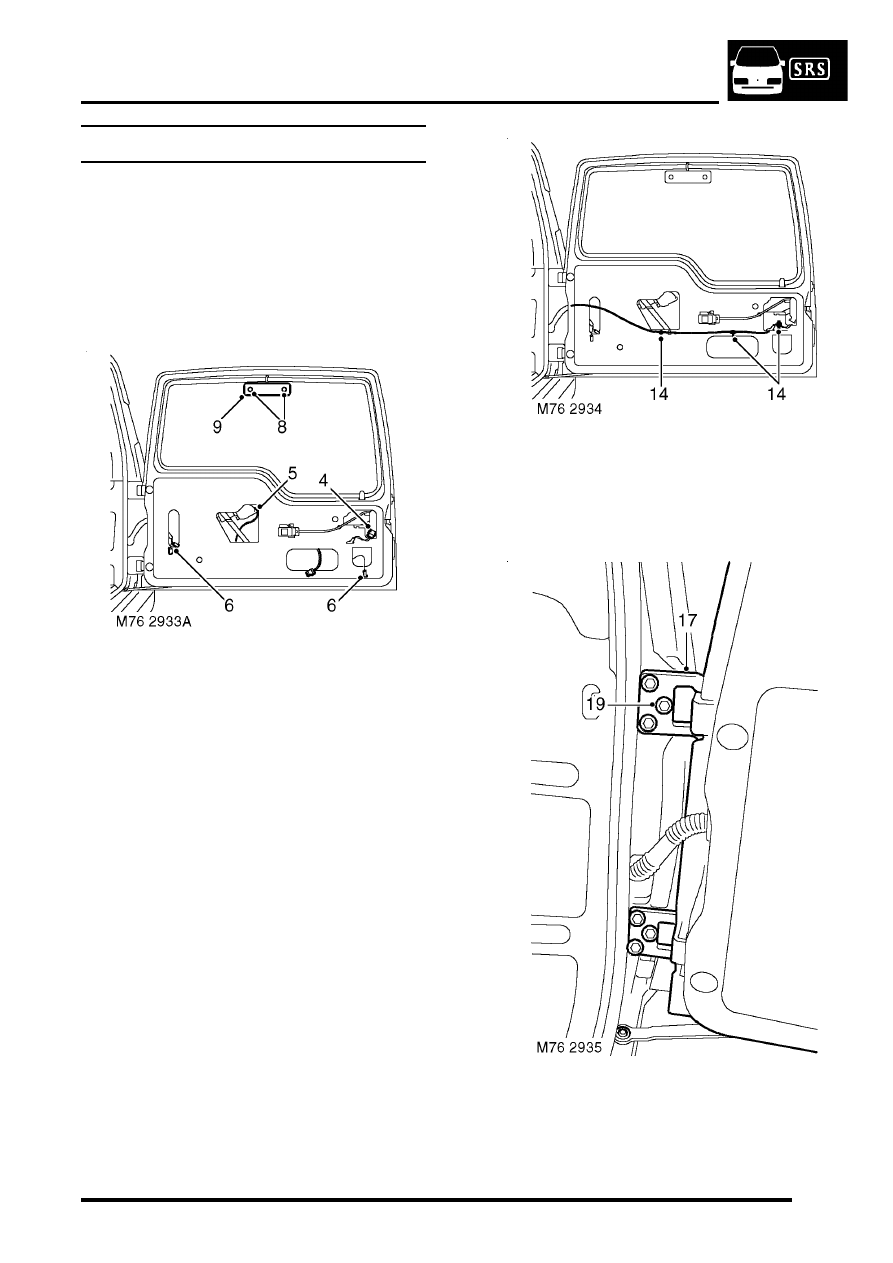
1. Remove spare wheel from tail door. 
2. Remove tail door trim casing. 


 + 

 DOORS, REPAIRS, Trim casing - tail 

door.

3. Carefully release water shedder from tail door. 

4. Disconnect multiplug from door latch. 
5. Disconnect multiplug from rear wiper  motor. 
6. Disconnect 2 Lucars from Heated Rear 

Window (HRW). 

7. Disconnect multiplug from  number plate lamp. 
8. Remove 2 screws securing Centre High  

Mounted Stop Lamp (CHMSL) cover to tail door 
glass.

9. Remove CHMSL cover. 

10. Disconnect 2 Lucars from CHMSL. 
11. Attach draw string to CHMSL wires and  draw 

wires through tail door. Disconnect  draw string 
from wires. 

12. Tape draw string in tail door to retain its 

position. 

13. Release washer tube from rear of wiper  arm. 

14. Release 3 clips securing harness to tail  door. 
15. Release harness sleeve from door outer edge 

and feed harness and washer tube through 
door. 

16. Remove spring clip securing check strap  to tail 

door aperture and collect washer. 

17. Mark position of hinges. 
18. Support the tail door on a jack, using a block of 

wood to protect the door.

19. Remove 6 bolts securing  tail door hinges to 

body and, with assistance, remove tail  door.

DOORS

76-1-4

REPAIRS

Refit

1. Support the tail door on a jack, using a block of 

wood to protect the door.

2. With assistance position door. Fit securing 

bolts but do not tighten at this stage. 

3. Fit washer and spring clip securing  check strap 

to aperture. 

4. Adjust position of tail door in relation  to 

aperture, ensuring gaps around all 4   edges 
are consistent,  and door closes cleanly onto 
dove tail. 

5. When tail door is correctly adjusted, tighten tail 

door hinge bolts to 34 Nm  (25 lbf.ft). 

6. Feed harness and washer tube through outer 

edge of door and connect harness sleeve to 
door.

7. Secure harness to tail door with clips. 
8. Connect washer tube to rear of wiper arm. 
9. Remove tape from draw string and secure  to 

CHMSL wires. 

10. Draw wires through tail door and  connect 

Lucars to CHMSL. 

11. Fit CHMSL cover and secure with screws. 
12. Connect multiplug of number plate lamp. 
13. Connect Lucars to HRW. 
14. Connect multiplug to rear wiper motor. 
15. Connect multiplug to door latch. 
16. Fit water shedder to door.
17. Fit tail door trim casing. 


 + 

 DOORS, REPAIRS, Trim casing - tail 

door.

18. Fit spare wheel to tail door. 

DOORS

REPAIRS

76-1-5

Glass - front or rear door  

$% 76.31.01

Remove

1. Remove door trim casing. 


 + 

 DOORS, REPAIRS, Trim casing - 

front door.
 

 + 

 DOORS, REPAIRS, Trim casing - 

rear door.

2. Carefully release water shedder from  door. 
3. Front door glass only: Remove exterior door 

mirror.  
 

 + 

 EXTERIOR FITTINGS, REPAIRS, 

Mirror - exterior - electric.

4. Remove inner waist seal. 

Front door shown, rear door similar

5. Remove 2 clips securing ends of outer  waist 

seal. 

6. Remove outer waist seal. 
7. Remove 2 bolts securing glass to  regulator. If 

necessary, lower glass to access bolts.

8. Remove bolts securing frame to door. 
9. Remove door frame complete with glass. 

10. Slide out and remove glass from frame. 

Refit

1. Fit glass to frame. 
2. Position frame to door and tighten bolts 

securing front door frame to 10 Nm (7 lbf.ft) and 
bolts securing rear door frame to 22 Nm  (16 
lbf.ft).

3. Secure regulator to glass with  bolts and tighten 

to 6 Nm (4.4 lbf.ft). 

4. Fit inner and outer waist seal and  secure with 

clips. 

5. Front door glass only: Fit exterior door mirror.  


 + 

 EXTERIOR FITTINGS, REPAIRS, 

Mirror - exterior - electric.

6. Fit water shedder to door.
7. Fit door trim casing.


 + 

 DOORS, REPAIRS, Trim casing - 

front door.
 

 + 

 DOORS, REPAIRS, Trim casing - 

rear door.

DOORS

76-1-6

REPAIRS

Quarter light 

$% 76.31.31 

Remove

1. Remove rear door glass. 


 + 

 DOORS, REPAIRS, Glass - front or 

rear door.

2. Remove 2 bolts securing quarter light glass to 

frame. 

3. Remove quarter light glass from frame. 

Refit

1. Fit quarter light glass to frame. 
2. Fit bolts securing quarter light  glass to frame 

and tighten to 10 Nm  (7 lbf.ft). 

3. Fit rear door glass. 


 + 

 DOORS, REPAIRS, Glass - front or 

rear door.


Content   ..  225  226  227  228   ..