Discovery 2. Manual - part 100


  Index      Land Rover     Land Rover Discovery 2 - service manual 1999 year


Search            


Content   ..  98  99  100  101   ..


Discovery 2. Manual - part 100


COOLING SYSTEM - V8

ADJUSTMENTS 26-2-13

ADJUSTMENTS

Drain and refill

$% 26.10.01 

WARNING: Since injury such as scalding could 
be caused by escaping steam or coolant, do not 
remove the filler cap from the coolant expansion 
tank while the system is hot.

Drain

1. Visually check engine and cooling system for 

signs of coolant leaks.

2. Examine hoses for signs of cracking, distortion 

and security of connections.

3. Position drain tray to collect coolant.
4. Remove expansion tank filler cap.
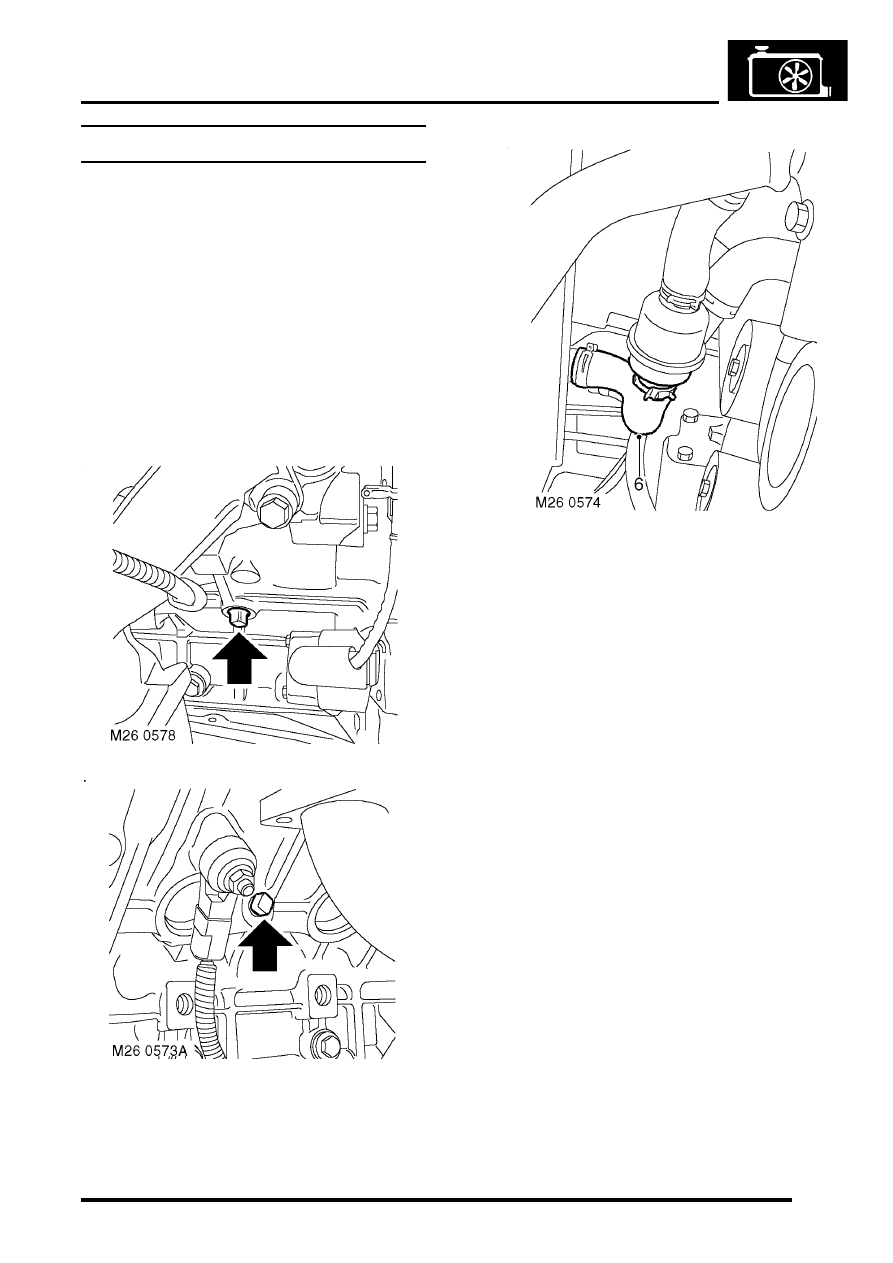
LH side

RH side

5. Remove drain plugs from LH and RH sides of 

cylinder block and allow cooling system to 
drain.

6. Disconnect bottom hose from radiator and 

allow cooling system to drain.

7. Disconnect top hose from thermostat and 

position open end of hose below level of 
coolant pump inlet, to allow coolant to drain 
from the system.

Refill

1. Flush system with water under low pressure. 

Do not use water under high pressure as it 
could damage the radiator.

2. Apply Loctite 577 to cylinder block drain 

plugs.Fit drain plugs to cylinder block and 
tighten to 30 Nm (22 lbf.ft). 

3. Connect bottom hose to radiator and top hose 

to thermostat housing. Secure with hose clips.

4. Prepare coolant to required concentration.


 + 

 CAPACITIES, FLUIDS, 

LUBRICANTS AND SEALANTS, Anti-Freeze 
Concentration.

COOLING SYSTEM - V8

26-2-14 ADJUSTMENTS

5. Release top hose from retaining lugs on the fan 

cowl, leaving the hose to rest on the lugs.

6. Remove bleed screw from top hose.

l

'A' From 03 MY 

l

'B' Up to 03 MY

7. Unclip the bleed hose from the battery box.
8. Remove expansion tank from its mounting 

bracket. Slowly fill the expansion tank with 
coolant, approx. 4 litres (7 pt).

9. Raise the expansion tank approx. 20 cm (8 in) 

vertically, coolant will drain into the system.

10. Refill the coolant expansion tank until a steady 

flow of coolant is emitted from the bleed hole.

11. Fit the bleed screw then, with the expansion 

tank still raised, continue filling the system until 
the coolant level reaches the base of the 
expansion tank filler neck.

12. Fit expansion tank filler cap, fit the expansion 

tank to its mountings and clip the bleed hose to 
the battery box.

13. Refit the top hose into its lugs on the fan cowl.
14. Start and run engine until normal operating 

temperature is reached, and check for leaks.

15. Switch off engine and allow to cool.
16. Check for leaks and top-up coolant to cold level 

mark on expansion tank

COOLING SYSTEM - V8

REPAIRS 26-2-15

REPAIRS

Fan - viscous

$% 26.25.19 

Remove

1. Release fixings and remove battery cover. 
2. Disconnect battery earth lead.
3. Remove upper fan cowl. 

4. Remove viscous fan using tool  LRT-12-093  

and tool LRT-12-094. 

RH thread.

Refit

1. Position viscous fan and tighten using tool 

LRT-12-093 and tool LRT-12-094

2. Fit upper fan cowl. 
3. Connect battery earth lead.
4. Fit battery cover and secure fixings. 

Radiator 

$% 26.40.01 

Remove

1. Remove viscous fan.


 + 

 COOLING SYSTEM - V8, REPAIRS, 

Fan - viscous.

2. Drain cooling system.


 + 

 COOLING SYSTEM - V8, 

ADJUSTMENTS, Drain and refill.

3. Remove 2 screws and remove lower of  fan 

cowl. 

4. Release clip and disconnect bottom hose  from 

thermostat housing. 

5. Release clip and disconnect top hose  from 

radiator. 

6. Remove clip and disconnect bleed hose  from 

radiator. 

7. Remove front grille.


 + 

 EXTERIOR FITTINGS, REPAIRS, 

Grille - front - up to 03MY. 

COOLING SYSTEM - V8

26-2-16 REPAIRS

8. Remove 6 scrivets and remove LH and RH  air 

deflectors from front panel. Disconnect 
multiplug of gearbox oil temperature sensor 
(arrowed).

9. Remove nut and move horn aside. 

10. Remove 2 bolts securing radiator LH and   RH 

upper mounting brackets to body panel  and 
remove brackets. 

11. Remove 4 screws securing air  conditioning 

condenser LH and RH upper  mounting 
brackets to condenser. 

12. Remove brackets with rubber mounts from  

radiator extension brackets. 

13. Position absorbent cloth under each  cooler 

hose to collect oil spillage. 

14. Push against coupling release rings and  

disconnect hoses from gearbox  oil cooler. 

CAUTION: Always fit plugs to open 
connections to prevent contamination.

15. If fitted: Push against coupling release rings 

and disconnect hoses from engine oil cooler.


Content   ..  98  99  100  101   ..