Discovery (1995+): Body Repair Manual - part 45


  Index      Land Rover     Discovery Body Repair Manual - 1995 year


Search            


Content   ..  43  44  45  46   ..


Discovery (1995+): Body Repair Manual - part 45


77

PANEL REPAIRS

14

REPAIR

14. Working from inside vehicle, remove ten bolts

securing body side panel.

15. Starting from ’D’ post and working towards rear

of vehicle, ease body side panel away from body
to break seal. When seal strength has been
completely broken, push outer panel towards
rear of vehicle to disengage rear quarter panel
from ’E’ post, then lift body side and rear quarter
panel assembly clear.

16. Remove fuel filler pipe (RH body side panel

only).

Cleaning/painting

17. Thoroughly clean all traces of existing sealant

from joint faces on monocoque and panel.

18. Paint cleaned surfaces with etch primer.
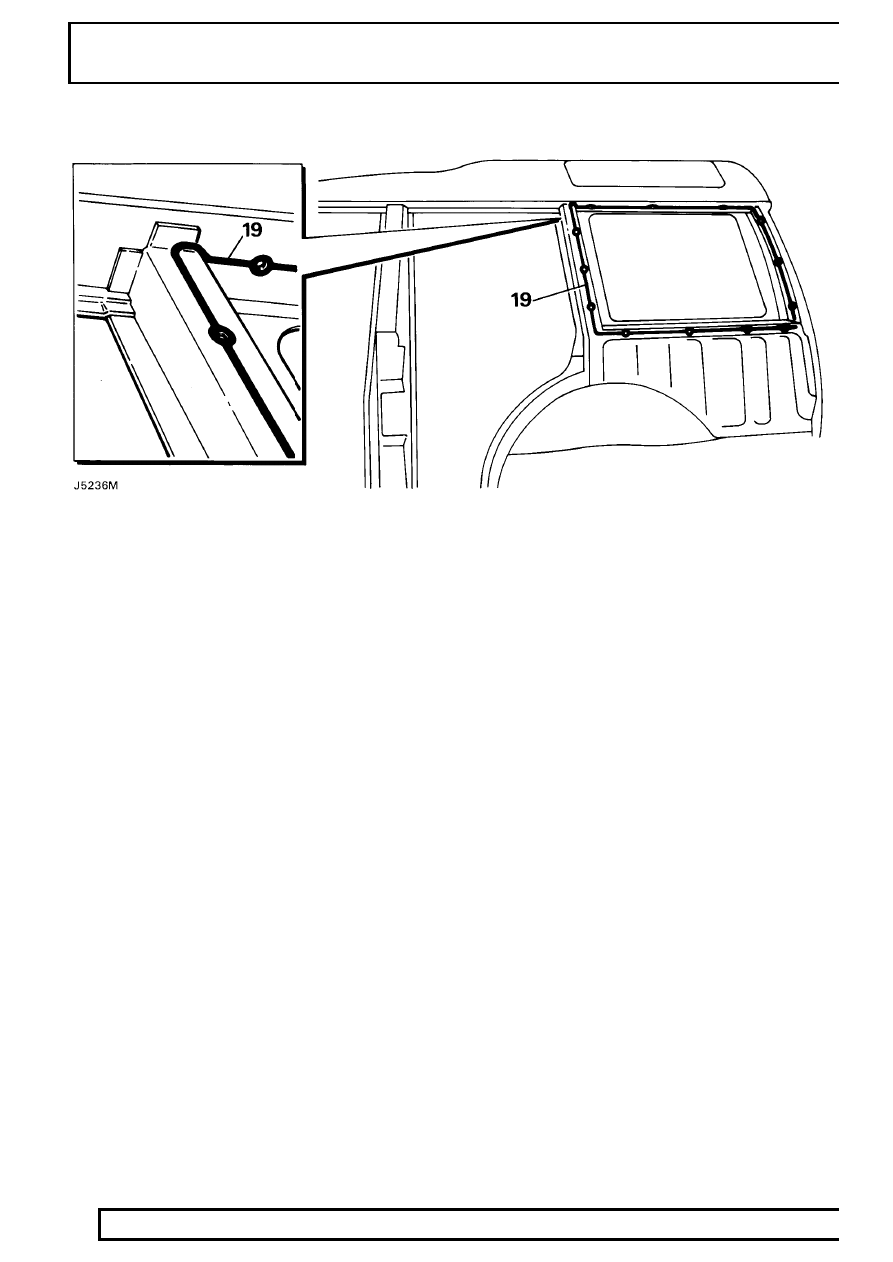
Refit

19. Apply a 6 mm (1/4 in) bead of 3M 8537 Super

Seam Sealer to the areas of the monocoque as
shown.

PANEL REPAIRS

15

REPAIR

20. Apply 20 x 20 mm (13/16 x 13/16 in) squares of

3M 8572 Bolted Panel Sealer to inner faces of
six securing screw holes in rear quarter panel.

21. Locate panel on body. Ensure that sealant is

not displaced. Working from inside vehicle,
loosely fit ten bolts securing panel.

22. Loosely fit countersunk, self-tapping screws

securing rear quarter panel to ’E’ post, and body
side panel to ’D’ post.

23. Loosely fit two bolts inside wheel arch and at

lower edge of body side panel.

24. Starting with three bolts securing upper edge of

panel, evenly tighten bolts to draw panel
upwards to its correct location.

25. Tighten remaining bolts and self-tapping screws,

ensuring a satisfactory seal between the joint
faces.

26. Clean off all surplus sealant from exposed

surfaces.

27. Using thumb pressure, apply 3M 8572 Bolted

Panel Sealer to all corners of window aperture to
seal any uneven contours between panels.

28. Apply a bead of 3M 8684 Flexseal to joint at

lower section of ’D’ post. Work the bead to
produce a smooth, cosmetically acceptable
finish.

29. Paint as necessary.

See Panels,

30. Refit capping to ’D’ post and secure with nuts

and washers.

31. Reverse removal operations to refit fuel filler

pipe and breather (where applicable).

32. Reverse operations 1 to 9 to refit associated

parts.

Rear quarter panel replacement

1. Remove body side panel and rear quarter panel

assembly from vehicle.

See this section.

2. Using a suitable high-speed saw, cut off rear

quarter panel. Make the line of cut approximately
30 mm (1 3/16 in) from joint with flange.

CAUTION: Avoid the use of an air chisel as
this could damage the body side panel.

3. Remove flange from body side panel using a

spot weld cutter.

77

PANEL REPAIRS

16

REPAIR

4. Mark centre line of front flange on the

replacement rear quarter panel. Mark and drill
six 6.5 mm (1/4 in) holes at locations shown.

5. Align and clamp rear quarter panel to body side

panel. Using a marker, transfer locations of the
holes on rear quarter panel flange to body side
panel flange.

6. Remove rear quarter panel and drill six 6,5 mm

(1/4 in) holes at locations marked on body side
panel flange.

7. Remove all roughness from edges of holes as

necessary, and apply etch primer to all bare
metal areas.

8. Bolt panels together using M6 X 20 mm (13/16

in) plated bolts, plain nuts, and spring washers.

9. Refit panel assembly to vehicle.

10. Paint as necessary.

See Panels,

PANEL REPAIRS

17

REPAIR

BODY SIDE CLOSING PANEL (3-DOOR)

Remove

1. Disconnect battery earth lead.
2. Raise side of vehicle.

WARNING: Support on safety stands.

3. Disconnect all ECUs.
4. Disconnect airbags and sensor system.

See

SUPPLEMENTARY RESTRAINT SYSTEM,
Repair.

5. Disconnect alternator.
6. Remove headlining.

See CHASSIS AND

BODY, Repair.

7. Remove treadplate.
8. Remove door aperture weatherstrip.
9. Remove rear outer seat belt.

See CHASSIS

AND BODY, Repair.

10. Remove front seat belt.

See CHASSIS AND

BODY, Repair.

11. Remove rear passenger seat.

See CHASSIS

AND BODY, Repair.

Refit

NOTE: In this operation, the body side
closing panel is replaced in combination
with a body side outer panel.

12. Prepare and clean panel joint faces. Punch or

drill holes in new closing panel for plug welding
as shown.

13. Reverse removal procedure.
14. Remove stands and lower vehicle.


Content   ..  43  44  45  46   ..