Discovery (1995+): Body Repair Manual - part 44
 

  Index      Land Rover     Discovery Body Repair Manual - 1995 year


Search            


Content   ..  42  43  44  45   ..


Discovery (1995+): Body Repair Manual - part 44


77

PANEL REPAIRS

10

REPAIR

Cleaning/painting

18. Thoroughly clean all traces of existing sealant

from joint faces of body monocoque and panel.

19. Paint all cleaned surfaces with etch primer.
20. Apply a 6 mm (1/4 in) bead of 3M 8537 Super

Seam Sealer to the monocoque as shown.

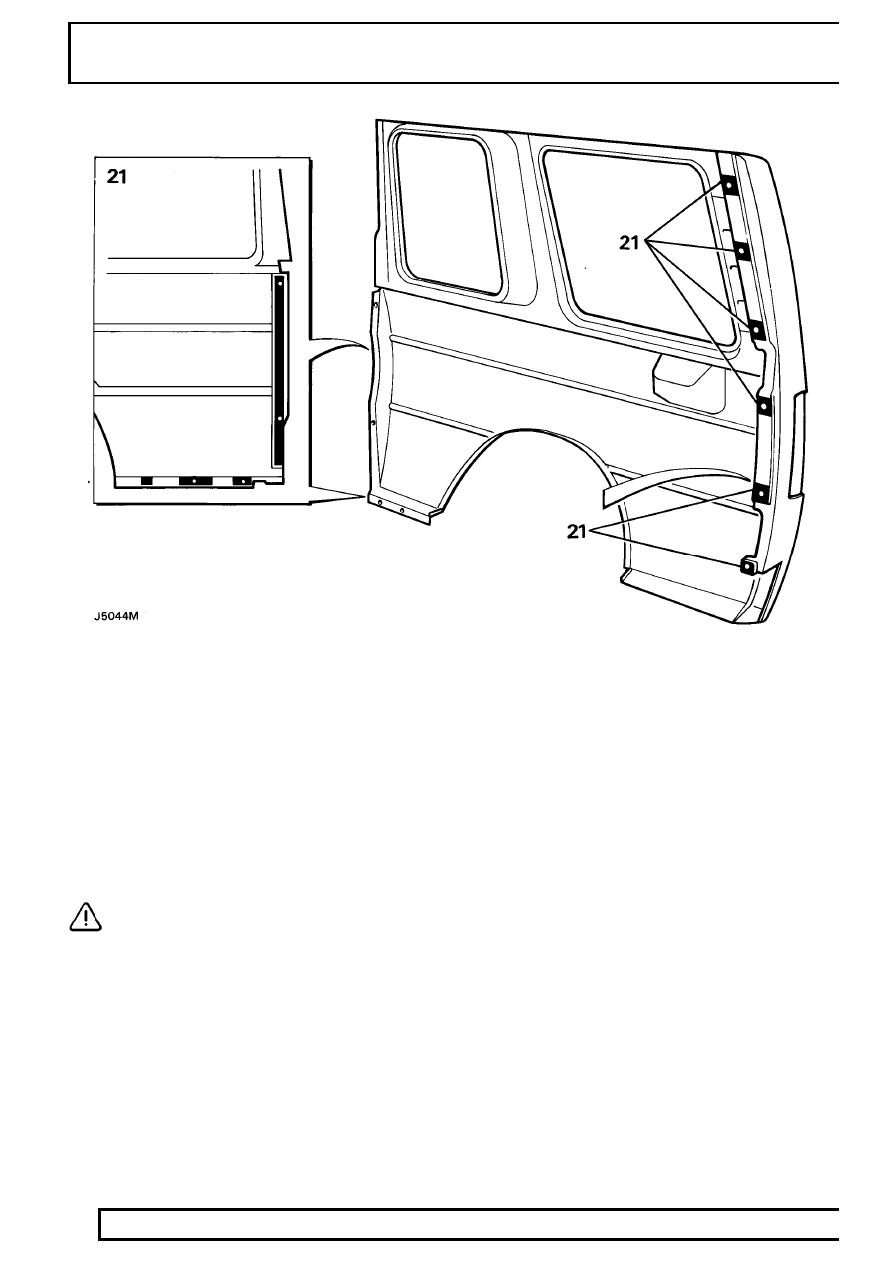
21. Apply 20 x 20 mm (13/16 x 13/16 in) squares of

3M 8572 Bolted Panel Sealer to inner faces of
six securing screw holes in rear quarter panel,
and strips of sealer to inner faces of panel as
shown.

CAUTION: Allow sufficient clearance at
lower edge of panel to prevent the
blockage of drain holes.

Refit

22. Locate panel on body. Ensure that sealant is

not displaced. Working from inside vehicle,
loosely fit twenty-one bolts securing panel.

23. Loosely fit six countersunk, self-tapping screws

securing rear quarter panel to ’E’ post, also three
screws securing lower section of body side
panel.

24. Starting with five bolts securing upper edge of

panel, tighten bolts evenly to draw panel
upwards to its correct location.

25. Tighten remaining bolts and six screws at ’E’

post, ensuring a satisfactory seal between the
joint faces.

26. Clean off all surplus sealant from exposed

surfaces.

PANEL REPAIRS

11

REPAIR

27. Using thumb pressure, apply 3M 8572 Bolted

Panel Sealer to all corners of window apertures
to seal any uneven contours between panels.

28. Apply a bead of 3M 8684 Flexseal to joint at

lower section of ’BC’ post. Work the bead to
produce a smooth, cosmetically acceptable
finish.

29. Paint as necessary.

See Panels,

30. Refit capping to ’BC’ post.
31. Refit fuel filler pipe and breather (where

applicable).

32. Reverse operations 1 to 11 to refit windows and

associated parts.

77

PANEL REPAIRS

12

REPAIR

BODY SIDE PANEL (5-DOOR)

Remove

NOTE: In this operation, the body side
panel is replaced in combination with a
rear quarter panel. The procedure for

replacing a RH or LH body side panel is the same,
except that the fuel filler pipe must be
disconnected when fitting a RH panel.

1. Disconnect battery negative lead.
2. Remove rear bumper assembly.
3. Working inside vehicle, remove fold down rear

seat.

See CHASSIS AND BODY, Repair.

4. Remove rear side and ’D’ post trim panels.

Remove alpine light trim casing.

See CHASSIS

AND BODY, Repair.

5. If renewing body side panel remove rear side

fixed window and mounting rubber.

See

CHASSIS AND BODY, Repair.

6. Remove rear light unit and release rubber boot

from outer panel.

7. Drill out two pop rivets securing rear speaker

mounting bracket to body side panel.

CAUTION: Prior to disconnecting the fuel
filler and breather hoses, check level of
fuel in tank. Drain as necessary to prevent

spillage.

8. Working beneath vehicle, loosen worm drive

clips securing filler and breather hoses, and
disconnect hoses from tank (RH body side panel
only).

9. Disconnect fuel filler negative lead (RH body

side panel only).

PANEL REPAIRS

13

REPAIR

10. Working through the three apertures in ’D’ post,

remove nuts and washers, and detach ’D’ post
capping.

11. Remove three countersunk self-tapping screws

securing body side panel to ’D’ post.

12. Remove six countersunk self-tapping screws

securing rear quarter panel to ’E’ post.

13. Remove two bolts; one inside wheel arch and

one at lower edge of body side panel.


Content   ..  42  43  44  45   ..