Discovery (1995+): Body Repair Manual - part 31
 

  Index      Land Rover     Discovery Body Repair Manual - 1995 year


Search            


Content   ..  29  30  31  32   ..


Discovery (1995+): Body Repair Manual - part 31


76

CHASSIS AND BODY

62

REPAIR

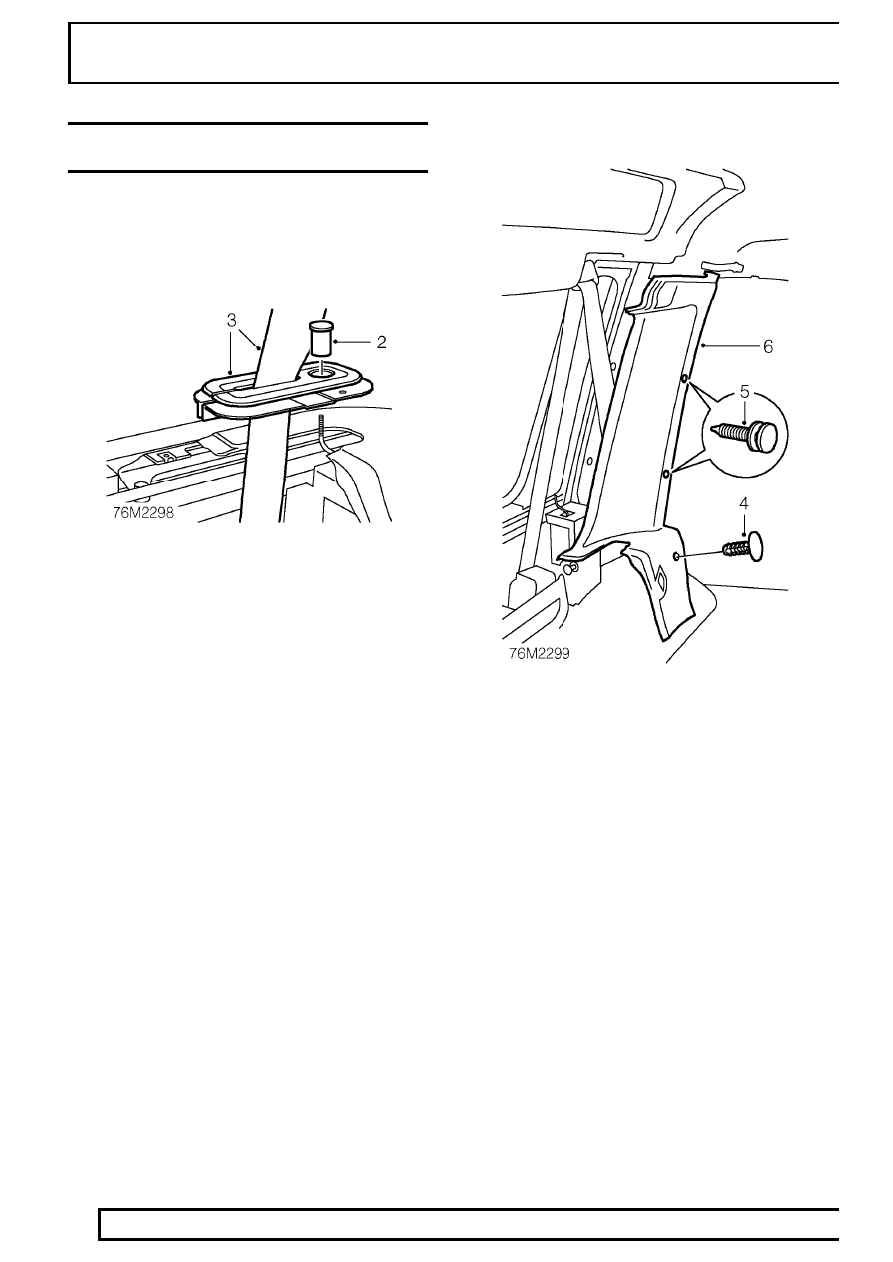
’D’ POST TRIM CASING - LH - WITH REAR AIR
CONDITIONING FITTED - 5 DOOR

Service repair no - 76.13.73/20

Remove

1. Remove rear compartment lower trim panel.

See this section.

2. Remove the squab release button from control

rod.

3. Release rear seat belt from guide and remove

guide.

4. Remove the trim casing retaining stud.
5. Release trim casing from 2 retaining studs.
6. Remove trim casing.

Refit

7. Fit trim casing under alpine light trim, align and

secure retaining studs.

8. Fit trim casing retaining stud.
9. Position trim casing rear edge beneath sixth light

seal flange.

10. Fit seat belt to guide, align squab release control

rod and position guide to trim casing.

11. Fit squab release button to control rod.
12. Fit rear compartment lower trim panel.

See this

section.

CHASSIS AND BODY

63

REPAIR

SWITCH PACK - DASH PANEL CENTRAL LOUVRE
PANEL

Service repair no - 76.46.38

Remove

1. Release switch pack from louvre panel.

2. Disconnect 3 multiplugs from switch pack.
3. Remove switch pack.

Refit

4. Position switch pack.
5. Connect multiplugs to switch pack.
6. Secure switch pack to louvre panel.

GRAB HANDLE

Service repair no - 76.58.30

Remove

1. Release 2 grab handle retaining screw covers.
2. Remove 4 screws securing grab handle to body.
3. Remove grab handle.
4. Collect 2 washers.

Refit

5. Position grab handle and washers.
6. Fit and tighten screws securing grab handle to

body.

7. Secure grab handle retaining screw covers.

76

CHASSIS AND BODY

64

REPAIR

GRAB HANDLE - TAIL DOOR - WITH REAR AIR
CONDITIONING FITTED

Service repair no - 76.58.35/20

Remove

1. Remove ’E’ post trim casing.

See this section.

2. Release foam strip from around grab handle

retaining bolts.

3. Remove 4 bolts securing grab handle to body.
4. Remove grab handle.

Refit

5. Position grab handle, fit bolts and tighten to

10

Nm (7 lbf ft) .

6. Secure foam strip to body.
7. Fit ’E’ post trim casing.

See this section.

HEADLINING - WITH SUN ROOF AND REAR AIR
CONDITIONING FITTED - 5 DOOR

Service repair no - 76.64.14/20

Remove

1. Remove both sun visors.

See this section.

2. Remove 4 grab handles.

See this section.

3. Remove front headlining stowage panel.

See

this section.

4. Remove LH alpine light trim casing.

See this

section.

5. Remove RH alpine light trim casing.

See this

section.

6. Release LH and RH sun visor clip retaining

screw covers.

7. Remove LH and RH sun visor clip retaining

screws.

8. Remove LH and RH clips.

CHASSIS AND BODY

65

REPAIR

9. Remove front sun roof aperture seal.

10. Release rear passenger interior lamp assembly

from headlining panel, disconnect multiplug and
remove lamp.

11. Release rear sun roof switch from headlining

panel, disconnect multiplug and remove switch.

12. Remove 3 vents from headlining.

13. Working through sun roof switch housing,

remove screw securing headlining panel to
body.

14. Remove rear sun roof aperture seal.


Content   ..  29  30  31  32   ..