Discovery (1995+): Body Repair Manual - part 15


  Index      Land Rover     Discovery Body Repair Manual - 1995 year


Search            


Content   ..  13  14  15  16   ..


Discovery (1995+): Body Repair Manual - part 15


75

SUPPLEMENTARY RESTRAINT SYSTEM

20

REPAIR

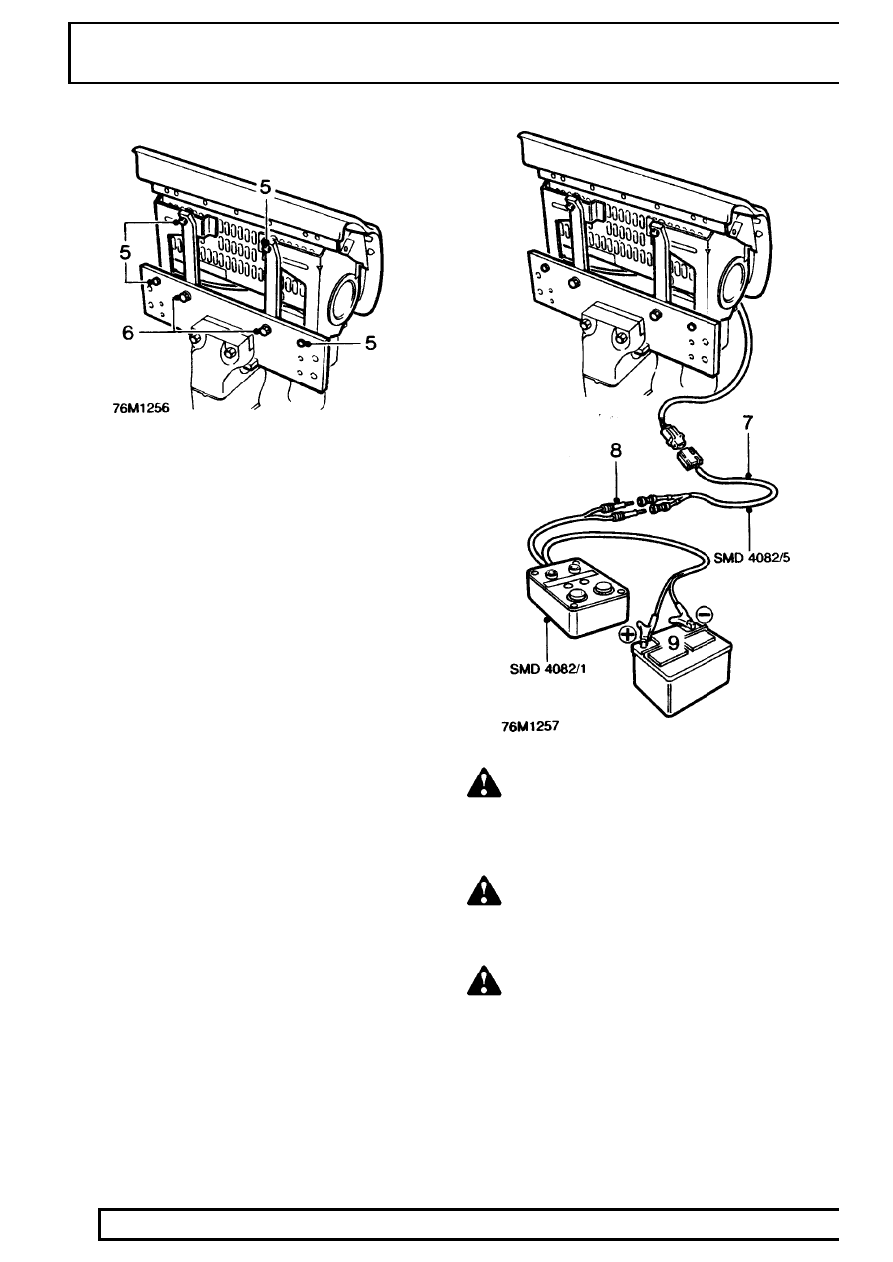
5. Position airbag module to tool SMD 4082/6.

Ensure module is correctly secured using all
fixings.

6. Ensure airbag module mounting brackets are

secure.

WARNING: Ensure tool SMD 4082/1 is not
connected to battery.

7. Connect flylead SMD 4082/5 to airbag module.
8. Connect flylead Smd 4082/5 to tool SMD 4082/1

WARNING: Do not lean over module whilst
connecting.

9. Connect tool SMD 4082/1 to battery.

WARNING: Ensure all personnel are
standing at least 15 metres (50 ft) away
from module.

SUPPLEMENTARY RESTRAINT SYSTEM

21

REPAIR

10. Press both operating buttons to deploy airbag

module.

11. DO NOT return to airbag module for 30 minutes.
12. Using gloves and face mask, remove airbag

module from tool, place airbag module in plastic
bag and seal bag.

13. Wipe down tool with damp cloth.
14. Transport deployed airbag module to designated

area for incineration.

NOTE: DO NOT transport airbag module in
the vehicle passenger compartment. DO
NOT re-use or salvage any parts of the

airbag system.

AIRBAG DIAGNOSTIC CONTROL UNIT - SPS SRS

Service repair no - 76.74.03

Remove

1. Remove centre console.

See CHASSIS AND

BODY, Repair.

2. Disconnect connector from control unit.
3. Remove 2 Torx bolts securing control unit to

body.

4. Remove control unit.

Refit

5. Position control unit to body, fit Torx bolts and

tighten to

10 Nm (7 lbf ft) .

6. Connect control unit connector and secure.
7. Fit centre console.

See CHASSIS AND BODY,

Repair.

8. Check supplementary restraint system using

TestBook.

SUPPLEMENTARY RESTRAINT SYSTEM

1

SPECIFICATIONS, TORQUE

TORQUE VALUES

NOTE: Torque wrenches should be regularly checked for accuracy to ensure that all fixings are
tightened to the correct torque.

Nm (lbf ft)

Airbag module screws

8 (6 lbf ft)

...........................................................................

Steering wheel nut

50 (37 lbf ft)

..............................................................................

Crash sensor screws (Distributed SRS)

10 (7 lbf ft)

..............................................

Control unit

10 (7 lbf ft)

...........................................................................................

CHASSIS AND BODY

1

REPAIR

FRONT DOOR

Service repair no - 76.28.01

Remove

1. Disconnect battery negative lead.
2. Detach the door seal at the lower section of the

’A’ post.

3. Carefully remove the two retaining buttons from

the trim panel on the side of the footwell and
ease out the panel.

4. Disconnect the three multiplugs connecting the

door harness and speaker leads.

5. Detach the convoluted grommet from the ’A’ post

and withdraw the door harness and speaker
leads.

6. Set the door in the open position without

engaging the check stay; then remove the roll
pin securing the check stay at the ’A’ post.

WARNING: Instruction 7 MUST BE carried
out with assistance.

7. Remove the door hinge ’C’ clips from the hinge

posts and with assistance carefully lift the door
from the vehicle.

Refit

8. Refit the door and secure the hinge posts with

the ’C’ clips.

9. Locate the check stay to the bracket on the ’A’

post and secure with a new roll pin.

10. Feed the door harness and speaker leads

through the aperture in the ’A’ post, fully open
the door and reconnect the multiplugs in the
footwell, take up the slack and refit the
convoluted grommet to the ’A’ post.

11. Refit the footwell side panel.
12. Check the location of the door and the operation

of the door lock. If necessary, adjust the door
and striker.

13. The door can be adjusted up and down or in and

out of the opening by loosening the six screws
securing the hinges to the door, and by the
addition or removal of shims between the hinge
and door.

14. The door lock striker can be adjusted by

loosening the striker and moving it in the
appropriate direction or by adding and removing
spacing washers between the striker and ’B’
post.


Content   ..  13  14  15  16   ..