Land Rover Discovery. Manual - part 104


  Index      Land Rover     Land Rover Discovery - service 1995-1996 year


Search            


Content   ..  102  103  104  105   ..


Land Rover Discovery. Manual - part 104


TRANSFER GEARBOX

1

REPAIR

LT230T TRANSFER GEARBOX

Service repair no - 41.10.25

Remove

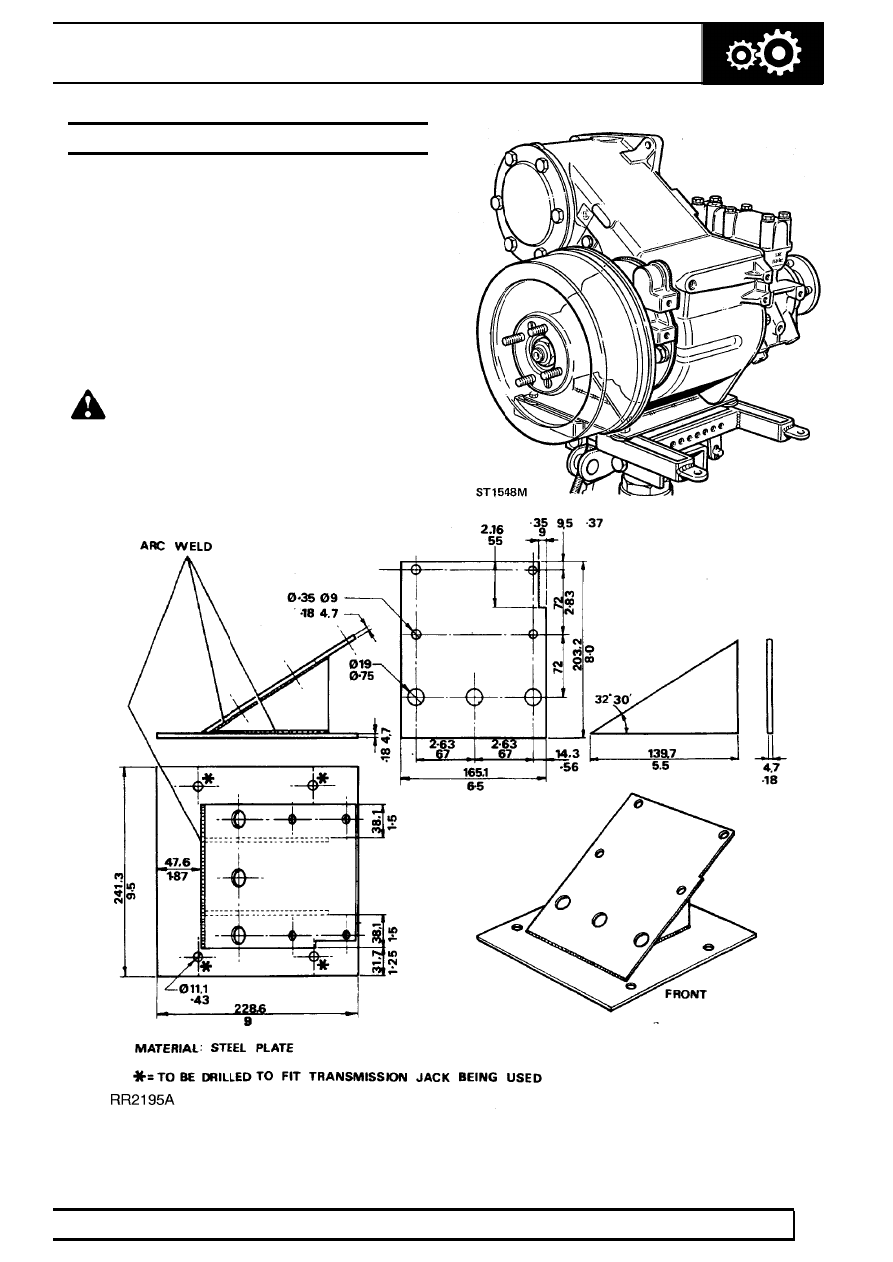
Adaptor plate for removing transfer gearbox

The transfer gearbox is removed from underneath the
vehicle. Using a transmission hoist with an adaptor
plate for securing the transfer gearbox to the hoist.
The adaptor can be manufactured locally to the
drawing below.

WARNING: When using a transmission
hoist it is essential to follow the hoist
manufacturer’s instructions.

41

TRANSFER GEARBOX

2

REPAIR

Remove

1. Site vehicle on a ramp [hoist].
2. Disconnect battery negative lead.
3. Remove fan cowl from radiator.
4. Remove transfer gear lever knob and gaiter.
5. Raise vehicle on ramp [hoist].
6. Drain oil and refit plug.

7. Detach heat shield at front exhaust pipe to

manifold.

8. Disconnect electrics to Lambda sensors.
9. Remove catalytic converter assembly.

10. Remove chassis crossmember from under

gearbox.

11. Remove heat shield from speedometer cable at

transfer gearbox.

12. Remove clamp and disconnect speedometer

cable from transfer gearbox. Tie cable to one
side.

13. Mark for reassembly then disconnect propeller

shaft to output flange, tie to one side.

14. Repeat on front propeller shaft to output flange.
15. Remove bolts retaining silencer front and rear

securing brackets and tie silencer to one side.

16. Place four 30mm long spacers between top of

hoist and adaptor plate, at securing points, and
secure adaptor plate to hoist.

17. Remove four central bolts from transfer gearbox

bottom cover, move hoist into position and
secure adaptor plate to transfer gearbox.

18. Adjust hoist to take weight of transfer gearbox.
19. Remove tie bar, transfer gearbox to main

gearbox.

20. Remove nuts and bolts securing right transfer

gearbox mounting bracket to chassis.

21. Repeat for left mounting bracket. Removal of

these fixings will also free speedometer
transducer bracket.

22. Remove right side mounting bracket to flexible

mounting rubber.

23. Lower hoist until rear brake drum clears

passenger footwell. Check engine does not
crush any components while lowering.

24. Loosen park brake adjustment nut.
25. Remove park brake drum.
26. Remove park brake assembly complete from

rear output flange.

27. Disconnect leads from transfer gearbox

temperature sensor and differential lock warning
light switch.

28. Remove banjo bolt from breather pipe, retrieve

sealing washers and lay pipe aside.

29. Remove split [cotter] pin and washers securing

differential lock to connecting rod and disconnect
rod from lever.

30. Select low range transfer gearbox position.
31. Remove high/low rod lower lock nut and remove

rod from yoke.

32. Position hoist jack channel under bell housing.
33. Using wooden block support the main gearbox

and bell housing.

34. Remove upper and lower bolts securing transfer

gearbox to main gearbox.

35. Fit guide studs 18G 1425 to main gearbox and

move transfer gearbox rearwards to detach.

TRANSFER GEARBOX

3

REPAIR

Refit

36. Select ’P’ in main gearbox, with low range and

differential lock selected in transfer gearbox.

37. Secure transfer gearbox to adaptor plate on

lifting hoist.

38. Ensure joint faces of transfer and main

gearboxes are clean and guide studs 18G 1425
are fitted.

39. Raise hoist until transfer gearbox can be located

over guide studs to main gearbox. At the same
time locate high/low lower link to yoke.

40. Remove guide studs and secure transfer

gearbox to main gearbox.

41. Complete refitting by reversing removal

procedure, noting the following important points.

42. After removal of adaptor plate from transfer

gearbox, clean threads of four bottom cover
bolts, coat threads with Loctite 290 and fit
together with spring washers. Tighten to

25Nm

43. Add correct grade of oil to transfer gearbox to oil

level plug hole.

See LUBRICANTS, FLUIDS

AND CAPACITIES, Information,
Recommended Lubricants and Fluids

44. Check main gearbox oil level.
45. Check operation of parking brake and adjust as

necessary.

See SECTION 10, Maintenance,

Vehicle Interior

41

TRANSFER GEARBOX

4

REPAIR

SHIFTLOCK SOLENOID/NEUTRAL SWITCH

Service repair no - 41.10.63/64

This is sited on top of the transfer gearbox. Access to
the component is gained through the transmission
tunnel aperture.

Remove

1. Disconnect battery negative lead.
2. Remove centre console.

See CHASSIS AND

BODY, Repair, Centre Console

3. Remove rear passenger heater air ducts.
4. Remove insulation pad.
5. Remove four screws and remove main gear

lever assembly.

6. Drill out rivets and remove tunnel blanking plate.
7. Disconnect solenoid multiplug.
8. Remove four retaining bolts and remove shiftlock

solenoid cover.

9. Remove solenoid and spring washer.

10. Clean joint sealant from mating faces.

KEY

1. Gearlever
2. Transmission tunnel aperture
3. Transfer gearbox
4. Bolt
5. Switch
6. Solenoid
7. Electrical connections

Refit

1. Apply Hylosil or equivalent sealant to mating

faces.

2. Ensure solenoid plug lead is located in cover

recess.

3. Reverse removal procedure.
4. Fit four solenoid bolts. Tighten to

9Nm.

Neutral switch, audible alarm

1. Disconnect neutral switch electrical plug.
2. Remove neutral switch from transfer box.

Refit

3. Apply Hylomar PL32/L20 or SL500 sealant to

neutral switch.

4. Reverse removal procedure.
5. Switch - Tighten to

25Nm.


Content   ..  102  103  104  105   ..