Land Rover Discovery. Manual - part 98
33
CLUTCH
2
FAULT DIAGNOSIS
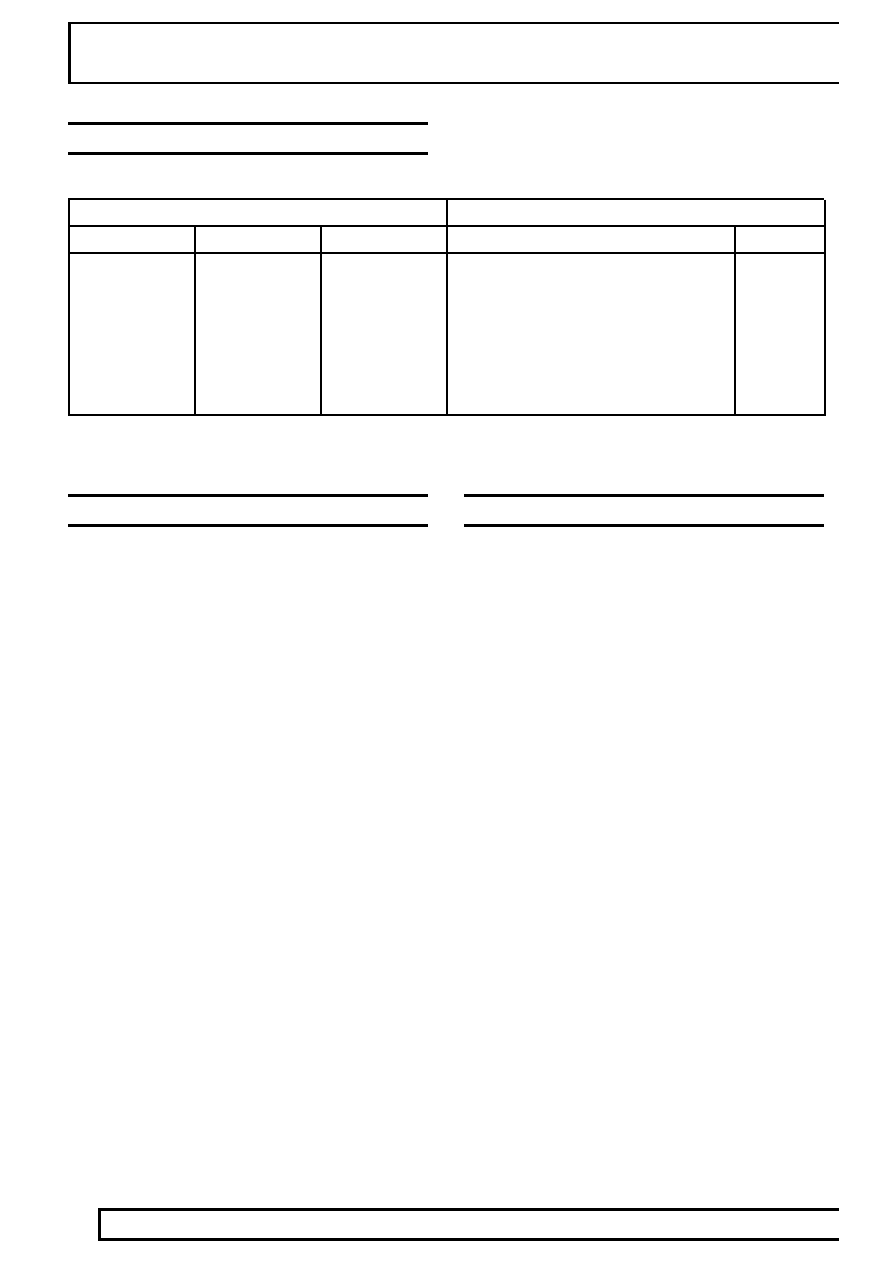
FAULT/SYMPTOM CHART
Symptoms
Slip
Spin/Drag
Judder/Fierce
Fault
Item
*
*
*
Worn or oil on clutch linings
2
*
*
*
Mechanical damage
4 5 6 7 8
*
*
Distorted clutch plate
2
*
Failed or air in hydraulic system
12 13
*
*
Primary shaft tight fit in crankshaft bush
15 17
*
Clutch splines sticking
2 15
*
Weak clutch plate springs or insecure/worn
engine/gearbox mountings
6
*
Insecure/worn propeller shafts
*
Insecure/worn suspension components/rubber
bushes
For items refered to in this chart.
See Description and operation, Description
CLUTCH NOISE - MECHANICAL FAULTS
Noise from clutch or gearbox in neutral, which
disappears when clutch is depressed.
Suspect gearbox input/primary shaft bearings.
See MANUAL GEARBOX, Fault diagnosis,
Manual Gearbox
- Noise from gearbox in neutral, which
disappears when clutch is depressed
Noise from clutch or gearbox in neutral, which
changes tone or becomes worse when the clutch
is depressed.
Suspect worn release bearing.
Knocking/rattling from clutch or gearbox in
neutral, which is reduced or disappears when the
clutch is depressed.
Suspect worn/weak release lever retainer or
clutch unit.
Noise from clutch or gearbox in neutral, which
disappears when clutch is depressed.
Suspect gearbox fault.
See MANUAL GEARBOX, Fault diagnosis,
Manual Gearbox
- Noise from gearbox in neutral, which
disappears when clutch is depressed.
HYDRAULIC FAULTS
Unable to dis-engage clutch, little or no pedal
resistance.
1. Check condition, specification and level of fluid.
2. Check pipes and cylinders for leaks.
3. Check that air vent in reservoir lid is clear.
Suspect faulty master cylinder if no fluid leaks
present.
See Repair, Master Cylinder
Spongy pedal operation
1. Check condition, specification and level of fluid.
2. Check that air vent in reservoir lid is clear.
Suspect air in fluid.
See Repair, Bleed Hydraulic System
Clutch is difficult to dis-engage and/or does not
immediately re-engage when pedal is released.
1. Check condition, specification and level of fluid.
2. Check that air vent in reservoir lid is clear.
Suspect pedal pivot, master cylinder or slave
cylinder seizure.
See Repair, Master Cylinder