Land Rover Discovery. Manual - part 37


  Index      Land Rover     Land Rover Discovery - service 1995-1996 year


Search            


Content   ..  35  36  37  38   ..


Land Rover Discovery. Manual - part 37


4.0 V8

11

REPAIR

ROCKER COVER GASKET - RIGHT HAND

Service repair no - 12.29.41 - RH Cover Gasket

1. Depressurise fuel system.

See FUEL SYSTEM

SFI, Repair, Fuel System - Depressurise

2. Disconnect battery negative lead.

3. Drain cooling system.

See COOLING SYSTEM

V8, Adjustment, Coolant

NOTE: Leave hose disconnected.

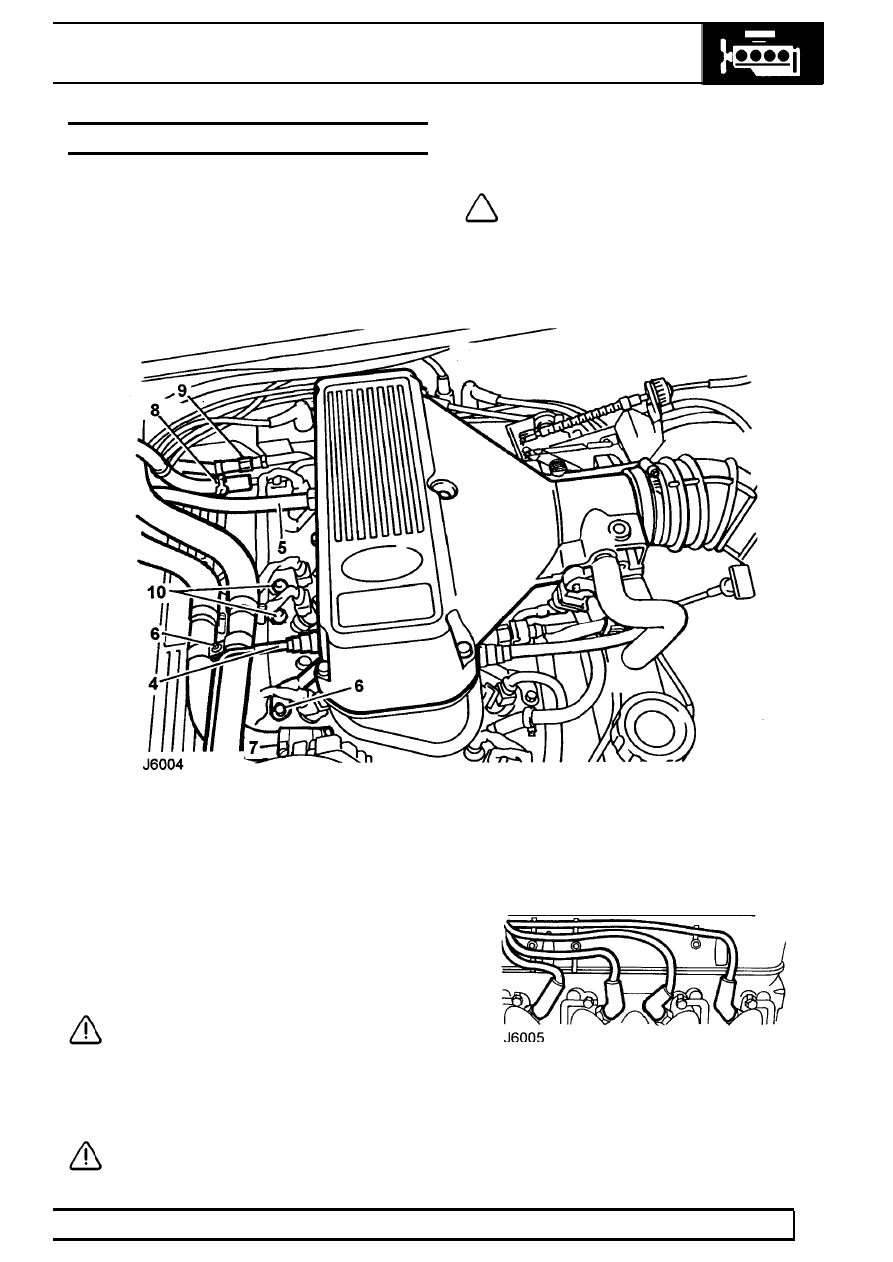
4. Disconnect purge pipe from plenum chamber

hose.

5. Disconnect breather pipe from rocker cover.
6. Remove bolt securing coolant pipe brackets and

nut securing bracket to manifold.

7. Loosen hose clip and disconnect coolant return

hose from pipe.

CAUTION: Plug connection.

8. Loosen clip and disconnect fuel return hose from

pipe.

9. Disconnect fuel hose from injector pipe.

CAUTION: Use 2 spanners.

10. Remove 2 nuts securing engine harness

brackets to manifold.

11. Release 4 ht leads from 2 brackets on rocker

cover.

12

ENGINE

12

REPAIR

12. Remove 4 bolts securing rocker cover to cylinder

head.

13. Remove rocker cover.
14. Remove and discard rocker cover gasket.

Refit

15. Clean mating faces between rocker cover and

cylinder head using Bostick cleaner 6001 or
equivalent. Allow to dry.

NOTE: Gasket fits one way round only. It
must be fitted accurately, first time.
Subsequent movement will destroy

bonding.

16. Apply a thin coating of impact adhesive (Bostick

1775 or equivalent) to mating faces of rocker
cover seal face and new gasket. Use a brush to
ensure an even film. Allow adhesive to become
touch dry.

17. Place one end of gasket into cover recess with

edge firmly against recess wall, holding
remainder of gasket clear. Work around cover,
pressing gasket into place ensuring edge firmly
contacts recess wall.

CAUTION: Allow cover to stand for thirty
minutes before fitting.

18. Fit rocker cover to cylinder head, ensure short

screws are inboard. Tighten to

9 Nm.

19. Connect fuel feed and return hoses.
20. Refit ht leads into retaining brackets.
21. Secure engine harness to brackets.
22. Connect coolant pipes to hoses and secure

brackets.

23. Connect breather hose to rocker cover.
24. Connect purge hose to plenum chamber.
25. Connect bottom hose to radiator.
26. Refill cooling system.

See COOLING SYSTEM

V8, Adjustment, Coolant

27. Reconnect battery negative lead.

4.0 V8

13

REPAIR

CRANKSHAFT REAR OIL SEAL

Service repair no - 12.21.20

Remove

1. Manual vehicles: Remove flywheel.

See

ENGINE 3.9 V8, Repair, Flywheel

2. Automatic vehicles: Remove drive plate.

See

ENGINE 4.0 V8, Repair, Drive Plate -
Automatic

3. Remove oil seal from location.

CAUTION: Do not damage seal location or
running surface on crankshaft.

Refit

4. Ensure both seal location and running surface

on crankshaft are clean.

5. Ensure mating faces of flywheel and crankshaft

are clean.

6. Lubricate seal guide LRT-12-095 with clean

engine oil. Position over crankshaft boss.

7. Lubricate oil seal lip.
8. Position seal squarely. Remove guide.
9. Drift seal into location using LRT-12-091.

10. Manual vehicles: Fit flywheel.

See ENGINE 3.9

V8, Repair, Flywheel

11. Automatic vehicles: Fit drive plate.

See

ENGINE 4.0 V8, Repair, Drive Plate -
Automatic

12

ENGINE

14

REPAIR

DRIVE PLATE - AUTOMATIC

Service repair no - 12.53.13

Remove

1. Remove automatic gearbox and torque

converter.

See AUTOMATIC GEARBOX,

Repair, LT230T Transfer Gearbox with
Automatic Gearbox Assembly - V8i

2. Remove 4 clamp ring bolts. Collect clamp ring.
3. Remove flexible drive plate/starter ring gear

assembly from hub aligner.

4. Remove 6 screws from hub aligner. Remove hub

aligner from crankshaft. Collect shim.

5. Check drive plate for distortion or cracks. Check

starter ring gear for chipped or broken teeth. If
either component shows signs of damage, fit a
new assembly.

Refit

6. Ensure all mating surfaces are clean.
7. Fit shim and hub aligner to crankshaft.
8. Fit hub aligner screws. Tighten to

85 Nm.

9. Fit drive plate and clamp ring.

10. Fit clamp ring bolts. Tighten to

45 Nm.

NOTE: It is only necessary to reshim the
drive plate when a new crankshaft or hub
aligner is fitted.

11. Fit automatic gearbox and converter assembly.

See AUTOMATIC GEARBOX, Repair, LT230T
Transfer Gearbox with Automatic Gearbox
Assembly - V8i

ROCKER SHAFT - OVERHAUL

Service repair no - 12.29.29 - Rocker shaft -
overhaul

See Overhaul Manual 4.0/4.6 V8 Engine

TAPPETS - ENGINE SET

Service repair no - 12.29.57 - Tappets - engine set

See Overhaul Manual 4.0/4.6 V8 Engine


Content   ..  35  36  37  38   ..