Defender 90 / 110 / 130. Manual - part 143
ELECTRICAL
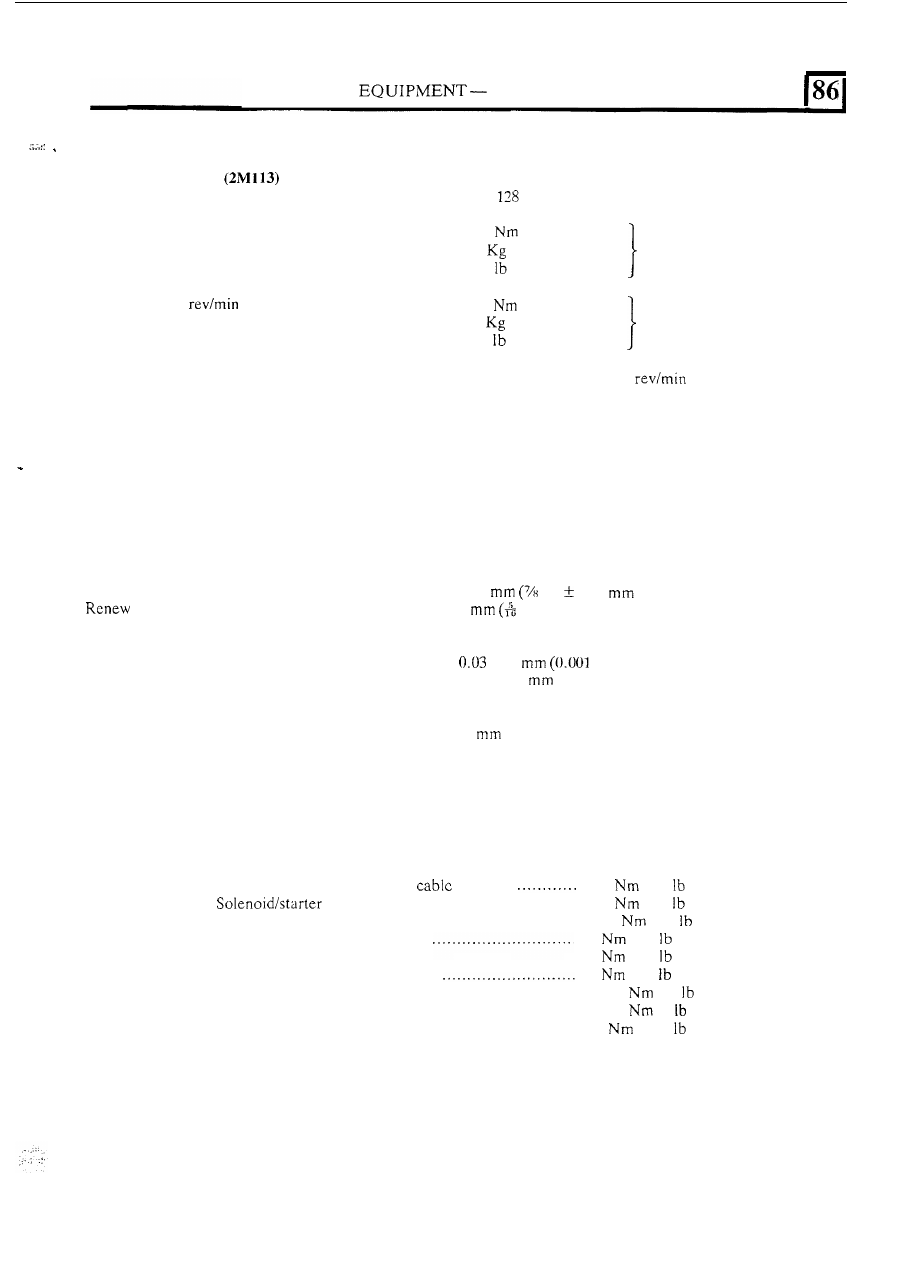
DIESEL ENGINE
STARTER MOTOR
TECHNICAL DATA
. .
Starter performance
Minimum battery requirement
................................
12
V
Ah (20 hr rate) battery
at least
70%
charged.
........................................................
940
A max at 6.5 V min
Lock torque
39.4
4.0
m
29.0
f t
.........................................
540 A max at
8.0 V min
Torque at 1000
14.9
1.5
m
11.0 ft
Light running current ............................................
100 A max at 5,000
-
7,500
Solenoid Windings Resistance
Operating winding resistance
..................................
measured between small unmarked Lucar terminal
and main terminal marked
‘STA’.
0.145
-
0.165
ohms
Hold-on winding resistance
....................................
measured between small unmarked Lucar terminal
and earth point on solenoid body.
0.46
-
0.56 ohms
Brushgear
New brush length
.................................................
brush
at
...................................................
22.2
in)
0.50
(0.020 in)
8
in)
Armature end-float
Cast
aluminium intermediate bracket .......................
Pressed steel intermediate bracket ...........................
-
1.4
-0.056 in)
0.03
-
1.55
(0.001
-
0.061 in)
Commutator
Commutator minimum diameter .............................
38
(1.5 in)
...
TIGHTENING TORQUES
Solenoid main
‘BAT’ terminal
fixing nut
link terminal fixing nuts
...................
Solenoid end cover fixing screws
..............................
Solenoid unit fixing screws
........
Brush plate fixing screws .......................................
Starter earth
stud,
nuts
...............
Pole shoe fixing screws
..........................................
Through bolts
.....................................................
Eccentric pivot pin locknut
.....................................
3.9
(2.9
ft)
3.5
(2.6
ft)
2.82
(2.1
ft)
6
(4.5
ft)
7
(5.0
ft)
6
(4.5
ft)
40.68
(30 ft)
10.84
(8
ft)
20
(15.0
ft)
33