Defender 90 / 110 / 130. Manual - part 64


  Index      Land Rover     Defender 90 / 110 / 130 - service repair manual


Search            


Content   ..  62  63  64  65   ..


Defender 90 / 110 / 130. Manual - part 64


COOLING 

SYSTEM 

- .  

ENGINE PROTECTION 

DRAIN AND 

FILL 

ENGINE COOLING SYSTEM 

. .  

To  prevent  corrosion  of 

the  aluminium  alloy  engine 

parts  it  is  imperative  that  the  cooling  system  is  filled 
with  a  solution 

of  clean  water  and  the  correct  type  of 

anti-freeze, winter and 

or water  and inhibitor 

if  frost  precautions  are  not  required.  Never 

fill  or 

top-up  with  water  only,  always  add  an  inhibitor 
(Marstons 

if anti-freeze is not used. NEVER 

salt  water  with  an  inhibitor  otherwise  corrosion  will 
occur.  In  certain  territories  where  the  only  available 
water  supply  may  have  some  salt  content,  use 

only 

clean rainwater or distilled water. 

Recommended solutions 

Anti-freeze 

Universal 

Anti-freeze 

or 

permanent  type ethylene base, without  methanol,  with 
a suitable  inhibitor 

for  aluminium  engines  and  engine 

Use one part of anti-freeze 

one part water. 

Inhibitor 

Lubricants 

SQ36 

inhibitor 

concentrate. 
Use 

100 

of inhibitor per litre of water. 

Anti-freeze  can  remain 

in 

the  cooling  system  and  will 

provide 

protection  for  two  years  provided 

that the specific gravity of the coolant is checked before 

onset 

second winter and topped-up with  new 

anti-freeze as required. 
Land  Rovers  leaving 

the 

factory  have  the  cooling 

system  filled  with 

50%  of  anti-freeze  mixture.  This 

gives  protection  against  frost  down  to  minus 

47°C 

(minus 

53°F). Vehicles  so  filled  can  be  identified  by  a 

label affixed to 

t h e  

windscreen and radiator. 

After  the second  winter  the  system  should  be  drained 
and  thoroughly flushed. 

adding new  anti-freeze 

examine  all  joints  and  renew 

hoses 

t o  

make 

sure  that  the  system 

is  leakproof.  Inhibitor  solution 

should  be  drained  and  flushed  out  and  new 
solution  introduced  every  two  years,  or 

where 

the purity 

of  the water is qucstionablc. 

See  the  ‘General  specification  data’  section 

for 

protection quantities. 

parts. 

WARNING: Do not remove the radiator filler cap when 

the  engine  is  hot  because  the  cooling  system  is 

pressurized and personal scalding could result. 

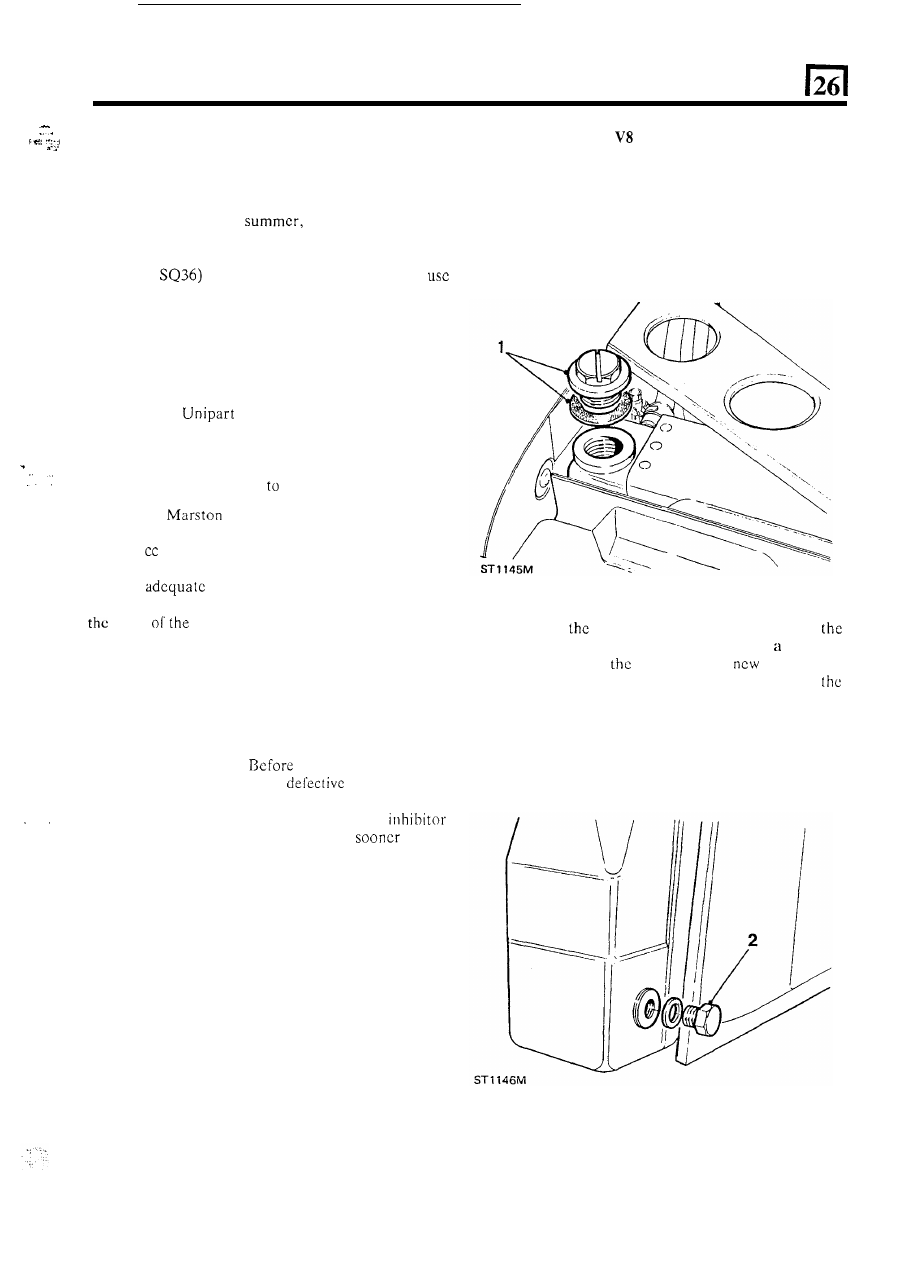
1. Remove the radiator filler plug. 

2.  Remove 

radiator  drain  plug  and  allow 

coolant  to  drain,  if  neccssary,  into 

suitable 

container. Refit 

drain plug and 

washer. The 

drain  plug  is  situated 

on  the  left-hand  side  of 

radiator  towards 

t h e  

bottom  facing  the  engine 

compartment. 

NOTE: Disconnect bottom hose to drain on radiators 
without a drain plug. Connect hose after draining. 

3 .   Remove the engine drain plugs, one each  side of  the 

cylinder  block,  beneath  the  exhaust  manifolds. 

Allow  the  coolant  to  drain  and  refit  plugs  and 

washers. 

CO

OL

ING S

YSTEM 

4. 

To  drain  the  expansion  tank  remove  it  from  the 
vehicle,  empty,  flush-out  and  refit.  If  necessary 
renew the expansion tank hose. 

5 .  

Make  up  a  solution 

of  anti-freeze  and  water 

in  a 

scparatc  container  in  the  concentration  required. 
The  cooling  system  capacity  is  quoted 

in  the  data 

Therefore  to  allow  for  topping  up  and  the 

DRAIN  AND  FILL  2.25  LITRE  PETROL  AND 
DIESEL AND 2.5 DIESEL 

SYSTEMS 

WARNING:  Do  not  remove the  radiator or  expansion 
tank  filler  caps  when  the  engine  is  hot  because  the 

cooling  system  is  pressurized  and  personal  scalding 
could result. 

1.  Remove  the  expansion  tanks  and  radiator  filler 

expansion  tank  make up a quantity 

in excess of  this 

quantity. 

6 .  

If  anti-freeze  is  not  required  use  Marstons 

SQ36 in 

the concentration recommended  as described  under 
‘Engine protection’.  Make 

up a quantity in excess of 

capacity for topping up and expansion tank. 

7.  Make 

all drain plugs are tight and fill the system 

through  the  radiator  filler 

plug  until  the  coolant  is 

just  below  the  filler  neck.  Fit  the  plug  but  d o  not 
over tighten. 

8. 

Half  fill the expansion  tank  with  coolant and secure 

the cap correctly. 

2.  Remove  the  radiator  drain  plug  and  allow  the 

coolant  to  drain,  if  necessary  into  a  suitable 
container.  Refit  the  drain  plug  with  a  new  washer. 

The  plug  is  located  on 

t h e  

left-hand  side 

of  the 

radiator facing the engine 

9.  Start  and  run  the  engine  until  normal  operating 

temperature  is  reached.  Allow  the  engine  to  cool 
and  check  the  levels  in  the  radiator  and  expansion 
tank  and  top up if  necessary.  Finally  check  all  hose 
connections for leaks. 

... 

,:, 

....... 

. . .  

NOTE: Radiator without a drain plug, disconnected 

the bottom hose to drain. Reconnect after 

3.  Remove  the  cylinder  block  drain  plug,  on  the  left- 

hand  side 

of 

engine, and  allow coolant  to drain 

completely before refitting the plug. 

4.  To  drain  the  expansion  tank,  disconnect 

hose 

from 

the 

tank  to  the  water  pump.  Drain  and  flush 

and reconnect the hose. 

5 .  

Make  up 

a  solution  of  anti-freeze  and  water  in  a 

separate  container 

in  the  concentration  required. 

The  cooling  system  capacity  can  vary 

so 

to 

‘Capacities’  under  ‘General  specification  data’. 

To 

allow for topping up and the expansion tank prepare 

quantity 

in  excess  of 

capacity  of  the  system 

concerned. 

6.  If  anti-freeze is not required,  use Marstons inhibitor 

SQ36 in the recommended concentration, see under 

‘Engine protection’. Prepare a  quantity 

in 

excess o f  

t h e  

capacity for topping up and the expansion tank. 

7.  Check  all  hoses and  drain  plugs for security  and 

the  system  through  t h e   expansion  tank  until 
approximately three quarters full. 

8. 

Fit  the  expansion  tank  cap  and  radiator  filler  plug 
and  run  the  engine  until  normal  operating 

temperature 

is  reached.  Allow  the  engine  to  cool 

completely.  Remove  the  expansion  tank  cap and  if 

necessary  top  up  to  half  full.  Remove  the  radiator 
filler  plug  and  check  that  the  coolant  level  is  just 

below  the  filler  neck.  Finally  examine  the  cooling 
system  for  leaks. Tighten  the radiator  filler plug  to 

40-50  Ibs.  in. 

REMOVING  THE  RADIATOR 

(2.25  litre  petrol 

and 

2.25 and 2.50 diesel) 

Disconnect 

the 

battery. 

2.  Drain  the  radiator  by  removing  the  drain plug  at 

the  bottom  left-hand  side  of  the  radiator  and 
releasing  the  expansion  tank  filler  cap.  See  drain 

and fill cooling system. 

3. 

Disconnect the overflow hose from the radiator. 

4.  The  radiator  is  held  in  position  by  two  brackets 

each secured  by  three 

screws.  Remove the screws 

and brackets. 
Disconnect  the  top  and  bottom  hoses  from  the 
radiator. 

6. 

Diesel engine 

7.  Disconnect 

vacuum  pump hose from  the pump 

and release it 

from the clips on the radiator cowling. 

Petrol engine 

8.  Disconnect  t h e   air  cleaner  hose 

from  the 

carburetter and remove the air cleaner. 

9.  Release  t h e   three  fixings  securing  cowling  to  the 

engine. 

10.  Pull  back  the  cowling towards 

radiator and 

lift 

radiator and cowl. 

11.  Remove the five screws securing the cowling to t h e  

radiator  and separate  the two units  noting  that  the 
cowling is held 

to 

bottom of 

radiator by  two 

clips. 

continued 

CO

OLI

N

G S

YS

T

EM 

FITTING THE 

RADIATOR 

14. 

12. 

13. 

Locate  the  cowling  into 

clip  at  the  bottom 

of 

the  radiator  and  secure 

it 

at  the  top  with  the  five 

screws. 
Lower 

radiator and cowl assembly into position 

in  the  vehicle  ensuring  that  the  two  pegs 

at 

the 

bottom 

of  the  radiator  locate in  the corresponding 

rubber pads 

in the crossmember 

17. 

18. 

Secure the top 

of  the radiator with the two brackets 

and bolts. 
Secure the cowling 

to the engine. 

Connect the top, bottom  and overflow hoses. 
Diesel engine 

Fit  the hose 

t o  

the vacuum  pump and secure 

it 

with 

the clips on the cowling. 
Fit  the  air  cleaner and  connect  the 

to  the  air 

manifold. 

All 

engines 

Check  that 

radiator drain plug  (where fitted) is 

tight and 

f i l l  t h e  

cooling system. 

A .  

Oil from engine to oil cooler. 

Cooled 

oil 

from cooler 

to engine. 

Start engine and check for oil leaks 

e-- 

-.-+ 


Content   ..  62  63  64  65   ..