Defender. Manual - part 90


  Index      Land Rover     Land Rover Defender - service manual 2007 year


Search            


Content   ..  88  89  90  91   ..


Defender. Manual - part 90


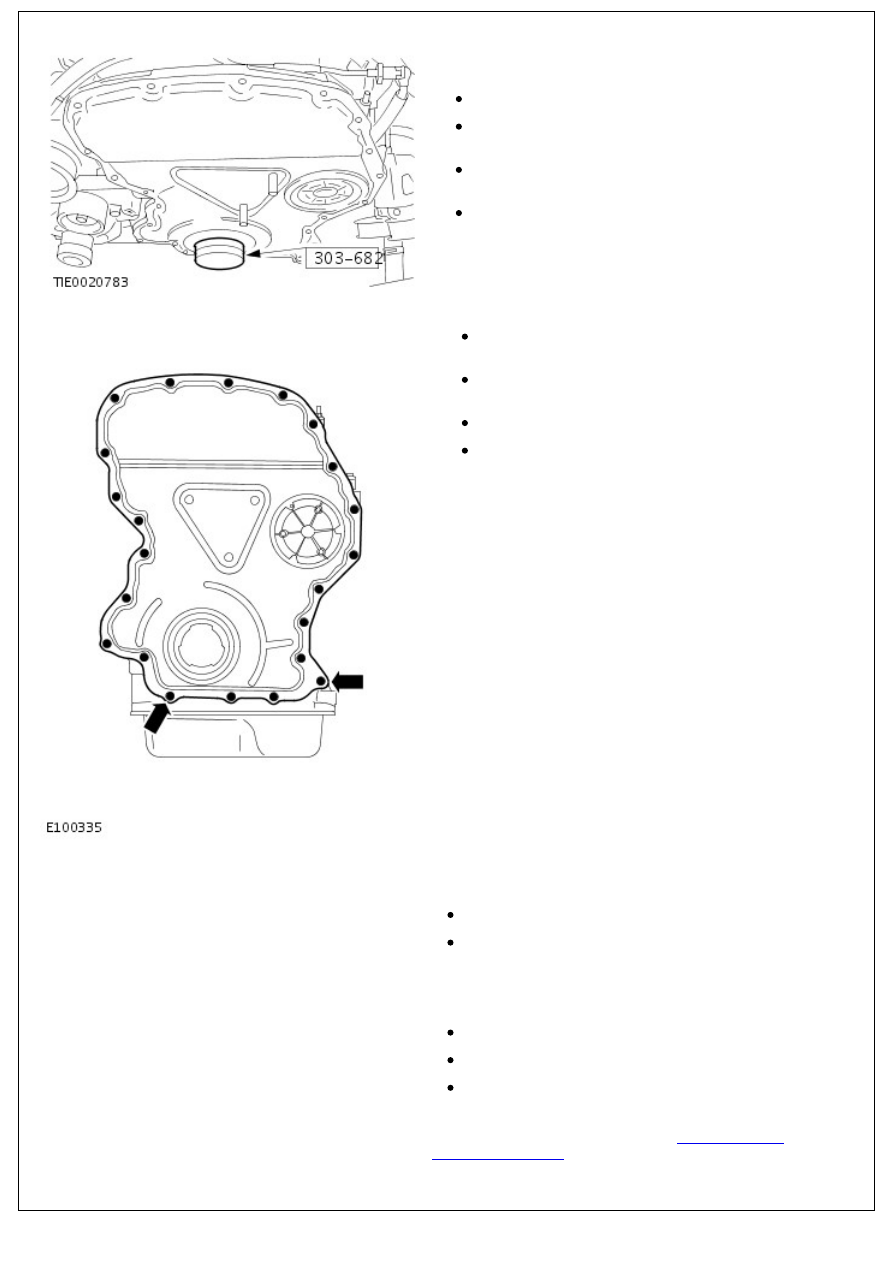
5. NOTE: Engine shown removed for clarity.

Using the special tool, align the engine timing cover.

Intall and tighten 2 engine timing cover bolts to 6 Nm.

Install and tighten the remaining 16 engine timing

cover bolts and 2 nuts to 6 Nm.

Slacken the engine timing cover bolts and nuts 360

degrees.

Install the special tool.

6. Tighten the engine timing cover nuts and bolts.

Tighten the engine timing cover nuts and bolts to 3

Nm.

Tighten the engine timing cover nuts and bolts in the

following sequence:

Tighten the 2 bolts indicated to 11 Nm.

Tighten the remaining nuts and bolts to 10 Nm.

7. NOTE: Clean the component mating faces.

Secure the coolant pump.

Install a new gasket.

Tighten the bolts to 22 Nm (16 lb.ft).

8. NOTE: Clean the component mating faces.

Secure the cylinder head coolant outlet elbow.

Install new O-ring seal.

Tighten the nut to 22 Nm (16 lb.ft).

Tighten the bolts to 22 Nm (16 lb.ft).

9. Install the accessory drive component bracket. 

For additional information, refer to: 

Accessory Drive

Component Bracket

 (303-05 Accessory Drive - 2.4L Duratorq-

TDCi HPCR (103kW/140PS) - Puma, Removal and

Installation).

10. Connect the battery ground cable. 

For additional information, refer to: 

Battery Connect

 (414-01

Battery, Mounting and Cables, General Procedures).

11. Fill and bleed the cooling system. 

For additional information, refer to: 

Cooling System Draining,

Filling and Bleeding

 (303-03 Engine Cooling - 2.4L Duratorq-

TDCi HPCR (103kW/140PS) - Puma, General Procedures).

Engine - 2.4L Duratorq-TDCi HPCR (103kW/140PS) - Puma - Timing Chain

In-vehicle Repair

Special Tool(s)

Timing tool, crankshaft

303-698

Removal

1. 

WARNING: Do not work on or under a vehicle

supported only by a jack. Always support the vehicle on safety

stands.

Raise and support the vehicle.

2. Disconnect the battery ground cable. 

For additional information, refer to: 

Battery Disconnect and

Connect

 (414-01 Battery, Mounting and Cables, General

Procedures).

3. Remove the timing cover. 

For additional information, refer to: 

Timing Cover

 (303-01

Engine - 2.4L Duratorq-TDCi HPCR (103kW/140PS) - Puma,

In-vehicle Repair).

4. Remove the crankshaft position (CKP) sensor. 

For additional information, refer to: 

Crankshaft Position (CKP)

Sensor

 (303-14 Electronic Engine Controls - 2.4L Duratorq-

TDCi HPCR (103kW/140PS) - Puma, Removal and

Installation).

5. 

CAUTION: Do not turn the crankshaft when the special

tool is fully located into the flywheel. Failure to follow this

instruction may result in damage to the vehicle.

Rotate the crankshaft to 50 degrees before top dead center

(BTDC).

Install the special tool through the CKP sensor hole.

6. Using suitable 6 mm bars, lock the camshaft sprockets.

7. Loosen the 6 camshaft sprocket bolts.

8. Loosen the 4 fuel injection pump sprocket bolts.

8. Loosen the 4 fuel injection pump sprocket bolts.

9. Detension and lock the timing chain tensioner.

1. Retract the pawl.

2. Push the lock in.

3. Insert a suitable pin.

10. Remove the timing chain tensioner and the RH timing

chain guide.

Remove the 2 bolts.

Remove the nut.

11. Remove the upper timing chain guide.

Remove the 2 bolts.

12. Remove the timing chain.


Content   ..  88  89  90  91   ..