Defender. Manual - part 78


  Index      Land Rover     Land Rover Defender - service manual 2007 year


Search            


Content   ..  76  77  78  79   ..


Defender. Manual - part 78


Engine - 2.4L Duratorq-TDCi HPCR (103kW/140PS) - Puma - Engine

Diagnosis and Testing

Overview

As diagnosis of the different areas of the engine is covered in other sections and by general procedures, this section is

limited to an oil pressure test.

For specific areas of the engine, refer to the general procedures in this section and the relevant section of the manual.

Inspection and Verification

1.  1. Verify the customer concern.

2.  2. Visually inspect for obvious signs of mechanical or electrical damage.

Visual Inspection Chart

Mechanical

Electrical

Engine oil level

Coolant level

Transmission fluid level

Fuel level

Coolant leaks

Oil leaks

Fuel leaks

Visibly damaged or worn parts

Loose or missing nuts or bolts

Fuel contamination/grade/quality

Sensor fitment/condition

Viscous fan and solenoid

Routing of pipework etc. to avoid vibrations

Contact anywhere between the driveline and chassis

Fuses

Wiring harness

Electrical connector(s)

Injectors

Glow plugs

5 volt sensor supply

Sensor(s)

Viscous fan solenoid

Engine control module (ECM)

3.  3. If an obvious cause for an observed or reported concern is found, correct the cause (if possible) before

proceeding to the next step.

4.  4. Use the approved diagnostic system or a scan tool to retrieve any diagnostic trouble codes (DTCs) before

moving onto the symptom chart or DTC index.
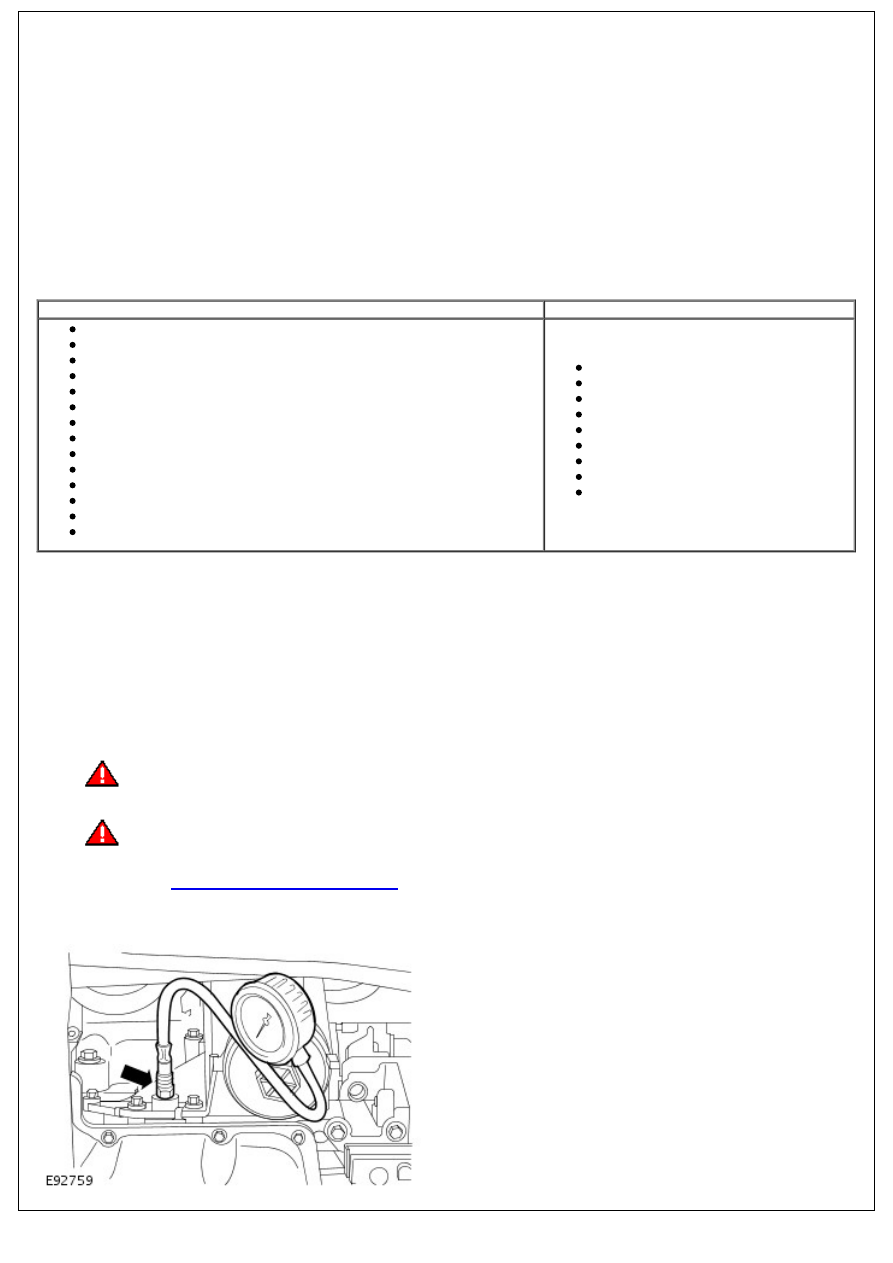
Oil Pressure Check

• NOTE: Prior to checking the engine oil pressure, a road test of 6 miles (10 kilometres), must be carried out. Do not

attempt to attain engine normal operating temperature by allowing the engine to idle.

1. 

• WARNINGS:

 The spilling of hot engine oil is unavoidable during this procedure, care must be taken to prevent scalding.

Failure to follow this instruction may result in personal injury.

 Wear protective gloves.

1. Remove the oil pressure sensor. 

REFER to: 

Engine Oil Pressure (EOP) Sensor

 (303-14 Electronic Engine Controls - 2.4L Duratorq-TDCi HPCR

(103kW/140PS) - Puma, Removal and Installation).

2.  2. Install the oil pressure gauge and the oil pressure gauge connector.

3.  3. Check and top-up the engine oil, if required.

4.  4. Start and run the engine.

5.  5. Note the oil pressure readings with the engine running at idle and at 2,000 rpm. 

REFER to: 

Specifications

 (303-01 Engine - 2.4L Duratorq-TDCi HPCR (103kW/140PS) - Puma, Specifications).

6.  6. Turn off the engine.

7.  7. Remove the special tools.

8.  8. Install the oil pressure sensor. 

REFER to: 

Engine Oil Pressure (EOP) Sensor

 (303-14 Electronic Engine Controls - 2.4L Duratorq-TDCi HPCR

(103kW/140PS) - Puma, Removal and Installation).

9.  9. Check and top-up the engine oil, if required.

Engine - 2.4L Duratorq-TDCi HPCR (103kW/140PS) - Puma - Engine Oil

Draining and Filling

General Procedures

1. 

WARNING: Do not work on or under a vehicle

supported only by a jack. Always support the vehicle on safety

stands.

Raise and support the vehicle. 

For additional information, refer to: 

Lifting

 (100-02 Jacking

and Lifting, Description and Operation).

2. Loosen the oil filter cover 3 turns and allow the engine oil to

drain.

3. NOTE: Position cloth to collect fluid spillage.

Remove the oil filter cover and oil filter element.

4. Remove and discard the oil filter element.

Remove and discard the oil filter cover O-ring seal.

5. Drain the engine oil.

Position a container to collect the engine oil.

Remove and discard the drain plug.

Allow the engine oil to drain.

6. Install a new drain plug.

Clean the component mating faces.

Tighten the drain plug to 23 Nm (17 lb.ft).

Remove the container.

7. Install a new oil filter cover O-ring seal.

Clean the components.

Lubricate the O-ring seal with clean engine oil.

8. Install a new oil filter element to the oil filter cover.
9. Install the oil filter cover and oil filter element.

Tighten the oil filter cover to 35 Nm (26 lb.ft).

10. Fill the engine with the recommended oil to the correct

level.

11. Connect the battery ground cable. 

For additional information, refer to: 

Battery Connect

 (414-01

Battery, Mounting and Cables, General Procedures).

12. Check and top-up the engine oil.


Content   ..  76  77  78  79   ..