Defender. Manual - part 50
 

  Index      Land Rover     Land Rover Defender - service manual 2007 year


Search            


Content   ..  48  49  50  51   ..


Defender. Manual - part 50


*

*

*

*

*

*

*

*

*

*

*

*

*

-

-

-

-

-

*

*

*

*

*

*

*

*

*

*

*

*

*

*

*

*

*

*

*

*

*

*

*

*

*

*

*

*

*

*

*

*

*

*

*

*

*

*

Worn panhard rod or radius arm bushes. Check

condition of ball joints and the lower steering

column shaft universal joint for wear.

Replace worn/faulty components.

Steering vibration, road wheel shimmy - wobble

• NOTE: Vibration through the steering linkage powerful enough to induce high frequency oscillation of the steering

wheel, is generally caused by out of balance road wheels. However there are a number of other possible causes of this

symptom which, if severe, may be described as shimmy or wobble. Regardless of the terminology used by the

owner/driver to describe the symptoms, the following diagnostic checks should be carried out in the order presented.

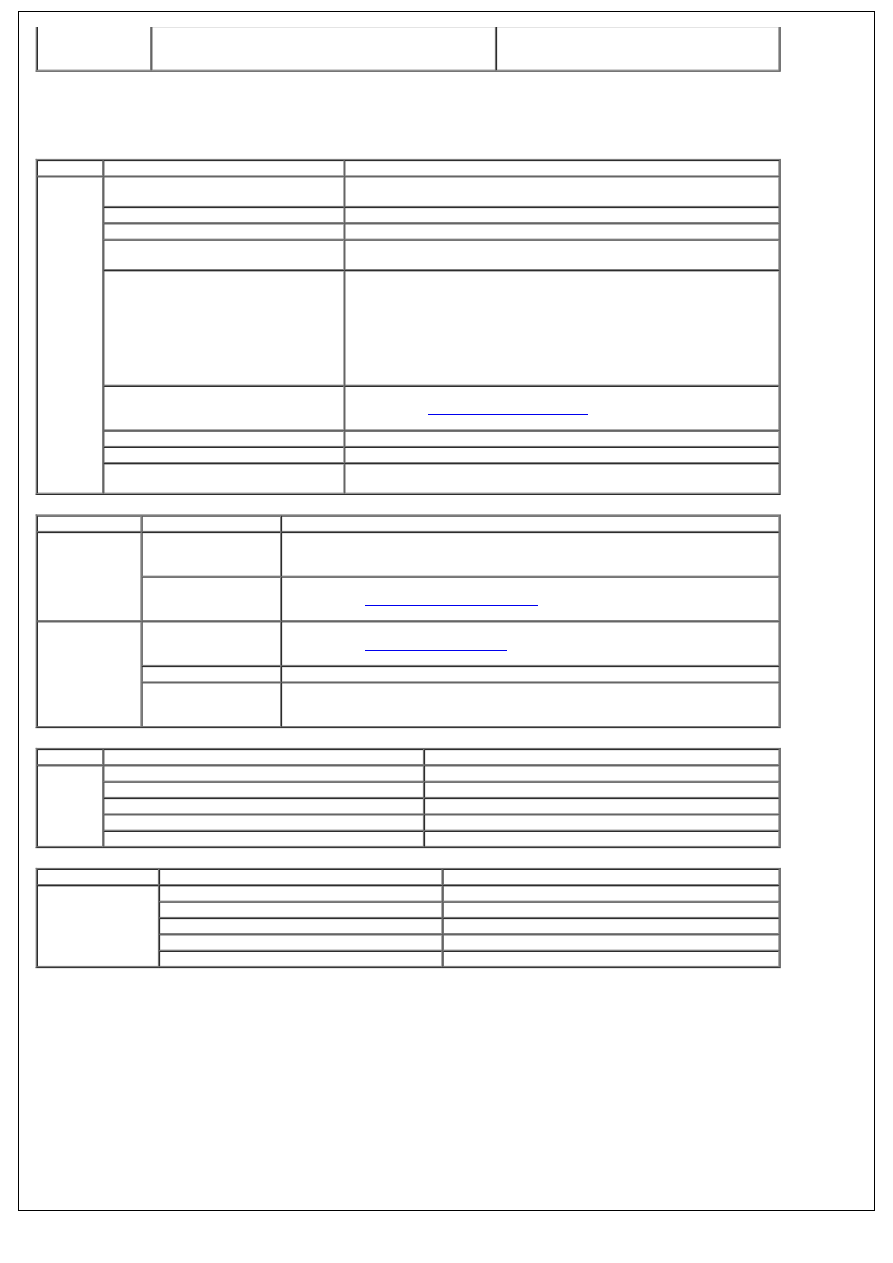
Symptom

Possible Sources

Action

Steering

vibration

Balance of road wheel,

condition/specification of tires.

Balance wheels, replace faulty or incorrect specification tires.

Faulty steering damper.

Replace steering damper.

Worn/alignment of universal joints.

Replace worn components, align joints correctly.

Worn steering linkage ball joints,

including steering box and tie rod.

Replace worn or damaged components.

Worn suspension bushes.

Incorrectly tightened fixings.

Replace worn or damaged components. Ensure all fixings are

tightened to correct torque with vehicle wheels on the ground.

If problem persists, fit the following damper kits:

90 Models - STC288 (front) and STC 289 (rear)

110/130 Models - STC290 (front)

110 Models (levelled) - STC291 (rear)

110 Models (unlevelled) - STC92 (rear)

130 Models - STC293 (rear)

Incorrectly adjusted power steering

box.

Adjust steering box. 

REFER to: 

Steering Gear Adjustment

 (211-00 Steering System -

General Information, General Procedures).

Excessive hub bearing end-float.

Check condition of hub bearings and adjust end-float as necessary.

Swivel joints incorrectly set.

Adjust swivel pin bearing preload.

Steering geometry out of

specification.

Carry out full steering geometry check.

Steering veer

Symptom

Possible Sources

Action

Steering veer -

not under

baking

Unevenly worn or

faulty front tires.

Inspect tires. Swap position (left to right) of front tires. If vehicle veers in

opposite direction, replace tires. If problem solved, leave tires in new

positions.

Steering box not

centralised.

Centralise steering box. 

REFER to: 

Steering Gear Centralization

 (211-00 Steering System - General

Information, General Procedures).

Steering veer -

under braking

Air in brake system

Carry out bleeding procedure. 

REFER to: 

Brake System Bleeding

 (206-00 Brake System - General

Information, General Procedures).

Brake pads glazed

Remove glaze or replace brake pads.

Swivel pin bearing

preload incorrectly

set

Adjust swivel pin bearing preload.

Directional stability

Symptom

Possible Sources

Action

Stability

Vehicle overloaded or load incorrectly positioned.

Check vehicle loading parameters in Owner Handbook.

Rear trailing link/chassis bushes worn.

Replace worn components.

Worn front and rear shock absorbers.

Replace worn components.

Faulty steering damper.

Replace steering damper.

Road wheels out of balance.

Balance the road wheels.

Power steering system - excessive noise

Symptom

Possible Sources

Action

Excessive noise

Incorrect fluid level.

Refill or drain to the correct level.

Hoses fouling vehicle body.

Re-route hoses away from vehicle body.

PAS drive belt tension

Re-tension drive belt.

Air in power steering system.

Bleed power steering system.

Faulty steering box and/or pump.

Replace faulty components.

POWER STEERING SYSTEM TEST

• NOTE: If steering lacks power assistance. Check pressure of hydraulic pump before fitting new components. Use fault

diagnosis chart to assist in tracing faults.

Item

Part Number

Description

A.

-

Steering box

B.

-

Steering pump

C.

-

Existing hose, steering box to pump

D.

-

Hose LRT-57-030

E.

-

Test adaptor LRT-57-001

F.

-

Pressure gauge LRT-57-005

G.

-

Thread adaptor LRT-57-004

H.

-

Thread adaptor LRT-57-022

1.  1. A hydraulic pressure gauge and test adaptor is used to test the power steering system. This gauge is able to

measure 140 kgf/cm!. The maximum power steering system pressure is 77 kgf/cm!.

2.  2. Under certain fault conditions of the hydraulic pump it is possible to obtain pressures up to 105 kgf/cm!. It is

important to realise that pressure on gauge is same pressure being exerted upon steering wheel. When testing,

turn steering wheel gradually while reading pressure gauge.

3.  3. Check and maintain maximum fluid level of reservoir.

4.  4. Examine power steering units and connections for leaks. All leaks must be rectified before attempting to test

the system.

5.  5. Check steering pump drive belt tension and renew belt if necessary.

6.  6. Assemble test equipment and fit to vehicle, as shown in RR3959M.

7.  7. Open tap of adaptor.

8.  8. Bleed system, take care not to overload pressure gauge.

9.  9. With system in good condition, pressures should be:

1. (A) Steering wheel held on full lock and engine running at 1,000 rev/min, 70 to 77 kgf/cm!.

2. (B) Steering wheel held on full lock and engine idling, 28 kgf/cm!.

3. Checks should be carried out on both full lock positions.

CAUTION: Do not maintain this pressure for more than 30 seconds in any one minute to avoid overheating fluid

and possibly damaging seals.

10.  10. Release steering wheel and with engine idling. Pressure should read below 7 kgf/cm!.

11.  11. If pressures differ to those given a fault exists.

12.  12. To determine if fault is steering box or pump. Close adaptor tap for a maximum five seconds.

13.  13. If gauge does not register specified pressure, pump is faulty.

14.  14. Fit a new pump, bleed system and repeat test. If low pressure or a substantial imbalance exists, fault is in

steering box valve and worm assembly.

STEERING DAMPER

• NOTE: The power steering system, as well as reducing the effort required to manoeuvre the vehicle when parking,

also helps to dampen any deflections of the road wheels, being transmitted back to the steering wheel.

When operating the vehicle off road, the road wheels are often deflected by ruts and boulders causing the steering

wheel to turn left and right. This phenomenon is known as 'steering kickback'. To subdue the effects of 'steering

kickback', a hydraulic damper is fitted in the steering linkage between the track rod and the differential casing. The

damper, which offers the same resistance in extension and compression, is sealed for life.

1.  1. Inspect damper for casing damage or leaks.

2.  2. Clamp one end of the damper horizontally in a vice using soft jaws. Compress and extend the unit by hand.

Resistance should be equal in both directions.

3.  3. If it is felt that the unit is outside acceptable limits, fit a new steering damper.

VISUAL AND SAFETY CHECKS

WARNING: Before taking vehicle out on the public highway for road test, it is important that the following basic

visual checks are carried out to ensure that the vehicle complies with legal requirements.

1. 

• NOTE: This information refers to standard tyres fitted as original equipment.

1. Check and adjust tyre pressures.

2.  2. Check condition of tyres. Inspect for signs of uneven wear, damage and feathering.

3.  3. Check tread depth. Ensure that the tyre make, type and general condition are common across each axle.

4.  4. Check wheel rims for signs of damage and excessive run out.

ROAD TEST PROCEDURE

General steering/handling problems can usually be classified into one of the categories listed and ARE GENERALLY

RELATED TO THE AGE, CONDITION AND USE OF THE VEHICLE.

WARNING: Ensure that all road tests are conducted by suitably qualified drivers in a safe and legal manner, and

where local traffic conditions allow.

1.  1. Carry out visual and safety checks.

2.  2. Confirm general nature of complaint with customer, simulating where possible the conditions under which the

problem occurs. Carry out following road test procedure to establish the problem.

3.  3. Steering load assessment - drive at 16 km/h (10 mph). Put 90° turn input into steering wheel, check self

centering. The self centering should be equal on each lock but not necessarily return to exactly straight ahead

without assistance from the driver.

4.  4. Steering assessment - drive at 64 km/h (40 mph) on a straight FLAT road (no camber), check for steering

veer. The vehicle should follow a straight path with NO tendency to follow a curved path. If vehicle veers

towards the kerb, vehicle may be 'camber sensitive'. A small amount of veer in direction of camber is

acceptable.

5.  5. Directional stability assessment - drive at 112 km/h (70 mph) or maximum legal speed on a straight flat road.

Carry out a normal lane change. Vehicle should quickly settle into a new straight path.

6.  6. Braking assessment (medium effort) - drive at 96 km/h (60 mph) on a straight flat road. Apply steady medium

braking effort, noting any tendency to veer. Carry out brake test three times, if a veer is consistently noted

carry out a braking efficiency test on a rolling road.

7.  7. Braking assessment (full effort) - drive at 96 km/h (60 mph) on a straight flat road. Apply full braking effort,

noting any tendency to veer. Carry out brake test three times, if a veer is consistently noted carry out a

braking efficiency test on a rolling road.

8.  8. If the symptom described by the customer is stiff steering or steering niggle, carry out stiff steering procedure.

If not, proceed with basic checks and adjustments.

Steering System - General Information - Power Steering System Filling and

Bleeding

General Procedures

1. Check that fluid level is at maximum level.
2. Run engine to normal operating temperature.
3. Recheck reservoir fluid level, top up if necessary.

4. NOTE: Maintain maximum fluid level in reservoir. Do not

increase engine speed or move steering wheel.

With engine at idle speed, slacken bleed screw. When fluid

seeps past bleed screw re-tighten screw.

5. Check fluid level.
6. Clean fluid from around bleed screw.
7. Check hose connections, pump and steering box for fluid

leaks by holding steering on full lock in both directions.

CAUTION: Do not maintain this pressure for more than 30 seconds in any one minute to avoid overheating fluid

and possibly damaging seals.

8. Carry out road test.
9. Check and top-up fluid level.


Content   ..  48  49  50  51   ..