Defender. Manual - part 10


  Index      Land Rover     Land Rover Defender - service manual 2007 year


Search            


Content   ..  8  9  10  11   ..


Defender. Manual - part 10


The front axle serial number is stamped on the LH side of the front axle tube, inboard of radius arm mounting bracket.

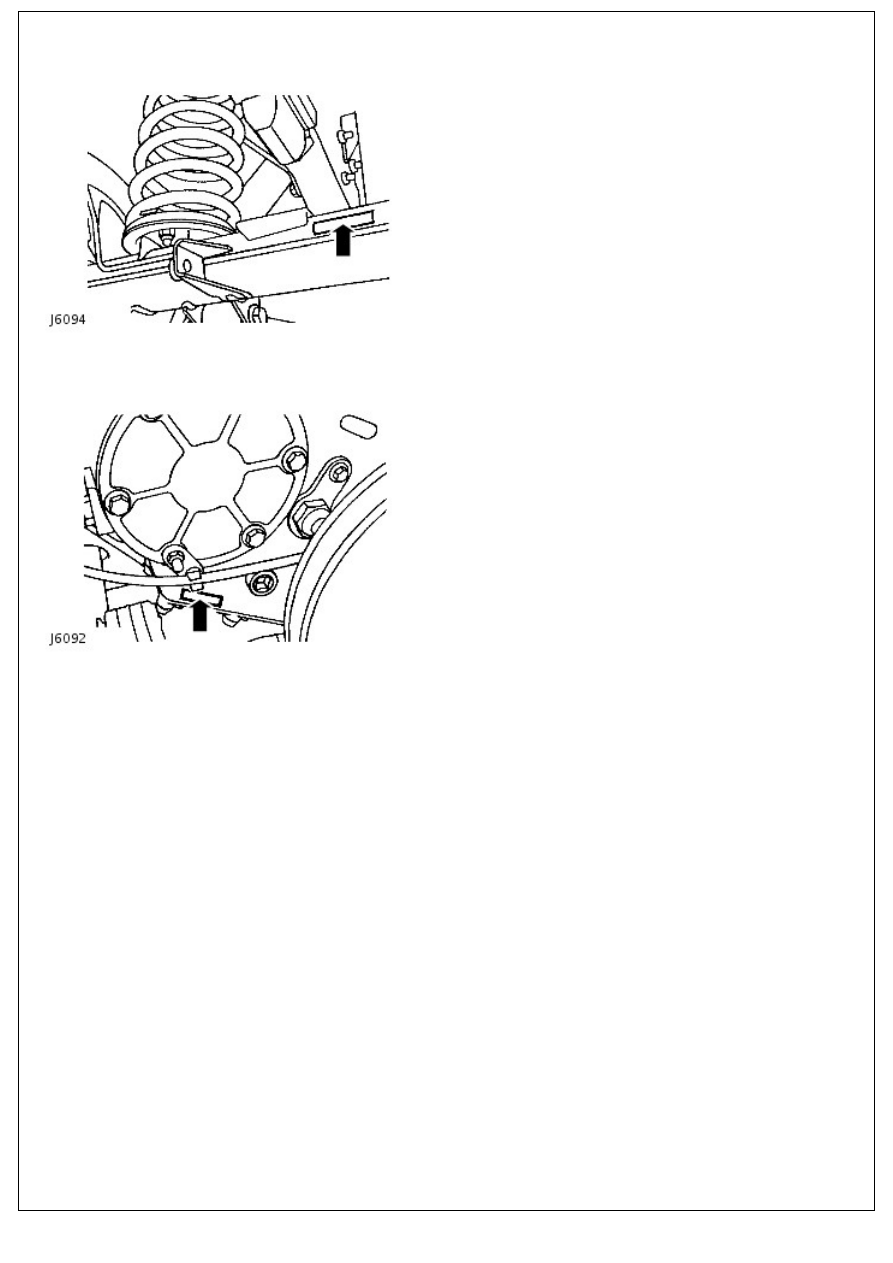
Rear Axle Serial Number

The rear axle serial number is stamped on the rear axle tube on the LH side, inboard of the spring mounting.

Transfer Case Serial Number

The transfer case serial number is stamped on the LH side of the transfer case below the mainshaft rear bearing housing

adjacent to the bottom cover.

Jacking and Lifting - Vehicle Recovery

Description and Operation

CAUTION: The vehicle has permanent four-wheel drive. The following towing instructions must be adhered to:

Towing the vehicle on all four wheels with driver operating steering and brakes.

Turn ignition key to position '1' to release steering lock.

Select neutral in main gearbox and transfer gearbox.

Secure tow rope, chain or cable to front towing eyes (alternative types shown).

Release the parking brake.

CAUTION: The brake booster and power assisted steering system will not be functional without the engine running.

Greater pedal pressure will be required to apply the brakes, the steering system will require greater effort to turn the

front road wheels. The vehicle tow connection should be used only in normal road conditions, 'snatch' recovery should

be avoided.

Transporting the vehicle by trailer

Lashing/towing eyes are provided on front and rear of the chassis side members, see J6085, to facilitate the securing of

the vehicle to a trailer or other means of transportation.

CAUTION: Underbody components must not be used as lashing points.

Install vehicle on trailer and apply park brake. Select neutral in main gearbox.

Rear suspended tow by breakdown vehicle

If the front axle is to be trailed turn ignition key to position '1' to release steering lock.

Select neutral in main gearbox and transfer box.

The steering wheel and/or linkage must be secured in a straight ahead position. DO NOT use the steering lock

mechanism for this purpose.

Jump starting

WARNING: Hydrogen and oxygen gases are produced during normal battery operation. This gas mixture can

explode if flames, sparks or lighted tobacco are brought near battery. When charging or using a battery in an enclosed

space, always provide ventilation and shield your eyes.

Keep out of reach of children. Batteries contain sulphuric acid. Avoid contact with skin, eyes, or clothing. Also, shield

eyes when working near battery to protect against possible splashing of acid solution. In case of acid contact with skin,

eyes, or clothing, flush immediately with water for a minimum of fifteen minutes. If acid is swallowed, drink large

quantities of milk or water, followed by milk of magnesia, a beaten egg, or vegetable oil.

SEEK MEDICAL AID IMMEDIATELY.

To Jump Start - Negative Ground Battery

WARNING: To avoid any possibility of injury use particular care when connecting a booster battery to a discharged

battery.

Position vehicles so that jump leads will reach, ensuring that vehicles DO NOT TOUCH, alternatively a fully

charged slave battery may be positioned on floor adjacent to vehicle.

Ensuring that ignition and all electrical accessories are switched off, that parking brake is applied and neutral is

selected, connect the jump leads as follows;

A. Connect one end of first jumper cable to positive (+) terminal of booster battery. B. Connect other end of first jumper

cable to positive (+) terminal of discharged battery. C. Connect one end of second jumper cable to negative terminal of

booster battery. D. Connect other end of second jumper cable to a good earth point on the disabled vehicle (eg. engine

front lifting eye, as shown in J6086), NOT TO NEGATIVE TERMINAL OF DISCHARGED BATTERY. Keep jumper lead away

from moving parts, pulleys, drive belts and fan blade assembly.

WARNING: Making final cable connection could cause an electrical arc which if made near battery could cause an

explosion.

If booster battery is installed in another vehicle, start engine and allow to idle.

Start engine of vehicle with discharged battery, following starting procedure in Owners' Manual.

CAUTION: If vehicle fails to start within a maximum time of 12 seconds, switch ignition off and investigate cause.

Failing to follow this instruction could result in irrepairable damage to catalyst, if fitted.

Remove negative (-) jumper cable from the engine and then terminal of booster battery.

Remove positive (+) jumper cable from positive terminals of booster battery and discharged battery.

Jacking and Lifting - Jacking

Description and Operation

General

WARNING: The following instructions must be adhered to before raising the vehicle off the ground:

Position vehicle on a solid, level surface.

Apply the parking brake.

Select 'P' - PARK on automatic transmission selector or 1st gear on manual transmission and 'H' High on transfer

case.

Select low range in the transfer box.

CAUTION: To avoid damage occurring to the under body components of the vehicle the following jacking

procedures must be adhered to.

DO NOT POSITION JACKS OR AXLE STANDS UNDER THE FOLLOWING COMPONENTS.

Body structure

Bumpers

Fuel lines

Brake lines

Front radius arms

Panhard rod

Steering linkage

Rear trailing links

Fuel tank

Engine sump

Gearbox bell housing

Vehicle jack

The jack provided with the vehicle is only intended for use in an emergency such as changing a tire. DO NOT use the

jack for any other purpose. Refer to the Owner's Handbook for the vehicle jack location points and jacking procedures.

WARNING: Never work under a vehicle supported solely by the vehicle jack.

Hydraulic jack

A hydraulic jack with a minimum lifting capacity of 1500 kg, (3,300 lbs) must be used.

• WARNINGS:

 Do not commence work on the underside of the vehicle until suitable axle stands have been placed in the correct

position.

 Always chock the wheels when jacking. The parking brake may be ineffective when the wheel(s) are off the

ground.

Raising the Front of the Vehicle


Content   ..  8  9  10  11   ..