Defender. Manual - part 4


  Index      Land Rover     Land Rover Defender - service manual 2007 year


Search            


Content   ..  1  2  3  4  5  ..


Defender. Manual - part 4


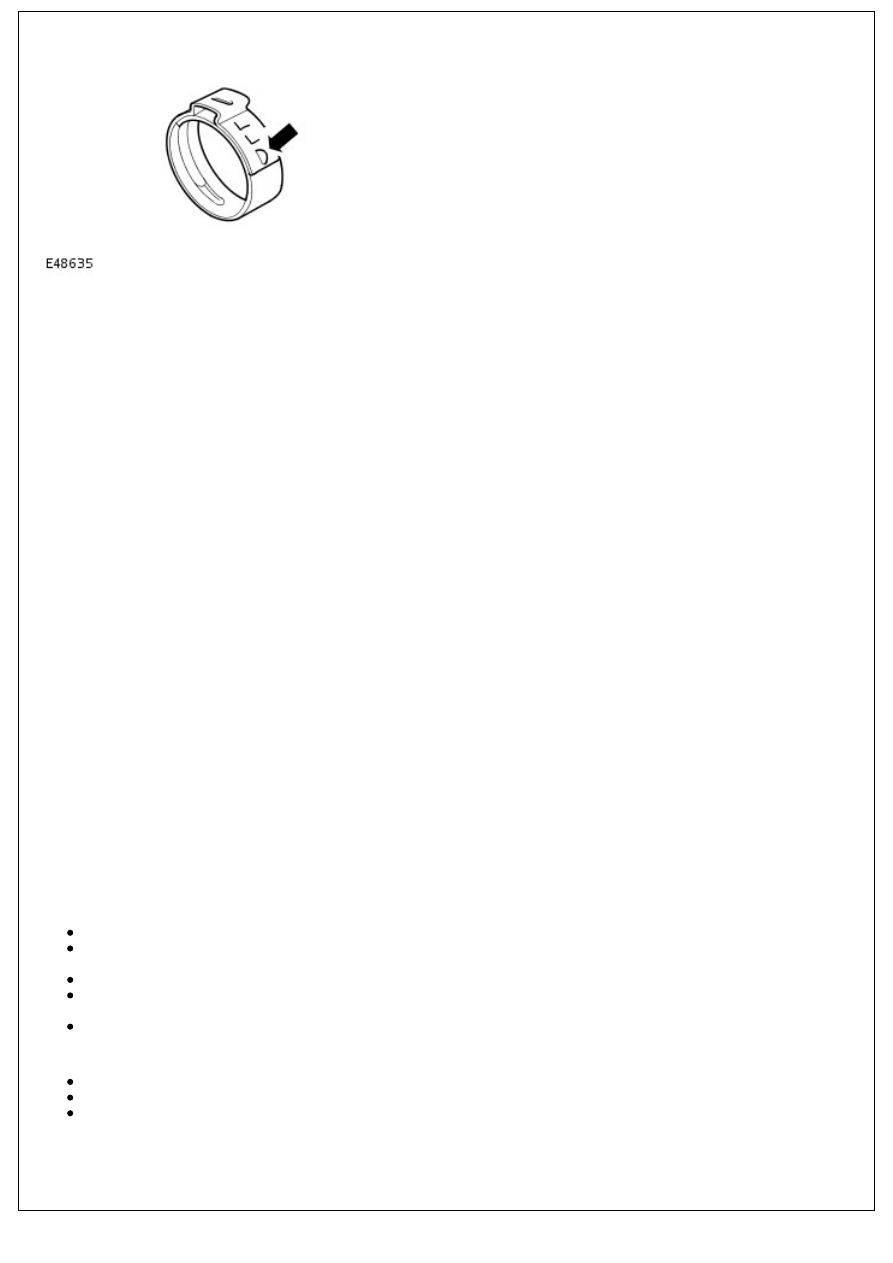
Oetiker clips may be removed by bending the tag (arrowed) and releasing the free end of the clip. Clips must not be re-

used. When installing new clips, make sure clip is positioned on hose before tightening and make sure that when clip is

tightened, the tag is located in the longitudinal slot in the free end of the clip (arrowed in illustration).

'Quick-fit' connections are also installed to certain hoses/pipes. Inspect 'quick-fit' connections for damage, prior to

connection. Replace if damaged. After engagement of 'quick-fit' connections, perform a 'tug' test to make sure

connection is securely installed.

Heat protection

Always make sure that heat shields and protective sheathing are in good condition; replace if damage is evident.

Particular care must be taken when routing hoses close to hot engine components such as the exhaust manifolds and

exhaust gas recirculation (EGR) pipes. Hoses will relax and deflect slightly when hot, make sure this movement is taken

into account when routing and securing hoses.

Electrical Precautions

General

The following guidelines are intended to make sure the safety of the operator whilst preventing damage to the electrical

and electronic components of this vehicle.

Equipment

Prior to commencing any test procedure on the vehicle, make sure that the relevant test equipment is working correctly

and that any harness or connectors are in good condition. It is particularly important to check the condition of all plugs

and leads of mains operated equipment.

Polarity

Never reverse connect the vehicle battery and always make sure the correct polarity when connecting test equipment.

High voltage circuits

Whenever disconnecting live ht circuits, always use insulated pliers and never allow the open end of the ht lead to

contact other components, particularly ECU's.

Connectors and harnesses

The engine compartment of a vehicle is a particularly hostile environment for electrical components and connectors.

Always observe the following:

Make sure electrically related items are dry and oil free before disconnecting/connecting test equipment.

Make sure that disconnected multiplugs and sensors are protected from any possible oil, coolant or other liquid

contamination. Any such contamination could impair performance or lead to component failure.

Never force connectors apart or pull on the wiring harness.

Always make sure locking tabs are disengaged before disconnecting multiplugs etc. and make sure that correct

orientation is achieved before connection.

Make sure that any protection covers, insulation etc. are replaced if disturbed.

Having confirmed that a component is faulty, carry out th following:

Switch off the ignition and disconnect the battery.

Remove the component and support the disconnected harness.

When replacing electrical components, keep oily hands away from electrical connections and make sure that

locking tabs on connectors are fully engaged.

Battery Disconnection/Connection

Always refer to the Electrical Section of this manual - Battery Connection/Disconnection prior to attempting to connect

or disconnect the battery. 

For additional information, refer to: 

Battery

 (414-01 Battery, Mounting and Cables, Removal and Installation).

Fuel Handling Precautions

The following information lists basic precautions which must be observed if fuel is to be handled safely. It also outlines

other areas of risk which must not be ignored. As this information is issued for basic guidance only, consult your local

Fire Department where any doubt as to personal and environmental safety exists - See also Health and Safety

Precautions.

General precautions

Always have the correct type of fire extinguisher containing Foam, CO2, Gas or powder accessible when handling or

draining fuel or dismantling fuel systems. Fire extinguishers must also be located in areas where fuel is stored.

Make sure that suitable warning signs are exhibited.

Keep all sources of ignition well away from areas where fuel is being handled.

Make sure that any leadlamps are flameproof and kept clear of spillage.

• WARNINGS:

 Do not disassemble or reassemble fuel system components whilst vehicle is over a pit.

 No one should be permitted to repair components associated with fuel without first having specialist training.

Always disconnect the vehicle battery before carrying out disassembly, reassembly or draining work on a fuel system.

Fuel tank and system draining

Draining must be carried out in accordance with the procedures given in the relevant Fuel System section of this

manual.

• WARNINGS:

 Never drain fuel or work on a fuel system while the vehicle is over a pit. Extraction or draining of fuel must be

carried out in a well ventilated area.

 Never switch on or operate mobile (cellular) phones in the vicinity of vehicles when operations are being carried

out on the fuel system.

 Always attach fuel vapour warning labels to fuel tanks immediately after draining.

 Containers used for storing fuel must be clearly marked with the contents and placed in a safe storage area which

meets the requirements of the local authority.

CAUTION: Some fuel lines are now installed with 'quick release' connectors. If a connector is damaged, no attempt

must be made to repair the connector, a new fuel line and connector(s) assembly must be installed.

Always release pipe clips fully before attempting to disconnect fuel pipes.

Fuel tank repairs

CAUTION: No attempt should be made to repair a fuel tank. If the structure of the tank is damaged, a new tank

must be installed.

Oil seals

Never use a seal which has been improperly stored or handled.

Take great care when removing old seals that the sealing surfaces and seal housing are not damaged.

Carefully examine seal before installing to make sure that it is clean and undamaged.

Make sure that the surface on which the seal is to run and also the seal housing is clean and free from burrs or

scratches. Renew the component if the sealing surface cannot be restored.

Special tools and protection sleeves are provided for installing the majority of seals and must be used when

specified.

Many seals are now coated with a protective wax and DO NOT need to be lubricated prior to installing. Always

check the relevant repair procedure which will state if a seal must be installed dry. Never touch these seals with

oily hands as the oil will contaminate the protective coating and affect the sealing properties of the seal; also,

make sure that installing tools and protection sleeves are free from oil and grease. Seals which must be

lubricated prior to installing should have the recommended lubricant applied to the areas specified in the repair

procedure.

Make sure that a seal is installed the correct way round. For example, the lip of the seal must face towards the

lubricant which it is sealing.

When installing an oil seal, make sure that it is positioned square to shaft and housing. Where the seal is to be

installed to a housing prior to installing over a shaft, take care not to allow the weight of an unsupported shaft

to rest on the seal.

Always use the recommended special tool and protection sleeve to install an oil seal. If no tool is specified, use a

suitable mandrel approximately 0.4 mm (0.015 in) smaller than the outside diameter of the seal. Use adhesive

tape on the shaft to protect the sealing lip of the seal.

Press or drift the seal in to the depth of its housing if the housing is shouldered or flush with the face of the

housing where no shoulder is provided. Make sure that the seal is not tilted in the housing when it is installed.

(A/C) System Precautions

The A/C system contains fluids and components which could be potentially hazardous to the service engineer or the

environment if not serviced and handled correctly. The following guidelines are intended to alert the service engineer to

potential sources of danger and emphasise the importance of ensuring the integrity of the A/C operating conditions and

components installed to the vehicle.

Where necessary, additional specific precautions are detailed in the relevant sections of this Manual and also in the

Health and Safety Section. These precautions must be referred to prior to commencing repair operations.

The refrigerant used in the A/C system is HC-134a (Hydro fluorocarbon) R134a.

• WARNINGS:

 Servicing must only be carried out by personnel familiar with both the vehicle system and the charging and testing

equipment. All operations must be carried out in a well ventilated area away from open flame and heat sources.

 R134a is a hazardous liquid and when handled incorrectly can cause serious injury. Suitable protective clothing,

consisting of face protection, heat proof gloves, rubber boots and rubber apron or waterproof overalls, must be worn

when carrying out operations on the A/C system.

Remedial actions

WARNING: Due to its low evaporating temperature, R134a must be handled with care. R134a splashed on any part

of the body will cause immediate freezing of that area. Also, refrigerant cylinders and replenishment trolleys when

discharging will freeze skin to them if contact is made.

If an accident involving R134a should occur, conduct the following remedial actions:

If liquid R134a enters the eye, do not rub it. Gently run large quantities of eye wash over affected eye to raise

the temperature. If an eye wash is not available, cool, clean water may be used to flush the eye. After rinsing,

cover the eye with a clean pad and seek immediate medical attention.

If liquid R134a is splashed onto the skin, run large quantities of water over the affected area to raise the

temperature. Implement the same action if the skin comes in contact with discharging cylinders. Wrap the

contaminated body parts in blankets (or similar materials) and seek immediate medical attention.

If the debilitating effects of inhalation of R134a vapour are suspected, seek fresh air. If the affected person is

unconscious, move them away from the contaminated area to fresh air and apply artificial respiration and/or

oxygen and seek immediate medical attention.

Service precautions

Observe the following precautions when handling components used in the system:

A/C units must not be lifted by their hoses, pipes or capillary lines.

Hoses and lines must not be subjected to any twist or stress; the efficiency of the system will be impaired by

kinks or restrictions. Make sure that hoses are correctly positioned before tightening couplings, and make sure

that all clips and supports are utilised.

Flexible hoses should not be positioned closer than 100 mm (4.0 in) to the exhaust manifold unless protected by

heat shielding.

Completed assemblies must be checked for refrigeration lines touching metal panels. Any direct contact of

components and panels may transmit noise and so must be eliminated.

The appropriate torque wrench must be used when tightening refrigerant connections to the stipulated value. An

additional spanner must be used to hold the union to prevent twisting of the pipe when tightening connections.

Before connecting any hose or pipe, make sure that refrigerant oil is applied to the seat of the new O-rings, BUT

NOT to the threads of the connection.

All protective plugs or caps must remain in place in the component until immediately prior to connection.

Make sure components are at room temperature before uncapping/unplugging, to prevent condensation of

moisture from the air that enters it.

When disconnecting, immediately plug or cap all pipes to prevent ingress of dirt and moisture into the system.

Components must not remain uncapped/unplugged, if a system has been left uncapped/unplugged for 24 hours

or longer, a new receiver/drier must be installed.

The receiver/drier contains desiccant which absorbs moisture. It must be positively sealed at all times. A

receiver/drier that has been left uncapped for longer than 24 hours must not be used; install a new unit.

The receiver/drier should be the last component connected to the system to make sure optimum dehydration

and maximum moisture protection of the system.

Whenever a component of the refrigeration system is replaced, it will also be necessary to install a new

receiver/drier unit.

Use alcohol and a clean lint-free cloth to clean dirty connections.

Make sure that all new parts installed are marked for use with R134a.

When a major repair has been completed, a leak test should be conducted; refer to the Repairs Section of this

manual for the correct procedure.

Refrigerant oil

CAUTION: Refrigerant oil (ND-8 PAG) easily absorbs water and must not be stored for long periods. Do not pour

unused refrigerant oil back into the container. Always use an approved refrigerant oil.

When replacing components in the system, drain the refrigerant oil from the component being replaced into a graduated

container. On assembly, add the quantity of refrigerant oil drained to the new component - See Compressor

Replacement in this Section.

A/C Compressor

A new compressor is sealed and pressurised with Nitrogen gas. When installing a new compressor, slowly release the

sealing cap; gas pressure should be heard to vent as the seal is broken.

CAUTION: A new compressor should always be sealed and could be pressurised with nitrogen gas. To avoid

possible oil loss, release the sealing cap(s) slowly. Do not remove the cap(s) until immediately prior to connecting the

pipes to the compressor.

Rapid refrigerant discharge

If the A/C system is damaged as a result of an accident and the system is punctured, the refrigerant will discharge

rapidly. The rapid discharge of refrigerant will also result in the loss of most of the oil from the system. The compressor

must be removed and all the remaining oil in the compressor drained and refilled as instructed in the air conditioning

section of this manual.

Precautions for refrigerant recovery, recycling and recharging

When the A/C system is recharged, any existing refrigerant is first recovered from the system and recycled. The system

is then charged with the required weight of refrigerant and volume of refrigerant oil.


Content   ..  1  2  3  4  5  ..