Jeep Grand Cherokee (2024 year). Manual in english - page 6
 

  Index      Manuals     Jeep Grand Cherokee (2024 year). Manual in english


Search            copyright infringement  


Content      ..     4      5      6      7     ..


Jeep Grand Cherokee (2024 year). Manual in english - page 6


NOTE:

Night Vision only shows objects of interest that are
warmer or colder than the surroundings.

Adjust the instrument cluster dimmer control bright-
ness to make the image appear brighter or dimmer.

To exit out of the Night Vision screen, select a different
menu in the instrument cluster display.

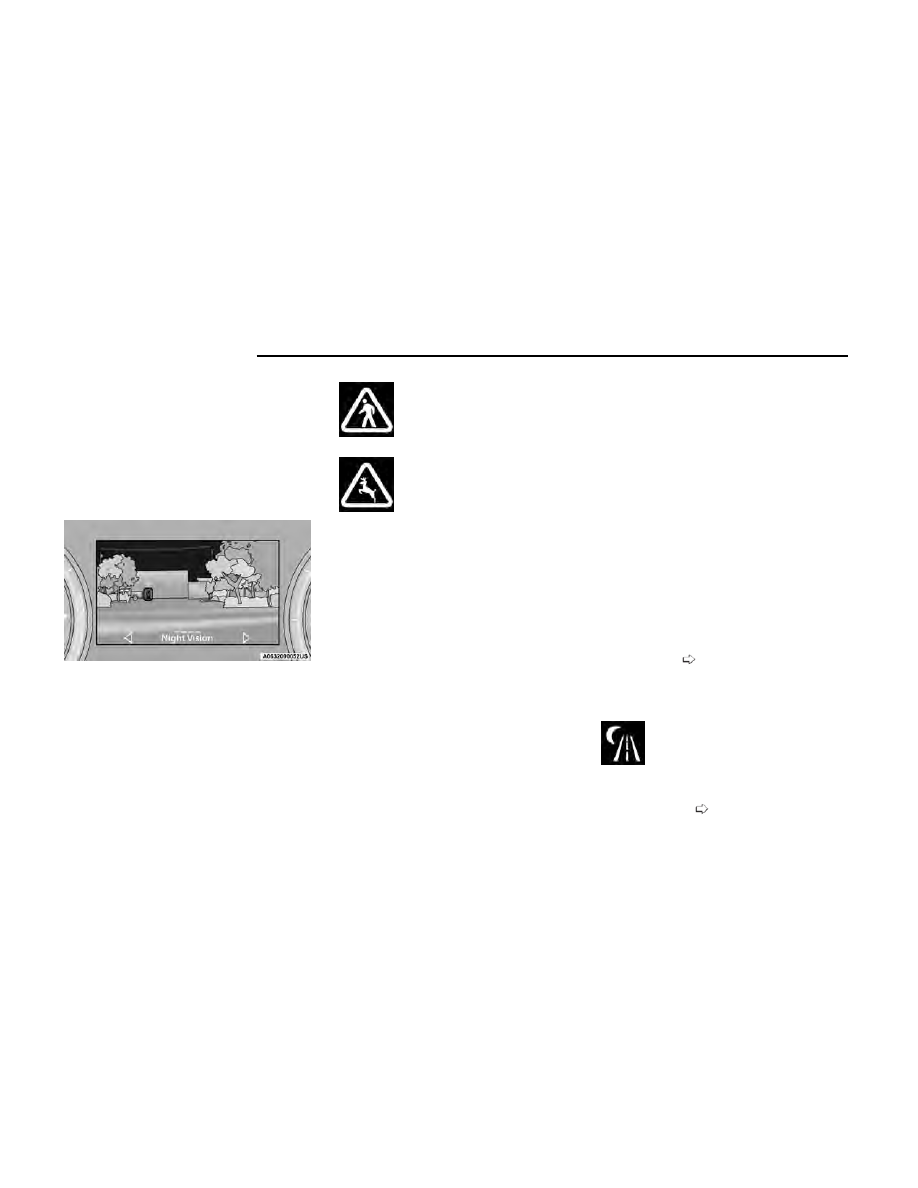
A yellow or red border and box highlight will appear
around objects of interest. More than one object of
interest may be highlighted.

The highlighting of the object(s) of interest will update
in real time based upon the current Night Vision
assessment.

The two categories of Night Vision warnings are Pedes-
trian Warnings and Animal Warnings.

Pedestrian Warning Light

Animal Warning Light

A Pedestrian or Animal Warning is considered either
Level 1 or Level 2. Level 1 warnings are yellow, and
Level 2 warnings are red. The colors are not
configurable.

Level 1 Warnings:

Yellow telltale in the instrument cluster display

Yellow highlights around the detected
pedestrian/animal

Occurs when the vehicle is moving at speeds
greater than 8 mph (13 km/h) and the target is in or
approaching the vehicle path

Level 2 Warnings:

Red telltale in the instrument cluster display

Red highlights around the detected
pedestrian/animal

Occurs when the vehicle is moving at speeds
greater than 8 mph (13 km/h) and a collision with
the detected pedestrian/animal is possible

The pedestrian/animal is directly in the vehicle
path, close to the headlight area

A video pop-up will display when there is a target
detected and the instrument cluster display is not
showing the Night Vision page

A chime will sound for a Level 2 Warning detection
event

Only one telltale can be displayed at a time based upon
priority.

The priority order of the warnings from highest to lowest
is:

1. Pedestrian Warning Level 2

2. Animal Warning Level 2

3. Pedestrian Warning Level 1

4. Animal Warning Level 1

Level 2 Warnings may display in the Head Up Display
(if equipped).

NOTE:

If the vehicle is stopped, or slowing down, all Level
2 warnings become Level 1 warnings.

You can enable or disable the warnings within the
Uconnect system

page 199.

If the warnings are off, the telltales, chimes, and
warning messages will all be off. Pedestrians and ani-
mals can still be detected by the system, but there will
be no warnings.

The Night Vision alert status telltale will be
gray when the warnings are suppressed. The
telltale will also turn gray to indicate that the
alerts are suppressed due to environmental

factors (e.g. daylight hours, external temperature is
greater than 86°F (30°C)) or if the gear selector is in
REVERSE. When the Night Vision alerts are active, the
telltale will be green

page 118.

Highlight Around Objects Of Interest

178

STARTING AND OPERATING

Camera Washers

When the front window washer is activated, the Night
Vision camera will also be washed

page 76.

WARNING!

Do not jerk the steering wheel in response to a
warning.

Never attempt to swerve around animals if doing
so would endanger you or others.

Do not stare at the image while driving. You could
crash and you or others could be injured.

The Night Vision system only provides alerts to
objects of interest and cannot serve as a substi-
tute for the driver’s personal judgment. The warn-
ings are meant to direct your attention to the
detected objects, but the Night Vision system does
not automatically brake the vehicle and may not
provide a warning with enough time to help avoid a
crash.

Warnings are only provided if a pedestrian or large
animal is detected by the system.

It is always the driver’s responsibility to be atten-
tive of road, traffic, and weather conditions,
vehicle speed, distance to the vehicle ahead, and
most importantly, brake operation, to ensure safe
operation of the vehicle under all road conditions.
Your complete attention is always required while
driving to maintain safe control of your vehicle.

DETECTION RANGE

The system can detect people 4 ft (1.25 m) tall or
greater in the upright position. The system can also
detect animals that are four-legged and 3 ft (1 m) tall or
greater in the upright position.

The detection distance for the system is between 26 ft
(8 m) and 328 ft (100 m) from the front of the vehicle.

The system may not be able to detect pedestrians or
animals in the following situations:

Pedestrian/animal is outside of the detection range

Pedestrian/animal is fully or partially covered

Pedestrian/animal does not reach the minimum
detection height

NOTE:

Other objects on the road that meet the height/shape/
temperature (e.g. sun exposure) of pedestrians/
animals may be detected and classified as targets.

WARNING!

Night Vision can only detect pedestrians and ani-
mals located within the range of the infrared
camera.

Night Vision may not detect pedestrians or animals
and highlight them if:

They are not in an upright position, for example
if they are sitting or lying down, or if the pedes-
trian is riding a bicycle

The figure in the display appears incomplete, for
example because the pedestrian or animal is
partially behind a vehicle

The pedestrian/animal is not directly ahead in
the coverage area

The pedestrian/animal is part of a group

(Continued)

WARNING!

The pedestrian is wearing certain types of
clothing

The pedestrian/animal is moving too quickly
through the field of view

The sensor is blocked by dirt, rain, snow, or ice

SERVICE THE NIGHT VISION
SYSTEM

When service conditions are present, the following fault
messages may appear in the instrument cluster display
when the vehicle is placed in the ON position.

If "Night Vision Unavailable Sensor Blocked" appears in
the instrument cluster display, make sure the camera is
clear of snow, ice, mud, dirt or other debris. The camera
is located in the upper fascia/bumper, inside the driver
side grille slot. Clean the camera using a soft wet cloth
or by pressing the Clean Camera button in the
Uconnect system. If the message continues to appear
after cycling the ignition, see an authorized dealer.

If “Night Vision Temporarily Unavailable” or “Night
Vision Unavailable Service Required" appears in the
instrument cluster display after cycling the ignition, see
an authorized dealer.

The camera must be properly aligned to work correctly.
If the camera needs adjustment, see an authorized
dealer. Do not attempt to adjust the camera yourself.

NOTE:

Alignment and performance of the Night Vision may be
affected by aftermarket modifications. Mopar® parts
should be used to get the optimal performance of this
system.

STARTING AND OPERATING

179

4

NIGHT VISION SYSTEM
LIMITATIONS

The Night Vision display is deactivated under the follow-
ing conditions:

Vehicle is shifted into REVERSE

The ignition is not in the ON/RUN position

The headlights are off and the vehicle speed is
greater than 8 mph (13 km/h)

The Night Vision display warnings are suppressed under
the following conditions:

Daylight hours

Temperatures above 86°F (30°C)

The system may not be fully functional in the following
situations:

On steep hills

On tight curves of the road

If the camera/sensor is damaged or blocked by dirt,
snow, ice, or other debris

In poor visibility conditions such as heavy fog, rain,
snow, or other weather conditions

If the vehicle has been modified with aftermarket
parts and/or accessories

NOTE:

If any of these conditions are present, the system does
not need service.

SURROUND VIEW CAMERA SYSTEM —
IF EQUIPPED

Your vehicle may be equipped with the Surround View
Camera system that allows you to see an on-screen
image of the surroundings and Top View of your vehicle
whenever the gear selector is put into REVERSE or a
different view is selected through the touchscreen but-
tons. The Top View of the vehicle will show which doors
are open. The image will be displayed on the Uconnect
display along with a caution note “Check Entire Sur-
roundings” across the top of the screen. After five sec-
onds, this note will disappear. The Surround View Cam-
era system is comprised of four sequential cameras
located in the front grille, rear liftgate and side mirrors.

NOTE:

The Surround View Camera system has programmable
settings that may be selected through the Uconnect
system

page 199.

Press this button on the touchscreen to
enter the Surround View Camera menu in
the Uconnect system.

When the vehicle is shifted into REVERSE, the Rear
View or Top View is the default view of the system.

When the vehicle is shifted out of REVERSE with cam-
era delay turned on, the camera image will continue to
be displayed for up to 10 seconds unless the vehicle
speed exceeds 8 mph (13 km/h), the vehicle is shifted
into PARK or the ignition is placed in the OFF position.
There is a touchscreen X button to disable the display
of the camera image.

When the vehicle is shifted out of REVERSE with cam-
era delay turned off, the Surround View Camera mode
is exited and the last known screen appears again.

When enabled, active guidelines are overlaid on the
image to illustrate the width of the vehicle, including
the side view mirrors and its projected backup path
based on the steering wheel position.

Different colored zones indicate the distance to the rear
of the vehicle.

The following table shows the approximate distances
for each zone:

Zone

Distance To The Rear Of

The Vehicle

Red

0 - 1 ft (0 - 30 cm)

Yellow

1 ft - 6.5 ft (30 cm - 2 m)

Green

6.5 ft or greater
(2 m or greater)

Modes Of Operation

Manual activation of the Surround View Camera is
selected by pressing the Surround View Camera button
located in the Controls menu within the Uconnect
system.

Top View

The Top View will show in the Uconnect system with
Rear View or Front View in a split screen display. There
are integrated ParkSense arcs in the image at the front,
rear, and if equipped, the sides of the vehicle. The arcs
will change color from yellow to red corresponding to
the distance zones to the oncoming object.

180

STARTING AND OPERATING

NOTE:

Front tires will be in image when the tires are
turned.

Due to wide angle cameras in the mirrors, the image
may appear distorted.

Top View will show which doors are open.

Open front doors and/or liftgate will cancel outside
image in Top View, but the standard view remains
unchanged.

Rear View Plus Top View

This is the default view of the system in
REVERSE and is always paired with the Top
View of the vehicle with optional active
guidelines for the projected path when

enabled.

Rear Cross Path View

Pressing the Rear Cross Path button will give
the driver a wider angle view of the rear cam-
era system. The Top View will be disabled
when this is selected.

Front View Plus Top View

Pressing the Front View will show you what is
immediately in front of the vehicle and is
always paired with the Top View of the
vehicle.

Front Cross Path View

Pressing the Front Cross Path button will give
the driver a wider angle view of the front
camera system. The Top View will be dis-
abled when this is selected.

Back Up Camera View

Pressing the Back Up Camera button will
provide a full screen rear view with Zoom
View.

NOTE:

If the Rear View Camera view was selected through the
Surround View Camera menu, exiting out of the Rear
View screen will return to the Surround View Camera
menu. If the Back Up Camera was manually activated
through the Controls menu of the Uconnect system,
exiting out of the display screen will return to the Con-
trols menu.

Deactivation

The system can be deactivated under the following
conditions:

The speed of the vehicle is greater than 8 mph
(13 km/h).

The vehicle is shifted into PARK.

The vehicle is in any gear other than REVERSE and
the touchscreen X button is pressed.

The camera delay system is turned off manually
through Uconnect Settings

page 199.

Front And Rear Camera Washers

When the front windshield washer is activated by pull-
ing the windshield wiper/washer lever rearward, the
front camera is also washed.

When the rear window washer is activated by pushing
the windshield wiper/washer lever forward, the Rear
Back Up camera and Digital Rearview Mirror
(if equipped) cameras are also washed. For more infor-
mation, see

page 77.

NOTE:

If snow, ice, mud, or any foreign substance builds up
on the camera lenses, clean the lenses, rinse with
water, and dry with a soft cloth. Do not cover the
lenses.

If a malfunction with the system has occurred, see
an authorized dealer.

WARNING!

Drivers must be careful when backing up even when
using the Surround View Camera. Always check care-
fully behind your vehicle, and be sure to check for
pedestrians, animals, other vehicles, obstructions, or
blind spots before backing up. You are responsible for
the safety of your surroundings and must continue to
pay attention while backing up. Failure to do so can
result in serious injury or death.

CAUTION!

To avoid vehicle damage, Surround View should
only be used as a parking aid. The Surround View
camera is unable to view every obstacle or object
in your drive path.

(Continued)

Surround View Camera View

STARTING AND OPERATING

181

4

CAUTION!

To avoid vehicle damage, the vehicle must be
driven slowly when using Surround View to be able
to stop in time when an obstacle is seen. It is rec-
ommended that the driver look frequently over
his/her shoulder when using Surround View.

ZOOM VIEW

When the Rear View Camera image is being displayed,
and the vehicle speed is below 8 mph (13 km/h) while
in any gear selector position, Zoom View is available.

By pressing the “magnifying glass” icon in
the upper left of the display screen, the
image will zoom in to two times the standard
view.

Pressing the icon a second time will return
the view to the standard Back Up Camera
display.

When Zoom View is selected while the vehicle is in
REVERSE, then shifted to DRIVE, the camera delay view
will display the standard Back Up Camera view. If the
vehicle is then returned to REVERSE gear from DRIVE,
the Zoom View selection will automatically resume.

Shifting to NEUTRAL from any gear will maintain the
selected view (Zoom or Standard) as long as the vehicle
speed is below 8 mph (13 km/h).

If the vehicle is in PARK, Zoom View is available until
the gear selector is placed in DRIVE or REVERSE and
speeds are at or above 8 mph (13 km/h).

NOTE:

If the vehicle is in DRIVE, NEUTRAL, or REVERSE,
and speed is greater than or equal to 8 mph
(13 km/h), Zoom View is unavailable and the icon
will appear gray.

While in Zoom View, the guidelines will not be
visible.

REFUELING THE VEHICLE — GASOLINE
ENGINE

1. Open the fuel filler door by pushing near the rear

outer edge of the fuel door near the center to
unlatch. Then use your hand to rotate fuel door to
full open.

NOTE:

In certain cold conditions, ice may prevent the
fuel door from opening. If this occurs, lightly push
around the perimeter of the fuel door to break
the ice buildup.

There is no fuel filler cap. Two flapper doors
inside the pipe seal the system.

2. Insert the fuel nozzle fully into the filler pipe – the

nozzle opens and holds the flapper doors while
refueling.

3. Fill the vehicle with fuel – when the fuel nozzle

“clicks” or shuts off the fuel tank is full.

4. Wait five seconds before removing the fuel nozzle to

allow fuel to drain from nozzle.

5. Remove the fuel nozzle and close the fuel door.

Engage the fuel door latch by pushing on the rear
outer edge near the center.

Fuel Filler Door

Fuel Filler

182

STARTING AND OPERATING

WARNING!

Never have any smoking materials lit in or near the
vehicle when the fuel door is open or the tank is
being filled.

Never add fuel when the engine is running. This is
in violation of most state and federal fire regula-
tions and may cause the Malfunction Indicator
Light to turn on.

A fire may result if fuel is pumped into a portable
container that is inside of a vehicle. You could be
burned. Always place fuel containers on the
ground while filling.

CAUTION!

To avoid fuel spillage and overfilling, do not “top off”
the fuel tank after filling.

REFUELING THE VEHICLE — HYBRID

1. Put the vehicle in the PARK position.

2. Push the fuel filler door release button (located

above the headlight switch).

3. Pushing the button will initiate a sequence of events

to depressurize the fuel system. A message will dis-
play in the cluster when the vehicle is ready to be
fueled.

NOTE:

After pushing the release button you will have
20 minutes to fuel the vehicle; beyond 20 min-
utes you will need to push the release button
again.

The fuel door should take 15 seconds to open
under normal conditions. It may take longer to
open in some situations, such as high ambient
temperatures or high altitudes.

If you hear a hissing sound, wait to begin fueling
the vehicle until after the hissing sound stops.

4. The fuel door pops away from the vehicle when it

has been released. To finish opening the fuel door,
manually rotate it away from the vehicle.

NOTE:

If the service station fuel pump repeatedly clicks
off (stops delivering fuel) before the fuel tank
has been filled, push the fuel door release but-
ton again.

If pushing the fuel door release button a second
time does not correct the problem, try using a
different fuel pump. If premature fuel pump shut-
off continues to be a problem, take the vehicle to
an authorized dealer for service.

If the fuel door does not re-latch upon closure,
push the fuel door release button again to reset
the latch. If pushing the fuel door release button
a second time does not correct the problem, take
the vehicle to an authorized dealer for service.

Fuel Filler Door Release Button

Instrument Cluster Message

STARTING AND OPERATING

183

4

NOTE:

In certain cold conditions, ice may prevent the fuel
door from opening. If this occurs, lightly push
around the perimeter of the fuel door to break the
ice buildup and re-release the fuel door using the
inside release button. Do not pry on the door.

5. There is no fuel filler cap. Two flapper doors inside

the pipe seal the system.

6. Insert the fuel nozzle fully into the filler pipe, the

nozzle opens and holds both flapper doors while
refueling.

7. Fill the vehicle with fuel. When the fuel nozzle

“clicks” or shuts off the fuel tank is full.

8. Wait five seconds before removing the fuel nozzle to

allow excess fuel to drain from nozzle.

9. Remove the fuel nozzle and then close the fuel door.

Engage the fuel door latch by pushing on the rear
outer edge near the center.

WARNING!

Never have any smoking materials lit in or near the
vehicle when the fuel door is open or the tank is
being filled.

Never add fuel when the engine is running. This is
in violation of most state and federal fire regula-
tions and may cause the Malfunction Indicator
Light to turn on.

A fire may result if fuel is pumped into a portable
container that is inside of a vehicle. You could be
burned. Always place fuel containers on the
ground while filling.

CAUTION!

To avoid fuel spillage and overfilling, do not “top off”
the fuel tank after filling.

Emergency Fuel Door Release

1. Place the vehicle's ignition in the RUN position and

make sure the READY indicator is not on.

NOTE:

If this is not performed, then the tank vent valve will
not open. This will result in premature fuel pump
shutoffs.

2. Open the liftgate.

3. Locate the grocery hook on the left side of the

vehicle on the rear side panel.

4. Rotate the hook a quarter turn and pull the hook out

of the side panel.

5. Pull the grocery hook directly out with the release

cable attached and gently pull to unlock the fuel
filler door.

NOTE:

Excessive force may break cable tether.

Fuel Filler Door

Rear Side Panel

Grocery Hook

184

STARTING AND OPERATING

6. Wait 15 seconds and then begin fueling your

vehicle.

VEHICLE LOADING

GROSS VEHICLE WEIGHT RATING
(GVWR)

The GVWR is the total permissible weight of your vehicle
including driver, passengers, vehicle, options and cargo.
The Vehicle Certification Label specifies maximum
capacities of front and rear axle systems (GAWR). Total
load must be limited so GVWR and front and rear GAWR
are not exceeded.

PAYLOAD

The payload of a vehicle is defined as the allowable
load weight a truck can carry, including the weight of
the driver, all passengers and cargo.

GROSS AXLE WEIGHT RATING
(GAWR)

The GAWR is the maximum permissible load on the
front and rear axles. The load must be distributed in the
cargo area so that the GAWR of each axle is not
exceeded.

Each axle GAWR is determined by the components in
the system with the lowest load carrying capacity (axle,
springs, tires or wheels). Heavier axles or suspension
components sometimes specified by purchasers for
increased durability do not necessarily increase the
vehicle's GVWR.

TIRE SIZE

The tire size on the Vehicle Certification Label repre-
sents the actual tire size on your vehicle. Replacement
tires must be equal to the load capacity of this tire size.

RIM SIZE

This is the rim size that is appropriate for the tire size
listed.

INFLATION PRESSURE

This is the cold tire inflation pressure for your vehicle
for all loading conditions up to full GAWR.

CURB WEIGHT

The curb weight of a vehicle is defined as the total
weight of the vehicle with all fluids, including vehicle
fuel, at full capacity conditions, and with no occupants
or cargo loaded into the vehicle. The front and rear curb
weight values are determined by weighing your vehicle
on a commercial scale before any occupants or cargo
are added.

LOADING

The actual total weight and the weight of the front and
rear of your vehicle at the ground can best be deter-
mined by weighing it when it is loaded and ready for
operation.

The entire vehicle should first be weighed on a commer-
cial scale to ensure that the GVWR has not been
exceeded. The weight on the front and rear of the
vehicle should then be determined separately to be
sure that the load is properly distributed over the front
and rear axle. Weighing the vehicle may show that the
GAWR of either the front or rear axles has been
exceeded but the total load is within the specified

GVWR. If so, weight must be shifted from front to rear or
rear to front as appropriate until the specified weight
limitations are met. Store the heavier items down low
and be sure that the weight is distributed equally. Stow
all loose items securely before driving.

Improper weight distributions can have an adverse
effect on the way your vehicle steers and handles and
the way the brakes operate.

WARNING!

Do not load your vehicle any heavier than the GVWR
or the maximum front and rear GAWR. If you do, parts
on your vehicle can break, or it can change the way
your vehicle handles. This could cause you to lose
control. Overloading can shorten the life of your
vehicle.

TRAILER TOWING

In this section you will find safety tips and information
on limits to the type of towing you can reasonably do
with your vehicle. Before towing a trailer, carefully
review this information to tow your load as efficiently
and safely as possible.

To maintain the New Vehicle Limited Warranty cover-
age, follow the requirements and recommendations in
this manual concerning vehicles used for trailer towing.

STARTING AND OPERATING

185

4

COMMON TOWING DEFINITIONS

The following trailer towing related definitions will assist
you in understanding the following information:

Gross Vehicle Weight Rating (GVWR)

The GVWR is the total allowable weight of your vehicle.
This includes driver, passengers, cargo and tongue
weight. The total load must be limited so that you do
not exceed the GVWR

page 107.

Gross Trailer Weight (GTW)

The GTW is the weight of the trailer plus the weight of
all cargo, consumables and equipment (permanent or
temporary) loaded in or on the trailer in its "loaded and
ready for operation" condition.

The recommended way to measure GTW is to put your
fully loaded trailer on a vehicle scale. The entire weight
of the trailer must be supported by the scale.

WARNING!

If the gross trailer weight is 5,000 lb (2,267 kg) or
more, it is required to use a weight-distributing hitch
to ensure stable handling of your vehicle. If you use a
standard weight-carrying hitch, you could lose control
of your vehicle and cause a collision.

Gross Combination Weight Rating

(GCWR)

The GCWR is the total allowable weight of your vehicle
and trailer when weighed in combination.

Gross Axle Weight Rating (GAWR)

The GAWR is the maximum capacity of the front and
rear axles. Distribute the load over the front and rear
axles evenly. Make sure that you do not exceed either
front or rear GAWR

page 185.

WARNING!

It is important that you do not exceed the maximum
front or rear GAWR. A dangerous driving condition can
result if either rating is exceeded. You could lose con-
trol of the vehicle and have a collision.

Tongue Weight (TW)

The TW is the downward force exerted on the hitch ball
by the trailer. You must consider this as part of the load
on your vehicle.

Trailer Frontal Area

The frontal area is the maximum height multiplied by
the maximum width of the front of a trailer.

Trailer Sway Control (TSC)

The TSC can be a mechanical telescoping link that can
be installed between the hitch receiver and the trailer
tongue that typically provides adjustable friction associ-
ated with the telescoping motion to dampen any
unwanted trailer swaying motions while traveling.

The electronic TSC (if equipped) recognizes a swaying
trailer and automatically applies individual wheel
brakes and/or reduces engine power to attempt to
eliminate the trailer sway.

Weight-Carrying Hitch

A weight-carrying hitch supports the trailer tongue
weight, just as if it were luggage located at a hitch ball
or some other connecting point of the vehicle. These
kinds of hitches are used to tow small and medium
sized trailers.

Weight-Distributing Hitch

A weight-distributing system works by applying leverage
through spring (load) bars. They are typically used for
heavier loads to distribute trailer tongue weight to the
tow vehicle's front axle and the trailer axle(s). When
used in accordance with the manufacturer's directions,
it provides for a more level ride, offering more consis-
tent steering and brake control thereby enhancing tow-
ing safety. The addition of a friction/hydraulic sway con-
trol also dampens sway caused by traffic and
crosswinds and contributes positively to tow vehicle and
trailer stability. Trailer Sway Control (TSC) and a weight-
distributing (load equalizing) hitch are recommended
for heavier Tongue Weights (TW) and may be required
depending on vehicle and trailer configuration/loading
to comply with Gross Axle Weight Rating (GAWR)
requirements.

WARNING!

If the gross trailer weight is 5,000 lb (2,267 kg) or
more, it is required to use a weight-distributing
hitch to ensure stable handling of your vehicle. If
you use a standard weight-carrying hitch, you could
lose control of your vehicle and cause a collision.

An improperly adjusted weight-distributing hitch
system may reduce handling, stability, braking per-
formance, and could result in a collision.

(Continued)

186

STARTING AND OPERATING

WARNING!

Weight-distributing systems may not be compatible
with surge brake couplers. Consult with your hitch
and trailer manufacturer or a reputable Recre-
ational Vehicle dealer for additional information.

RECOMMENDED DISTRIBUTION HITCH
ADJUSTMENT

1. Verify that the vehicle is at the Normal Ride Height.

NOTE:

The vehicle must remain in the engine run position
with all doors closed while attaching a trailer for
proper leveling of the air suspension system.

2. Position the vehicle to be ready to connect to the

trailer (do not connect the trailer).

3. For vehicles equipped with Quadra-Lift air suspen-

sion, use the touchscreen radio settings to enable
Tire/Jack mode. Tire/Jack mode will be canceled
and the procedure must be restarted if the vehicle
is driven at speeds above 5mph (8 km/h).

4. Measure the height from the top of the front wheel

opening on the fender to ground; this is height H1.

5. Attach the trailer to the vehicle without the weight

distribution bars connected.

6. Measure the height from the top of the front wheel

opening on the fender to the ground; this is height
H2.

7. Install and adjust the tension in the weight distribut-

ing bars per the manufacturer’s recommendations
so that the height of the front fender is approxi-
mately (H2-H1)/2+H1 (about 1/2 the difference
between H2 and H1 above Normal Ride Height
[H1]).

8. Use the touchscreen radio settings and switch off

Tire/Jack mode. Make sure the truck returns to Nor-
mal Ride Height. Perform a visual inspection of the
trailer and weight-distributing hitch to confirm the
manufacturers’ recommendations have been met.

9. The vehicle can now be driven.

Measurement Example

Example Height (mm)

H1

925

H2

946

H2-H1

21

(H2-H1)/2

10.5

(H2-H1)/2 + H1

935.5

Measuring Height (H)

STARTING AND OPERATING

187

4

TRAILER HITCH CLASSIFICATION

The following chart provides the industry standard for the maximum trailer weight a given trailer hitch class can tow and should be used to assist you in selecting the correct
trailer hitch for your intended towing condition.

Trailer Hitch Classification Definitions

Class

Max. Trailer Hitch Industry Standards

Class I - Light Duty

2,000 lb (907 kg)

Class II - Medium Duty

3,500 lb (1,587 kg)

Class III - Heavy Duty

6,000 lb (2,722kg)

Class IV - Extra Heavy Duty

10,000 lb (4,535 kg)

Refer to the “Trailer Towing Weights (Maximum Trailer Weight Ratings)” chart for the Maximum Gross Trailer Weight (GTW) towable for your given drivetrain.

All trailer hitches should be professionally installed on your vehicle.

TRAILER TOWING WEIGHTS (MAXIMUM TRAILER WEIGHT RATINGS)

Grand Cherokee — 2nd Row Seats

Engine

Model

GCWR

Frontal Area

Maximum GTW

Maximum Trailer TW (See Note)

2.0L

AWD Without Trailer

Tow Prep Group

9,625 lb (4,366 kg)

30 sq ft (2.79 sq m)

3,500 lb (1,588 kg)

350 lb (159 kg)

2.0L

AWD With Trailer

Tow Prep Group

12,125 lb

(5,568 kg)

40 sq ft (3.72 sq m)

6,000 lb (2,722 kg)

600 lb (272 kg)

3.6L

AWD Without Trailer

Tow Prep Group

8,600 lb (3,901 kg)

30 sq ft (2.79 sq m)

3,500 lb (1,588 kg)

350 lb (159 kg)

3.6L

AWD With Trailer

Tow Prep Group

11,300 lb

(5,126 kg)

40 sq ft (3.72 sq m)

6,200 lb (2,812 kg)

620 lb (281 kg)

3.6L

RWD Without Trailer

Tow Prep Group

8,500 lb (3,856 kg)

30 sq ft (2.79 sq m)

3,500 lb (1,588 kg)

350 lb (159 kg)

188

STARTING AND OPERATING

Engine

Model

GCWR

Frontal Area

Maximum GTW

Maximum Trailer TW (See Note)

3.6L

RWD With Trailer

Tow Prep Group

11,200 lb

(5,080 kg)

40 sq ft (3.72 sq m)

6,200 lb (2,812 kg)

620 lb (281 kg)

5.7L

AWD With Trailer

Tow Prep Group

12,700 lb

(5,761 kg)

40 sq ft (3.72 sq m)

7,200 lb (3,266 kg)

720 lb (327 kg)

Refer to local laws for maximum trailer towing speeds.

Grand Cherokee L — 3rd Row Seats

Engine

Model

GCWR

Frontal Area

Maximum GTW

Maximum Trailer TW (See Note)

3.6L

RWD Without Trailer

Tow Prep Group

9,000 lb (4,082 kg)

30 sq ft (2.79 sq m)

3,500 lb (1,588 kg)

350 lb (159 kg)

3.6L

RWD With Trailer

Tow Prep Group

11,700 lb

(5,307 kg)

40 sq ft (3.72 sq m)

6,200 lb (2,812 kg)

620 lb (281 kg)

3.6L

AWD Without Trailer

Tow Prep Group

9,000 lb (4,082 kg)

30 sq ft (2.79 sq m)

3,500 lb (1,588 kg)

350 lb (159 kg)

3.6L

AWD With Trailer

Tow Prep Group

11,700 lb

(5,307 kg)

40 sq ft (3.72 sq m)

6,200 lb (2,812 kg)

620 lb (281 kg)

5.7L

AWD With Trailer

Tow Prep Group

13,100 lb

(5,942 kg)

40 sq ft (3.72 sq m)

7,200 lb (3,266 kg)

720 lb (327 kg)

Refer to local laws for maximum trailer towing speeds.

Grand Cherokee 4xe

Model

GCWR

Frontal Area

Maximum GTW

Maximum Trailer TW

Hybrid 4x4 - Limited/Overland/

TrailHawk/Summit With Trailer

Tow Prep Group

12,125 lb (5,568 kg)

55 ft

2

(5.11 m

2

)

6,000 lb (2,722 kg)

600 lb (272 kg)

Hybrid 4x4 - Limited/Overland/

TrailHawk/Summit Without

Trailer Tow Prep Group

9,625 lb (4,366 kg)

30 ft

2

(2.79 m

2

)

3,500 lb (1,588 kg)

350 lb (159 kg)

Refer to local laws for maximum trailer towing speeds.

STARTING AND OPERATING

189

4

NOTE:

The trailer tongue weight must be considered as
part of the combined weight of occupants and
cargo, and should never exceed the weight refer-
enced on the Tire And Loading Information Placard

page 357. The addition of passengers and

cargo may require reducing trailer tongue weight
and Gross Trailer Weight (GTW). For GTW of
5,000 lbs (2267 kg) or more refer to Weight-
Distributing Hitch

page 186. Redistributing

cargo (to the trailer) may be necessary to avoid
exceeding Rear Gross Axle Weight Rating (GAWR).

Vehicles not factory-equipped with the trailer tow
package are limited to 3,500 lb (1,588 kg) GTW and
350 lb (158 kg) TW.

TRAILER HITCH RECEIVER COVER
REMOVAL — IF EQUIPPED

Your vehicle may be equipped with a trailer hitch
receiver cover, this must be removed to access the
trailer hitch receiver. This cover is located at the bottom
center of the rear fascia/bumper.

1. Turn the two locking retainers located at the bottom

of the hitch receiver cover a quarter turn counter-
clockwise and pull bottom of the hitch receiver cover
outward (towards you).

2. Pull the bottom of the cover outward (towards you)

then downwards to disengage the tabs located at
the top of the hitch receiver cover to remove.

To reinstall the cover after towing repeat the procedure
in reverse order.

NOTE:

Be sure to engage all tabs of the hitch receiver cover in
the fascia/bumper prior to installation.

TRAILER AND TONGUE WEIGHT

Never exceed the maximum tongue weight stamped on
your fascia/bumper or trailer hitch.

WARNING!

Always load a trailer with 60% of the weight in the
front of the trailer. This places 10% of the GTW on the
tow hitch of your vehicle. Loads balanced over the
wheels or heavier in the rear can cause the trailer to
sway severely side to side which will cause loss of
control of the vehicle and trailer. Failure to load trail-
ers heavier in front is the cause of many trailer
collisions.

Consider the following items when computing the
weight on the rear axle of the vehicle:

The tongue weight of the trailer.

The weight of any other type of cargo or equipment
put in or on your vehicle.

The weight of the driver and all passengers.

Hitch Receiver Cover

1 — Hitch Receiver Cover
2 — Locking Retainers

Weight Distribution

190

STARTING AND OPERATING

NOTE:

Remember that everything put into or on the trailer
adds to the load on your vehicle. Also, additional
factory-installed options or dealer-installed options
must be considered as part of the total load on your
vehicle. Refer to the Tire And Loading Information Plac-
ard for the maximum combined weight of occupants
and cargo for your vehicle.

TOWING REQUIREMENTS

To promote proper break-in of the new vehicle drivetrain
components, the following guidelines are
recommended.

CAUTION!

Do not tow a trailer at all during the first 500 miles
(805 km) the new vehicle is driven. The engine,
axle or other parts could be damaged.

Then, during the first 500 miles (805 km) that a
trailer is towed, do not drive over 50 mph
(80 km/h) and do not make starts at full throttle.
This helps the engine and other parts of the
vehicle wear in at the heavier loads.

Perform the maintenance listed in the Scheduled Ser-
vicing

page 303. When towing a trailer, never

exceed the GAWR or GCWR ratings.

WARNING!

Improper towing can lead to a collision. Follow these
guidelines to make your trailer towing as safe as pos-
sible:

Make certain that the load is secured in the trailer
and will not shift during travel. When trailering
cargo that is not fully secured, dynamic load shifts
can occur that may be difficult for the driver to con-
trol. You could lose control of your vehicle and have
a collision.

When hauling cargo or towing a trailer, do not over-
load your vehicle or trailer. Overloading can cause
a loss of control, poor performance or damage to
brakes, axle, engine, transmission, steering, sus-
pension, chassis structure or tires.

Safety chains must always be used between your
vehicle and trailer. Always connect the chains to
the hook retainers of the vehicle hitch. Cross the
chains under the trailer tongue and allow enough
slack for turning corners.

Vehicles with trailers should not be parked on a
grade. When parking, apply the parking brake on
the tow vehicle. Put the tow vehicle transmission in
PARK (P). For four-wheel drive vehicles, make sure
the transfer case is not in NEUTRAL (N). Always,
block or "chock" the trailer wheels.

GCWR must not be exceeded.

Total weight must be distributed between the tow
vehicle and the trailer such that the following four
ratings are not exceeded

:

GVWR

GTW

GAWR

Tongue weight rating for the trailer hitch utilized

Towing Requirements — Tires

Do not attempt to tow a trailer while using a com-
pact spare tire.

Do not drive more than 50 mph (80 km/h) when
towing while using a full size spare tire.

Proper tire inflation pressures are essential to the
safe and satisfactory operation of your vehicle.

Check the trailer tires for proper tire inflation pres-
sures before trailer usage.

Check for signs of tire wear or visible tire damage
before towing a trailer.

Replacing tires with a higher load carrying capacity
will not increase the vehicle's GVWR and GAWR
limits.

For further information

page 357.

Towing Requirements — Trailer Brakes

Do

not

interconnect the hydraulic brake system or

vacuum system of your vehicle with that of the
trailer. This could cause inadequate braking and
possible personal injury.

An electronically actuated trailer brake controller is
required when towing a trailer with electronically
actuated brakes. When towing a trailer equipped
with a hydraulic surge actuated brake system, an
electronic brake controller is not required.

Trailer brakes are recommended for trailers over
1,000 lb (453 kg) and required for trailers in excess
of 2,000 lb (907 kg).

STARTING AND OPERATING

191

4

WARNING!

Do not connect trailer brakes to your vehicle's
hydraulic brake lines. It can overload your brake
system and cause it to fail. You might not have
brakes when you need them and could have an
accident.

Towing any trailer will increase your stopping dis-
tance. When towing, you should allow for addi-
tional space between your vehicle and the vehicle
in front of you. Failure to do so could result in an
accident.

CAUTION!

If the trailer weighs more than 1,000 lb (453 kg)
loaded, it should have its own brakes and they should
be of adequate capacity. Failure to do this could lead
to accelerated brake lining wear, higher brake pedal
effort, and longer stopping distances.

Towing Requirements — Trailer Lights

And Wiring

Whenever pulling a trailer, regardless of the trailer size,
stop lights and turn signals on the trailer are required
for motoring safety.

The Trailer Tow Package may include a four- and seven-
pin wiring harness. Use a factory approved trailer har-
ness and connector.

NOTE:

Do not cut or splice wiring into the vehicle’s wiring
harness.

The electrical connections are all complete to the
vehicle but you must mate the harness to a trailer con-
nector. Refer to the following illustrations.

NOTE:

Disconnect the trailer wiring connector from the
vehicle (or any other device plugged into vehicle’s
electrical connectors) before launching a boat into
water.

Be sure to reconnect once clear from water area.

TOWING TIPS

Before towing, practice turning, stopping, and backing
up the trailer in an area located away from heavy traffic.

Automatic Transmission

Select the DRIVE (D) range when towing. The transmis-
sion controls include a drive strategy to avoid frequent
shifting when towing. However, if frequent shifting does
occur while in DRIVE, you can use the AutoStick shift
control to manually select a lower gear.

Four-Pin Connector

1 — Ground
2 — Park
3 — Left Stop/Turn
4 — Right Stop/Turn

Seven-Pin Connector

1 — Backup Lamps
2 — Running Lamps
3 — Left Stop/Turn
4 — Ground
5 — Battery
6 — Right Stop/Turn
7 — Electric Brakes

192

STARTING AND OPERATING

NOTE:

Using a lower gear while operating the vehicle under
heavy loading conditions, will improve performance and
extend transmission life by reducing excessive shifting
and heat buildup. This action will also provide better
engine braking.

Cruise Control — If Equipped

Do not use on hilly terrain or with heavy loads.

When using the Cruise Control, if you experience
speed drops greater than 10 mph (16 km/h), disen-
gage until you can get back to cruising speed.

Use Cruise Control in flat terrain and with light loads
to maximize fuel efficiency.

RECREATIONAL TOWING (BEHIND MOTORHOME)

TOWING THIS VEHICLE BEHIND ANOTHER VEHICLE

Towing Condition

Wheels OFF The Ground

Two-Wheel Drive Models

Four-Wheel Drive Models

Without 4WD LOW

Four-Wheel Drive Models With

4WD LOW

Flat Tow

NONE

NOT ALLOWED

NOT ALLOWED

See Instructions

Transmission in PARK

Ensure vehicle is set to Nor-
mal Ride Height —
if equipped

Transfer case in N
(NEUTRAL)

Tow in forward direction

Dolly Tow

Front

NOT ALLOWED

NOT ALLOWED

NOT ALLOWED

Rear

OK

NOT ALLOWED

NOT ALLOWED

On Trailer

ALL

OK

OK

OK

NOTE:

When towing your vehicle, always follow applicable
state and provincial laws. Contact state and provin-
cial Highway Safety offices for additional details.

Vehicles equipped with Quadra-Lift must be placed
in Transport Mode before tying them down (from the
body) on a trailer or flatbed truck. If the vehicle can-
not be placed in Transport Mode (for example,
engine will not run), tie-downs should be fastened

over the tires using specific straps (not to the body).
Failure to follow these instructions may cause fault
codes to be set and/or cause loss of proper tie-
down tension.

STARTING AND OPERATING

193

4

RECREATIONAL TOWING —
TWO-WHEEL DRIVE MODELS

DO NOT flat tow this vehicle. Damage to the drivetrain
will result.

Recreational towing (for two-wheel drive models) is
allowed ONLY if the rear wheels are OFF the ground.
This may be accomplished using a tow dolly or vehicle
trailer. If using a tow dolly, follow this procedure:

1. Properly secure the dolly to the tow vehicle, follow-

ing the dolly manufacturer's instructions.

2. Drive the rear wheels onto the tow dolly.

3. Apply the Electric Park Brake. Shift the transmission

into PARK.

4. Turn the ignition OFF.

5. Properly secure the rear wheels to the dolly, follow-

ing the dolly manufacturer’s instructions.

6. Install a suitable clamping device, designed for tow-

ing, to secure the front wheels in the straight
position.

CAUTION!

Towing with the rear wheels on the ground will cause
severe transmission damage. Damage from improper
towing is not covered under the New Vehicle Limited
Warranty.

RECREATIONAL TOWING —
QUADRA-TRAC I (SINGLE-SPEED
TRANSFER CASE WITHOUT 4WD
LOW RANGE) FOUR-WHEEL DRIVE
MODELS

Recreational towing is not allowed.

These models do

not have a N (NEUTRAL) position in the transfer case.

NOTE:

This vehicle may be towed on a flatbed or vehicle trailer
provided all four wheels are

OFF

the ground.

CAUTION!

Towing this vehicle in violation of the previously
stated requirements can cause severe transmission
and/or transfer case damage. Damage from improper
towing is not covered under the New Vehicle Limited
Warranty.

RECREATIONAL TOWING —
QUADRA–TRAC II WITH 4WD LOW
RANGE

The transfer case must be shifted into N (NEUTRAL)
and the transmission must be in PARK (P) for recre-
ational towing. The N (NEUTRAL) selection button is
adjacent to the air suspension switch. Shifts into and
out of transfer case N (NEUTRAL) can take place with
the selector switch in any mode position.

NOTE:

Ensure vehicle is set to Normal Ride Height -
if equipped

page 145.

If the vehicle is equipped with Quadra-Lift air sus-
pension, the engine should be started and left run-
ning for a minimum of 60 seconds (with all the
doors closed) at least once every 24 hours. This
process allows the air suspension to adjust the vehi-
cle’s ride height to compensate for temperature
effects.

CAUTION!

DO NOT dolly tow any 4WD vehicle. Towing with
only one set of wheels on the ground (front or rear)
will cause severe transmission and/or transfer
case damage. Tow with all four wheels either ON
the ground, or OFF the ground (using a vehicle
trailer).

Tow only in a forward direction. Towing this vehicle
backwards can cause severe damage to the trans-
fer case.

The transmission must be in PARK for recreational
towing.

Before recreational towing, perform the procedure
outlined under “Shifting into N (NEUTRAL)” to be
certain that the transfer case is fully in N (NEU-
TRAL). Otherwise, internal damage will result.

Towing this vehicle in violation of the previously
stated requirements can cause severe transmis-
sion and/or transfer case damage. Damage from
improper towing is not covered under the New
Vehicle Limited Warranty.

(Continued)

194

STARTING AND OPERATING

CAUTION!

Do not use a bumper-mounted clamp-on tow bar
on your vehicle. The bumper face bar will be
damaged.

Shifting Into Transfer Case N (NEUTRAL)

WARNING!

You or others could be injured or killed if you leave
the vehicle unattended with the transfer case in the N
(NEUTRAL) position without first fully engaging the
Electric Park Brake. The transfer case N (NEUTRAL)
position disengages both the front and rear drive-
shafts from the powertrain and will allow the vehicle
to roll, even if the transmission is in PARK. The Elec-
tric Park Brake should always be applied when the
driver is not in the vehicle.

CAUTION!

It is necessary to follow these steps to be certain that
the transfer case is fully in N (NEUTRAL) before recre-
ational towing to prevent damage to internal parts.

Use the following procedure to prepare your vehicle for
recreational towing:

1. Bring the vehicle to a complete stop on level ground,

with the engine running.

2. Press and hold the brake pedal.

3. Shift the transmission into NEUTRAL.

4. If vehicle is equipped with Quadra-Lift air suspen-

sion, ensure the vehicle is set to Normal Ride Height
with the Auto Entry/Exit setting deselected.

NOTE:

Steps 1 through 4 are requirements that must be
met before pushing the N (NEUTRAL) button, and
must continue to be met until the shift has been
completed. If any of these requirements are not
met before pushing the N (NEUTRAL) button or
are no longer met during the shift, then the N
(NEUTRAL) indicator light will flash continuously
until all requirements are met or until the N
(NEUTRAL) button is released.

The ignition must be in the ON/RUN position for
a shift to take place and for the position indicator
lights to be operable. If the ignition is not in the
ON/RUN position, the shift will not take place
and no position indicator lights will be on or
flashing.

A flashing N (NEUTRAL) position indicator light
indicates that shift requirements have not been
met.

If the vehicle is equipped with Quadra-Lift air
suspension, the engine should be started and
left running for a minimum of 60 seconds (with
all the doors closed) at least once every
24 hours. This process allows the air suspension
to adjust the vehicle’s ride height to compensate
for temperature effects.

Engaging/disengaging of the Electric Park Brake
requires the ignition to be in the ON/RUN
position.

If shift conditions/interlocks are not met, a “4WD
Shift Canceled” or a “4WD Shift Aborted/ Retry
Shift” message will be displayed on the instru-
ment cluster. To reattempt shift, put the trans-
mission in NEUTRAL (N) and push and hold the
4WD LOW button.

If shift conditions/interlocks are not met, a “To
Complete 4WD Shift Put Transmission In Neu-
tral” or a “To Complete 4WD Shift Speed Must Be
Below 3 MPH” or a “To Complete 4WD Shift Allow
Engine To Return To Idle” message will flash from
the instrument cluster display

page 107.

5. Using a ballpoint pen or similar object, push and

hold the recessed transfer case N (NEUTRAL) button
(located by the selector switch) for more than four
seconds. The light behind the N symbol will blink,
indicating shift in progress. The light will stop blink-
ing (stay on solid) when the shift to N (NEUTRAL) is
complete. A “Four-Wheel Drive System In Neutral”
message will appear in the instrument cluster.

N (NEUTRAL) Button

STARTING AND OPERATING

195

4

6. After the shift is complete and the N (NEUTRAL) light

stays on, release the N (NEUTRAL) button.

7. Shift the transmission into REVERSE or DRIVE.

8. Release the brake pedal for five seconds and

ensure that there is no vehicle movement.

9. Press and hold the brake pedal. Shift the transmis-

sion back into NEUTRAL.

10. Apply the Electric Park Brake.

11. With the transmission and transfer case in N (NEU-

TRAL), push and hold the ENGINE START/STOP
button until the engine turns off. Ensure vehicle is
in RUN position with the engine off.

12. Place the transmission gear selector in PARK.

Release the brake pedal.

13. Attach the vehicle to the tow vehicle using a suit-

able tow bar.

14. Release the Electric Park Brake. Ensure vehicle is

in RUN position with the engine off.

15. Push the ENGINE START/STOP button twice (with-

out pressing the brake pedal), to turn the ignition
to the OFF position.

Shifting Out Of Transfer Case N

(NEUTRAL)

Use the following procedure to prepare your vehicle for
normal use:

1. Bring the vehicle to a complete stop, leaving it con-

nected to the tow vehicle.

2. Place ignition in ON/RUN.

3. Apply the Electric Park Brake.

4. Start the engine.

NOTE:

Steps 1 through 5 are requirements that must be
met before pushing the N (NEUTRAL) button, and
must continue to be met until the shift has been
completed. If any of these requirements are not
met before pushing the N (NEUTRAL) button or
are no longer met during the shift, the N (NEU-
TRAL) indicator light will flash continuously until
all requirements are met or until the N (NEU-
TRAL) button is released.

The ignition must be in the ON/RUN position for
a shift to take place and for the position indicator
lights to be operable. If the ignition is not in the
ON/RUN position, the shift will not take place
and no position indicator lights will be on or
flashing.

A flashing N (NEUTRAL) position indicator light
indicates that shift requirements have not been
met.

5. Press and hold the brake pedal.

6. Shift the transmission into NEUTRAL.

7. Using a ballpoint pen or similar object, push and

hold the recessed transfer case N (NEUTRAL) button
(located by the selector switch) for five seconds.

NOTE:

If the engine is in high idle after a cold start, the
instrument cluster will display “To Complete 4WD
Shift Allow Engine To Return To Idle” and the trans-
fer case will not be able to shift out of N (NEUTRAL).

8. When the N (NEUTRAL) indicator light turns off,

release the N (NEUTRAL) button. After the N (NEU-
TRAL) button has been released, the transfer case
will always shift to 4WD HI.

9. Shift the transmission into PARK. Turn the engine

off.

10. Release the brake pedal.

11. Disconnect vehicle from the tow vehicle.

12. Start the engine.

13. Press and hold the brake pedal.

14. Release the Electric Park Brake.

15. Shift the transmission into REVERSE or DRIVE,

release the brake pedal, and check that the
vehicle operates normally.

N (NEUTRAL) Button

196

STARTING AND OPERATING

DRIVING TIPS

ON-ROAD DRIVING TIPS

Utility vehicles have higher ground clearance and a nar-
rower track to make them capable of performing in a
wide variety of off-road applications. Specific design
characteristics give them a higher center of gravity than
conventional passenger cars.

An advantage of the higher ground clearance is a better
view of the road, allowing you to anticipate problems.
They are not designed for cornering at the same speeds
as conventional passenger cars any more than low-
slung sports cars are designed to perform satisfactorily
in off-road conditions. Avoid sharp turns or abrupt
maneuvers. As with other vehicles of this type, failure to
operate this vehicle correctly may result in loss of con-
trol or vehicle rollover.

OFF-ROAD DRIVING TIPS

Quadra-Lift — If Equipped

When off-roading, it is recommended that the lowest
useable vehicle height that will clear the current
obstacle or terrain be selected. The vehicle height
should then be raised as required by the changes in
terrain.

The Selec-Terrain switch will automatically change the
vehicle to the optimized height based on the Selec-
Terrain switch position. The vehicle height can be
changed from the default height for each Selec-Terrain
mode by normal use of the air suspension switches.

When To Use 4WD LOW Range —

If Equipped

When off-road driving, shift to 4WD LOW for additional
traction. This range should be limited to extreme situa-
tions such as deep snow, mud, or sand where addi-
tional low speed pulling power is needed. Vehicle
speeds in excess of 25 mph (40 km/h) should be
avoided when in 4WD LOW range.

WARNING!

Do not drive in 4WD LOW range on dry pavement;
driveline damage may result. 4WD LOW range locks
front and rear drivelines together and does not allow
for differential action between the front to rear drive-
shafts. Driving in 4WD LOW on pavement will cause
driveline binding; use only on wet or slippery
surfaces.

Driving Through Water

Although your vehicle is capable of driving through
water, there are a number of precautions that must be
considered before entering the water.

NOTE:

Your vehicle is capable of water fording in up to
24 inches (61 cm) with air suspension or 21 inches
(53 cm) without air suspension, of water while crossing
small rivers or streams. To maintain optimal perfor-
mance of your vehicle's heating and ventilation system
it is recommended to switch the system into recircula-
tion mode during water fording. Be sure to avoid lower-
ing the vehicle in water, ensure that the easy exit entry
setting is turned off in Uconnect settings.

CAUTION!

When driving through water, do not exceed 5 mph
(8 km/h). Always check water depth before entering
as a precaution, and check all fluids afterward. Driv-
ing through water may cause damage that may not be
covered by the New Vehicle Limited Warranty.

Driving through water more than a few inches/
centimeters deep will require extra caution to ensure
safety and prevent damage to your vehicle. If you must
drive through water, try to determine the depth and the
bottom condition (and location of any obstacles) prior to
entering. Proceed with caution and maintain a steady
controlled speed less than 5 mph (8 km/h) in deep
water to minimize wave effects.

Flowing Water

If the water is swift flowing and rising (as in storm run-
off), avoid crossing until the water level recedes and/or
the flow rate is reduced. If you must cross flowing water
avoid depths in excess of 9 inches (23 cm). The flowing
water can erode the streambed, causing your vehicle to
sink into deeper water. Determine exit point(s) that are
downstream of your entry point to allow for drifting.

Standing Water

Avoid driving in standing water deeper than 24 inches
(61 cm) with air suspension or 21 inches (53 cm) with-
out air suspension, and reduce speed appropriately to
minimize wave effects. Maximum speed is 5 mph
(8 km/h).

Maintenance

After driving through deep water, inspect your vehicle
fluids and lubricants (engine oil, transmission oil, axle,
transfer case) to ensure the fluids have not been con-

STARTING AND OPERATING

197

4

taminated. Contaminated fluid (milky, foamy in appear-
ance) should be flushed/changed as soon as possible
to prevent component damage.

Driving In Snow, Mud And Sand

In heavy snow, when pulling a load, or for additional
control at slower speeds, shift the transmission to a low
gear and shift the transfer case to 4WD LOW if neces-
sary

page 141. Only shift into a lower gear to main-

tain forward motion. Over-revving the engine can spin
the wheels and traction will be lost.

Avoid abrupt downshifts on icy or slippery roads,
because engine braking may cause skidding and loss of
control.

Hill Climbing

NOTE:

Before attempting to climb a hill, determine the condi-
tions at the crest and/or on the other side.

Before climbing a steep hill, shift the transmission to a
lower gear and shift the transfer case to 4WD LOW. Use
FIRST gear and 4WD LOW for very steep hills.

If you stall or begin to lose forward motion while climb-
ing a steep hill, allow your vehicle to come to a stop and
immediately apply the brakes. Restart the engine, and
shift into REVERSE (R). Back slowly down the hill, allow-
ing the compression braking of the engine to help regu-
late your speed. If the brakes are required to control
vehicle speed, apply them lightly and avoid locking or
skidding the tires.

WARNING!

If the engine stalls, you lose forward motion, or can-
not make it to the top of a steep hill or grade, never
attempt to turn around. To do so may result in tipping

(Continued)

WARNING!

and rolling the vehicle. Always back carefully straight
down a hill in REVERSE gear. Never back down a hill
in NEUTRAL using only the brake.

Remember, never drive diagonally across a hill. Always
drive straight up or down.

If the wheels start to slip as you approach the crest of a
hill, ease off the accelerator and maintain forward
motion by turning the front wheels slowly. This may pro-
vide a fresh “bite” into the surface and will usually pro-
vide traction to complete the climb.

Traction Downhill

When descending mountains or hills, use Hill Descent
Control or Selec-Speed Control to avoid repeated heavy
braking.

If not equipped with Hill Descent Control or Selec-Speed
Control use the following procedure:

Shift the transmission into a low gear, and the transfer
case into 4WD LOW range. Let the vehicle go slowly
down the hill with all four wheels turning against engine
compression drag. This will permit you to control the
vehicle speed and direction.

When descending mountains or hills, repeated braking
can cause brake fade with loss of braking control. Avoid
repeated heavy braking by downshifting the transmis-
sion whenever possible.

After Driving Off-Road

Off-road operation puts more stress on your vehicle
than does most on-road driving. After going off-road, it
is always a good idea to check for damage. That way
you can get any problems taken care of right away and
have your vehicle ready when you need it.

Completely inspect the underbody of your vehicle.
Check tires, body structure, steering, suspension,
and exhaust system for damage.

Inspect the radiator for mud and debris and clean
as required.

Check threaded fasteners for looseness, particularly
on the chassis, drivetrain components, steering, and
suspension. Retighten them, if required, and torque
to the values specified in the Service Manual.

Check for accumulations of plants or brush. These
things could be a fire hazard. They might hide dam-
age to fuel lines, brake hoses, axle pinion seals, and
propeller shafts.

After extended operation in mud, sand, water, or
similar dirty conditions, have the radiator, fan, brake
rotors, wheels, brake linings, and axle yokes
inspected and cleaned as soon as possible.

WARNING!

Abrasive material in any part of the brakes may cause
excessive wear or unpredictable braking. You might
not have full braking power when you need it to pre-
vent a collision. If you have been operating your
vehicle in dirty conditions, get your brakes checked
and cleaned as necessary.

If you experience unusual vibration after driving in
mud, slush or similar conditions, check the wheels
for impacted material. Impacted material can cause
a wheel imbalance and freeing the wheels of it will
correct the situation.

198

STARTING AND OPERATING

MULTIMEDIA

UCONNECT SYSTEMS

For detailed information about your Uconnect 5/5 NAV
With 8.4-inch Display or Uconnect 5/5 NAV With 10.1-
inch Display system, refer to your Uconnect Radio
Instruction Manual.

NOTE:

Uconnect screen images are for illustration purposes
only and may not reflect exact software for your vehicle.

CYBERSECURITY

Depending on applicability, your vehicle may be able to
send or receive information from a wired or wireless
network. This information allows systems and features
in your vehicle to function properly.

Your vehicle may be equipped with certain security fea-
tures to reduce the risk of unauthorized and unlawful
access to vehicle systems and wireless communica-
tions. Vehicle software technology continues to evolve
over time and FCA US LLC, working with its suppliers,
evaluates and takes appropriate steps as needed. As
always, if you experience unusual behavior, contact an
authorized dealer immediately,

page 380, or refer

to your Uconnect Radio Instruction Manual for addi-
tional contact information.

The risk of unauthorized and unlawful access to your
vehicle systems may still exist, even if the most recent
version of vehicle software (such as Uconnect software)
is installed.

WARNING!

ONLY insert trusted devices/components into your
vehicle. Media of unknown origin could possibly
contain malicious software, and if installed in your
vehicle, it may increase the possibility for vehicle
systems to be breached.

As always, if you experience unusual vehicle
behavior, take your vehicle to an authorized dealer
immediately.

NOTE:

To help further improve user experience, features, sta-
bility, etc., and minimize the potential risk of a security
breach, vehicle owners should routinely check
www.driveuconnect.com (US Residents) or
www.driveuconnect.ca (Canadian Residents) to learn
about available Uconnect software updates.

UCONNECT SETTINGS

The Uconnect system uses a combination of buttons on
the touchscreen and buttons on the faceplate located
on the center of the instrument panel. These buttons
allow you to access and change the customer program-
mable features. Many features can vary by vehicle.

Buttons on the faceplate are located below and/or
beside the Uconnect system in the center of the instru-
ment panel. In addition, there is a SCROLL/ENTER con-
trol knob located on the right side. Turn the control
knob to scroll through menus and change settings.
Push the center of the control knob one or more times
to select or change a setting.

Your Uconnect system may also have SCREEN OFF and
MUTE buttons on the faceplate.

Push the SCREEN OFF button on the faceplate to turn
off the Uconnect screen. Push the button again or tap
the screen to turn the screen on.

Press the Back Arrow button to exit out of a Menu or
certain option on the Uconnect system.

Push and hold the Power button on the radio’s face-
plate for a minimum of 15 seconds to reset the radio.

CUSTOMER PROGRAMMABLE
FEATURES

Uconnect 5/5 NAV With 10.1-inch Display

1 — Uconnect Buttons On The Touchscreen
2 — Uconnect Buttons On The Faceplate

199

5

Press the Vehicle button, then press the Settings tab on
the top of the touchscreen. In this menu, the Uconnect
system allows you to access all of the available pro-
grammable features.

NOTE:

Only one touchscreen area may be selected at a
time.

Depending on the vehicle’s options, feature settings
may vary.

When making a selection, press the button on the
touchscreen to enter the desired menu. Once in the
desired menu, press and release the preferred setting
option until a check mark appears next to the setting,
showing that setting has been selected. Once the set-
ting is complete, press the Vehicle button to exit to the
screen. Pressing the Up or Down Arrow button on the
right side of the screen will allow you to toggle up or
down through the available settings.

Display

When the Display button is pressed on the touchscreen, the system will display the options related to the theme (if equipped), brightness, and color of the touchscreen. The
available settings are:

NOTE:

Depending on the vehicle’s options, feature settings may vary.

Setting Name

Description

Language

This setting will change the language of the Uconnect system. The available languages are English, French, Spanish, and Italian.

Display Mode

This setting will allow you to set the brightness manually or have the system set it automatically. The “Auto” setting has the system
automatically adjust the display brightness. The “Manual” setting will allow the user to adjust the brightness of the display.

Display Brightness Daytime

This setting will allow you to set the brightness when it is daytime. To access this setting, Display Mode must be set to “Manual”.
The “+” setting will increase the brightness; the “-” will decrease the brightness.

Display Brightness Nighttime

This setting will allow you to set the brightness when it is nighttime. To access this setting, Display Mode must be set to “Manual”.
The “+” setting will increase the brightness; the “-” will decrease the brightness.

Set Theme

This setting will allow you to change the display theme.

Units

This setting will allow you to change the units. The available options are “Speed” (MPH or km/h), “Distance” (mi or km), “Current
Consumption” (MPG [US], MPG [UK], L/100 km, or km/L), “Pressure” (psi, kPa, or bar), and “Temperature” (°C or °F) units of mea-
surement independently.

Theme Mode

This setting will allow you to adjust the brightness of your theme. Setting options are “Light”, “Dark” and “Auto”. Select to show
themes in Light or Dark mode. “Auto” changes the theme with the headlights.

Touchscreen Beep

This setting will allow you to turn the touchscreen beep on or off.

Show Main Category Bar Labels

This setting will allow you to turn the bottom main category bar labels on or off.

200

MULTIMEDIA

Setting Name

Description

Navigation Turn-by-Turn Displayed In
Cluster

This setting will display Navigation prompts in the Instrument Cluster Display.

Phone Pop-ups Displayed In Cluster

This setting will display smartphone notifications and messages in the Instrument Cluster Display.

Ready To Drive Pop-ups

This setting will enable the Ready To Drive pop-ups in the Instrument Cluster Display.

Massage Pop-Up Displayed With Button
Press

This setting will activate or deactivate the massage feature pop-ups.

Entertainment Screens

When the Entertainment Screens button is pressed on the touchscreen, the system displays the different options related to the vehicle’s Entertainment.

NOTE:

Depending on the vehicle’s options, feature settings may vary.

Setting Name

Description

Passenger Screen Permissions

This setting will enable or disable Passenger Screen Permissions. Options within this setting are “Navigation”, “Device Manager”,
and “Uconnect Theater”, and each have “On” and “Off” options.

Rear Seat Screen Permissions

This setting will enable or disable your Rear Seat Screen Permissions. “On” and “Off” options are found within “Navigation”.

My Profile

When the My Profile button is pressed on the touchscreen, the system displays options related to the vehicle’s profiles.

NOTE:

Depending on the vehicle’s options, feature settings may vary.

Setting Name

Description

Language

This setting will change the language of the Uconnect system. The available languages are English, French, Spanish, and Italian.

Display Mode

This setting will adjust the display for the radio to “Auto” or “Manual”. “Manual” allows for more customization with the radio dis-
play brightness.

MULTIMEDIA

201

5

Setting Name

Description

Display Brightness Daytime

This setting will allow you to set the brightness when it is daytime. To access this setting, Display Mode must be set to “Manual”.
The “+” setting will increase the brightness; the “-” will decrease the brightness.

Display Brightness Nighttime

This setting will allow you to set the brightness when it is nighttime. To access this setting, Display Mode must be set to “Manual”.
The “+” setting will increase the brightness; the “-” will decrease the brightness.

Theme Mode

This setting will allow you to adjust the brightness of your theme. Setting options are “Light”, “Dark” and “Auto”. Select to show
themes in Light or Dark mode. “Auto” changes the theme with the headlights.

Units

This setting will allow you to change the units. The available options are “Speed” (MPH or km/h), “Distance” (mi or km), “Current
Consumption” (MPG [US], MPG [UK], L/100 km, or km/L), “Pressure” (psi, kPa, or bar), and “Temperature” (°C or °F) units of mea-
surement independently.

Touchscreen Beep

This setting will allow you to turn the touchscreen beep on or off.

Show Main Category Bar Labels

This setting will allow the main category bar labels to be shown on or off.

Navigation Turn-by-Turn Displayed In
Cluster

This setting will display Navigation prompts in the Instrument Cluster Display.

Phone Pop-Ups Displayed In Cluster

This setting will display smartphone notifications and messages in the Instrument Cluster Display.

Massage Pop-Up Displayed With Button
Press

This setting will activate or deactivate the massage feature pop-ups.

Time Format

This setting will allow you to set the time format (AM/PM). Sync Time With GPS must be “Off” for this setting to be available. The
“12 hrs” setting will set the time to a 12-hour format. The “24 hrs” setting will set the time to a 24-hour format.

Voice Options

This setting will allow you to change the voice options for the radio to “Male” or “Female”.

Wake Up Word

This setting will allow you to set the system “Wake Up” word. The available options are “Off”, “Hey, Uconnect”, and “Hey, Jeep®”.

Voice Barge-in

This setting will allow Voice Barge-in, which is a feature that will allow you to interrupt the help message or system prompts by
speaking, to be turned on or off.

Show Command List

This setting will allow the Command List to be shown on or off.

Navigation Settings

This setting will redirect to the list of Navigation settings. Refer to your Uconnect Radio Instruction Manual for further information.

Ambient Color Personalization

This setting will redirect to a new menu that will allow you to change the ambient lighting color in the cabin.

Auto-On Driver Heated/Ventilated Seat &
Heated Steering Wheel

This setting will activate the vehicle’s comfort system and heated seats or heated steering wheel when the vehicle is remote
started or ignition is started. The “Off” setting will not activate the comfort systems. The “Remote Start” setting will only activate
the comfort systems when using Remote Start. The “All Start” setting will activate the comfort systems whenever the vehicle is
started.

202

MULTIMEDIA

Setting Name

Description

Radio Off Delay

This setting will keep certain electrical features running after the engine is turned off. When any door is opened, the electronics will
deactivate. The available settings are “0 sec”, “45 sec”, “5 min”, and “10 min”.

Radio Off With Door

This setting will allow you to determine if the radio shuts off when any of the doors are opened.

Audio Settings

This setting will open the submenu, containing the audio settings

page 212.

App Drawer Favoriting Pop-ups

This setting will allow you to favorite app drawer pop-ups with “On” and “Off” options.

App Drawer Unfavoritings Pop-ups

This setting will allow you to unfavorite app drawer pop-ups with “On” and “Off” options.

New Text Message Pop-ups

This setting will allow you to have pop-up notifications for new text messages. Setting options are “On” and “Off”.

Missed Calls Message

This setting will allow you to have pop-up notifications for missed calls. Setting options are “On” and “Off”.

Navigation Pop-ups

This setting will allow you to have pop-up notifications for Navigation. Setting options are “On” and “Off”.

Reset App Drawer to Default Order

This setting will reset the app drawer to its factory default layout.

Restore Settings to Default

This setting will return all the previously changed settings to their factory defaults.

More Profile Options

This setting will give access to more profile options.

Safety & Driving Assistance

When the Safety & Driving Assistance button is pressed on the touchscreen, the system displays the options related to the vehicle’s safety settings. These options will differ
depending on the features equipped on the vehicle. The settings may display in list form or within subfolders on the screen. To access a subfolder, select the desired folder; the
available options related to that feature will then display on the screen.

NOTE:

Depending on the vehicle’s options, feature settings may vary.

Setting Name

Description

Forward Collision Warning Sensitivity —
Located In Automatic Emergency Braking
Submenu

This setting will change the distance at which the Forward Collision Warning (FCW) alert sounds. The “Medium” setting will have the
FCW system signal when an object is in view, and the possibility of a collision is detected. The “Near” setting will have the FCW sys-
tem signal when the object is closer to the vehicle. The “Far” setting will have the FCW system signal when an object is at a far dis-
tance from the vehicle.

MULTIMEDIA

203

5

Setting Name

Description

Forward Collision Warning — Located In
Automatic Emergency Braking Submenu

This setting will turn the Forward Collision Warning system on or off. The “Off” setting will deactivate the FCW and PEB system. If
“Off” is selected, an Off icon will display on your Instrument Cluster Display. The “Warning Only” setting will provide only an audible
chime when a collision is detected. The “Warning + Active Braking” setting will provide an audible chime and apply some brake
pressure when a collision is detected.

Traffic Sign Assist

This setting will turn Traffic Sign Assist on or off.

Traffic Sign Assist Warning

This setting will allow you to set the warning type related to the traffic sign. The available options are “Off”, “Visual”, and “Visual +
Chime”.

Traffic Sign Assist Sensitivity

This setting will change the Traffic Sign Assist Sensitivity. The available options are “+ 0”, “+ 5”, and “+ 10”.

Traffic Sign Assist Offset

This setting will alter the Traffic Sign Assist Offset. The available options will allow you to adjust the offset from a range of 0 to 5
mph.

Traffic Sign

Within this setting are three additional settings: “Traffic Sign Blinking” with “On” and “Off” options, “Traffic Sign Sensitivity” with “+
0”, “+ 5”, and “+ 10” options, and “Traffic Sign Information Offset” with selectable options between 0 to 5 mph.

New Speed Zone Indication

This setting will allow you to set if the system will warn you that the speed limit has changed in an area. The available options are
“Off”, “Visual”, and “Visual + Chime”.

Active Lane Management

This setting will alert the driver when a lane departure is detected. The available options are “Vibration Only”, “Steering Assist
Only”, and “Vibration + Steering Assist”.

Lane Warning

This setting will let you choose between “Early”, “Medium”, and “Late”.

Vibration Strength

This setting will allow you to change the vibration strength between “Low”, “Medium”, and “High”.

Steering Assist Strength

This setting will change the strength of the steering wheel feedback during a lane departure. The available settings are “Low”,
“Medium”, and “High”.

Night Vision Video Warning

This setting will turn the Night Vision Video Warning and green/gray cluster indicator light on or off.

ParkSense

This setting will change the type of ParkSense alert when a close object is detected and provide “only warning” and “warning +
braking assist” options.

Front ParkSense Volume

This setting adjusts the volume of the Front ParkSense system. The available settings are “Low”, “Medium”, and “High”.

Rear ParkSense Volume

This setting adjusts the volume of the Rear ParkSense system. The available settings are “Low”, “Medium”, and “High”.

Rear ParkSense Braking Assist

This setting will turn the Rear ParkSense Braking Assist on or off.

Side Distance Warning

This setting will turn the Side Distance Warning on or off.

Drowsy Driver Detection

This setting will monitor the driver’s driving habits and warn you of any changes, indicating that the driver may be drowsy. The avail-
able options are “On” and “Off”.

204

MULTIMEDIA

Setting Name

Description

Blind Spot Alert

This setting will change the type of alert provided when an object is detected in a vehicle’s blind spot. The “Off” setting will turn off
Blind Spot Alert. The “Lights” setting will activate the Blind Spot Alert lights on the outside mirrors. The “Lights & Chime” setting will
activate the lights on the outside mirrors and an audible chime.

Electric Power Steering Default

This setting will change the Electric Power Steering Default. The available options are “Comfort” for a lower effort steering experi-
ence, “Normal” for the standard effort steering experience, and “Sport” for a higher effort steering experience.

Hill Start Assist

This setting will turn the Hill Start Assist system on or off.

Tire Fill Assist

This setting will turn Tire Fill Assist on or off.

Rear Seat Alert

When this setting is turned on and the rear doors are opened while the engine is running, or if the engine is turned on within
10 minutes of the door opening, a message will appear to check the rear seat when the vehicle is powered OFF.

Clock & Date

When the Clock & Date button is pressed on the touchscreen, the system displays the different options related to the vehicle’s internal clock.

NOTE:

Depending on the vehicle’s options, feature settings may vary.

Setting Name

Description

Sync Time With GPS

This setting will sync the time to the GPS receiver in the system. The system will control the time via the GPS location.

Time Format

This setting will allow you to set the time format (AM/PM). Sync Time With GPS must be off for this setting to be available. The
“12 hrs” setting will set the time to a 12-hour format. The “24 hrs” setting will set the time to a 24-hour format.

Set Time

This setting will allow you to set the hours and minutes. Sync Time With GPS must be off for this setting to be available. The “+”
setting will increase the hours or minutes. The “-” setting will decrease the hours or minutes.

Set Time Hours

This setting will allow you to set the hours. Sync Time With GPS must be off for this setting to be available. The “+” setting will
increase the hours. The “-” setting will decrease the hours.

Set Time Minutes

This setting will allow you to set the minutes. Sync Time With GPS must be off for this setting to be available. The “+” setting will
increase the minutes. The “-” setting will decrease the minutes.

Set Date

This setting will allow you to set the day, month and year. Using “+” or “-”, you can scroll through the available days, months, and
years.

Show Time and Date During Screen Off

This setting will allow you to show the time and date while the screen is off. Available options are “On” and “Off”.

MULTIMEDIA

205

5

Phone/Bluetooth®

When the Phone/Bluetooth® button is pressed on the touchscreen, the system displays the options related to Bluetooth® connectivity from an external audio device or smart-
phone. The list of paired audio devices or smartphones can be accessed from this menu.

NOTE:

Depending on the vehicle’s options, feature settings may vary.

Setting Name

Description

Device Manager

This setting will open the Device Manager main screen.

Do Not Disturb All

This setting will open the Do Not Disturb All settings menu. The available options are “On” and “Off”.

Enable Two Active Phones

This setting will enable or disable two active phones with the vehicle. The setting options are “On” and “Off”.

Phone Pop-Ups Displayed In Cluster

This setting will activate phone message pop-ups in the Instrument Cluster Display.

Voice

When the Voice button is pressed on the touchscreen, the system displays the options related to the vehicle’s Voice Recognition feature.

NOTE:

Depending on the vehicle’s options, feature settings may vary.

Setting Name

Description

Voice Options

This setting will allow you to change the system’s voice to either “Male” or “Female”.

Wake Up Word

This setting will allow you to set the system’s “Wake Up” word. The available options are “Off”, “Hey, Uconnect”, and “Hey, Jeep®”.

Voice Barge-In

This setting allows you to respond to a Voice Response before the statement is completed by the system. The available options are
“On” and “Off”.

Show Command List

This setting will allow you to turn the Command List on or off. The “Always” setting will always show the Command List. The “With
Help” setting will show the Command List and provide a brief description of what the command does. The “Never” setting will turn
the Command List off.

206

MULTIMEDIA

Navigation

When the Navigation button is pressed on the touchscreen, the system displays options related to the vehicle’s built-in Navigation system. These settings can change which
icons display on the map, how “time to arrival is calculated”, and route types.
For more information on Navigation and settings, refer to your Uconnect Radio Instruction Manual.

Camera

When the Camera button is pressed on the touchscreen, the system displays the options related to the vehicle’s camera features.

NOTE:

Depending on the vehicle’s options, feature settings may vary.

Setting Name

Description

Surround View Camera Delay

This setting will add a timed delay to the Surround View Camera when shifting out of REVERSE.

Surround View Camera Guidelines

This setting will turn the Surround View Camera Guidelines on or off.

ParkView Backup Camera Delay

This setting will add a timed delay to the ParkView Backup Camera when shifting out of REVERSE.

ParkView Backup Camera Active
Guidelines

This setting will turn the ParkView Backup Camera Active Guidelines on or off.

Forward Facing Camera Guidelines

This setting will turn the Forward Facing Camera Guidelines on or off.

Mirrors & Wipers

When the Mirrors & Wipers button is pressed on the touchscreen, the system displays the options related to the vehicle’s mirrors and wipers.

NOTE:

Depending on the vehicle’s options, feature settings may vary.

Setting Name

Description

Tilt Side Mirrors In Reverse

This setting will tilt the outside side-view mirrors when the ignition is in the ON/RUN position and the transmission gear selector is
in the REVERSE position. The mirrors will move back to their previous position when the transmission is shifted out of REVERSE.
The available settings are “On” and “Off”.

MULTIMEDIA

207

5

Setting Name

Description

Auto Folding Side Mirrors

This setting will automatically fold and unfold the side-view mirrors when the vehicle is turned off, the doors are locked, or the key
fob button is pushed. The available options are “On” and “Off”.

Rain Sensing Auto Wipers

This setting will turn the Rain Sensing Auto Wipers on or off.

Headlights With Wipers

This setting will turn the headlights on when the wipers are activated.

Lights

When the Lights button is pressed on the touchscreen, the system displays the options related to the vehicle’s exterior and interior lights.

NOTE:

When the “Daytime Running Lights” feature is selected, the daytime running lights can be turned on or off. This feature is only allowed by law in the country of the vehicle
purchase.

Depending on the vehicle’s options, feature settings may vary.

Setting Name

Description

Ambient Color Personalization

This setting will redirect to a new menu that will allow you to change the ambient lighting color in the cabin.

Headlight Off Delay

This setting will allow you to set the amount of time it takes for the headlights to shut off after the vehicle is turned off. The avail-
able settings are “0 sec”, “30 sec”, “60 sec”, and “90 sec”.

Headlight Illumination On Approach

This setting will allow you to set the amount of time it takes for the headlights to shut off after the vehicle is unlocked. “Greeting
Lights” must be selected and “Headlight Illumination on Approach” must be selected above 0 seconds for the feature to be
enabled. The available settings are “0 sec”, “30 sec”, “60 sec”, and “90 sec”.

Headlights with Wipers

This setting will turn the headlights on when the wipers are activated.

Proximity Wake-Up

This setting will allow you to turn on or off some exterior and interior lighting illumination when approaching the vehicle.

NOTE:

“Headlight Illumination On Approach” must be set to a value other than zero for “Proximity Wake-Up” to be active.

Greeting Lights

When the “Greeting Lights” feature is selected, it enables “Headlight Illumination On Approach”. When “Headlight Illumination On
Approach” is selected, it allows the adjustment of the amount of time the headlights remain on after the doors are unlocked with
the key fob. “Greeting Lights” must be selected and “Headlight Illumination On Approach” must be selected above zero seconds for
the feature to be enabled. The available settings are “On” and “Off”.

Auto Dim High Beams

This setting will allow you to turn the Auto Dim High Beams on or off.

208

MULTIMEDIA

Setting Name

Description

Daytime Running Lights

This setting will allow you to turn the Daytime Running Lights on or off.

Cornering Lights

When this setting is selected, if the steering wheel rotation angle is large or the turn signal indicators are on, a light (incorporated in
the fog light) will turn on, on the relevant side to improve visibility at night.

Flash Lights With Lock

This setting will allow you to turn the flashing of the lights when the Lock button is pushed on the key fob on or off.

Brakes

When the Brakes button is pressed on the touchscreen, the system will display settings related to the vehicle’s brake system.

NOTE:

Depending on the vehicle’s options, feature settings may vary.

Setting Name

Description

Auto Park Brake

This setting will turn the Auto Park Brake on or off.

Brake Service

This setting will allow you to set the brakes for service. When the setting is selected, a pop-up will display with “Yes” and “No”
options.

Doors & Locks

When the Doors & Locks button is pressed on the touchscreen, the system displays the options related to locking and unlocking the vehicle’s doors.

NOTE:

Depending on the vehicle’s options, feature settings may vary.

Setting Name

Description

Auto Unlock On Exit

This setting will unlock the doors when any of the doors are opened from the inside.

Flash Lights With Lock

This setting will allow you to turn the flashing of the lights when the Lock button is pushed on the key fob on or off.

Sound Horn With Lock

This setting will sound the horn when the Lock button is pushed on the key fob. The “Off” setting will not sound the horn when the
Lock button is pushed. The “1st Press” setting will sound the horn when the Lock button is pushed once. The “2nd Press” setting
will sound the horn when the Lock button is pushed twice.

MULTIMEDIA

209

5


Content      ..     4      5      6      7     ..