Jeep Wrangler (2023 year). Manual in english - page 5
 

  Index      Manuals     Jeep Wrangler (2023 year). Manual in english


Search            copyright infringement  


Content      ..     3      4      5      6     ..


Jeep Wrangler (2023 year). Manual in english - page 5


GETTING TO KNOW YOUR VEHICLE

73

5. While keeping the rear window level, slide to the left 

until it is completely separate from its retainer. Do not 

pull downward while removing the rear window. 

Damage to the retainer could result.

Step Five

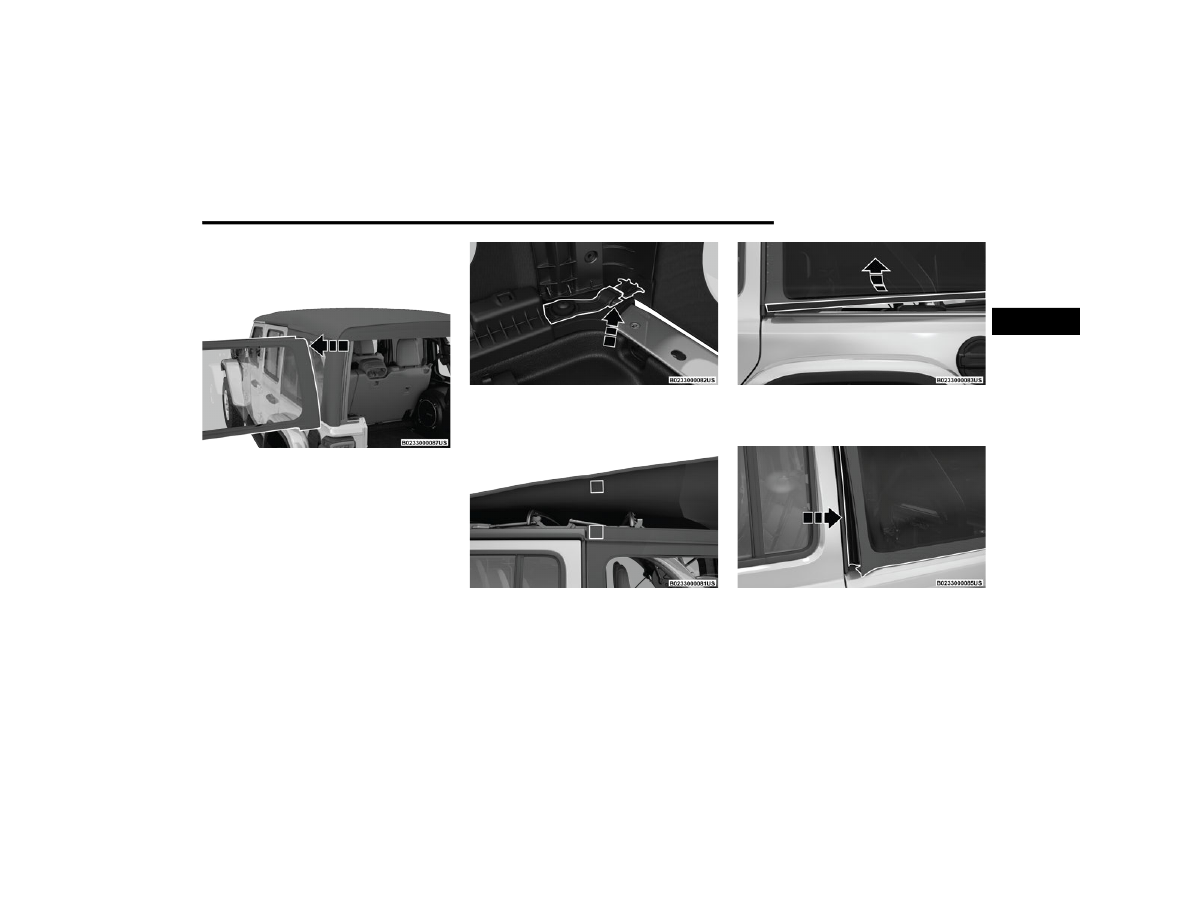
Remove The Right And Left Quarter Windows:
1. Through the rear opening, push the bottom corner 

outward and release tab from the bottom of the 

window pillar.

Step One

2. Undo the hook-and-loop fastener located at the upper 

front corner of each quarter window.

Step Two

3. Starting at the rear of the vehicle, remove plastic 

retainer from along the bottom of the window moving 

toward the front of the vehicle.

Step Three

4. Remove plastic retainer from the bottom to the top of 

the front window.

Step Four

2

74

GETTING TO KNOW YOUR VEHICLE


5. While keeping the window level, slide rearward until it 

is completely separate from its retainer. Do not pull 

downward while removing the window. Damage to 

the retainer could result.

Step Five

6. Store in soft window bag (if equipped) or a safe 

location.

NOTE:

For information on the use of the storage bag, refer to the 

next section.

Soft Top Window Storage Bag —

If Equipped 

To safely store the soft top rear window, and rear quarter 

windows, proceed as follows:

NOTE:

The swing gate bar, once removed from the rear window, 

does not store in the soft window storage bag (if 

equipped).
1. With the bag opened completely, fold both fabric 

dividers downward and lay the first quarter window 

all the way to the right side with the inside of the 

window facing downward and the window pillar to 

the outside.

NOTE:

The quarter windows are marked “1” and “2” on the inside 

of the window pillar. 

Step One

Step One

2. Fold the first divider upward, covering the first quarter 

window.

Step Two

1 — Quarter Window Facing Downward
2 — Both Dividers Folded Down

GETTING TO KNOW YOUR VEHICLE

75

3. Lay the second quarter window on top of the first 

divider all the way to the left side with the inside of the 

window facing downward and the window pillar to the 

outside.

Step Three

4. Fold the second divider upward, covering the second 

quarter window.

Step Four

5. Lay the rear window on top of the second divider.

Step Five

6. Close the storage bag and store in a safe location.

Step Six

Lowering The Soft Top All The Way

1. Remove the rear window and quarter panel windows  

Ú

page 72.

2. From the Sunrider® position  

Ú

page 67, remove 

straps if previously secured and move to the rear of 

the vehicle.

1 — Quarter Window Facing Downward
2 — Second Divider Folded Down

2

76

GETTING TO KNOW YOUR VEHICLE


3. Locate the Sunrider® latch beneath the #6 Bow of 

the soft top on the left side.

Step Three

4. Pull the latch to release the top, and allow the soft top 

to slide rearward freely in the guide tracks to the 

stowed position.

Step Four

5. While pushing downward slightly on the folded soft 

top, slide the lock lever on the left and right side lift 

assist mechanisms to the “lock” position.

Step Five (Locked Position)

6. Once the lock lever is in the “lock” position, push 

downward on each side of the folded soft top to 

ensure it is secure. An audible “click” may be heard.

Step Six

NOTE:

Secure the top by using the two hook-and-loop fasteners 

provided in the center console. 

Step Six

CAUTION!

Failure to follow the next steps could result in damage 

to the Soft Top or vehicle.

GETTING TO KNOW YOUR VEHICLE

77

R

AISING

 T

HE

 S

OFT

 T

OP

Use this QR code to access your digital 

experience.
Raising The Soft Top From The Fully 

Lowered Position
1. From the fully lowered position, 

remove straps if previously 

secured.

2. While pushing down on the rear of the top, slide the 

lock lever on the left and right side lift assist 

mechanisms to the “unlock” position.

Step Two

3. Push up and forward from the #5 Bow along the guide 

track until it locks into the Sunrider® position with an 

audible “click”.

Step Three

4. Gently pull rearward on the #6 Bow to ensure the top 

is locked in the Sunrider® position.

5. Using the side link, lift and push the soft top toward 

the front of the vehicle manually guiding the top into 

the closed position.

Step Five

Step Five

CAUTION!

Failure to follow the next steps could result in damage 

to the Soft Top or vehicle.

1 — Unlocked Position
2 — #5 Bow Location

2

78

GETTING TO KNOW YOUR VEHICLE


6. From inside the vehicle, pull the handle on the header 

latch downward to engage the hook into its receiver. 

Repeat on the other side.

Step Six

7. Pull the handle back upward while squeezing the 

hook, locking the latch into place.

Step Seven

Installing The Soft Top Windows

Install The Right And Left Quarter Windows
1. From the rear of the vehicle, guide the top of the 

window into the retainer and slide forward while 

keeping the window level. Repeat on the other side.

Step One

2. Place the top of the quarter window pillar into the top 

cover, and insert the bottom tab into the clip.

Step Two

Step Two

CAUTION!

Failure to follow all Quarter Window Install steps could 

result in damage to the Soft Top or vehicle.

GETTING TO KNOW YOUR VEHICLE

79

3. Engage the retainers on the front of the windows, 

ensuring they are fully engaged, followed by the 

retainers along the bottom of the windows.

Step Three

NOTE:

It is critical that the retainers are fully engaged before the 

vehicle resumes motion.
4. Secure the hook-and-loop fastener at the upper front 

corner of each quarter window by pressing firmly.

Step Four

Install The Rear Window
1. Guide the rear window into the retainer from left to 

right while keeping the window level.

Step One

2. Insert the swing gate bar into the retainers at the 

bottom of the window from left to the right.

Step Two

3. Rotate the swing gate bar into the left and right side 

retainers.

Step Three

1 — Retainer At Front Of Quarter Window
2 — Retainer At Bottom Of Quarter Window

2

80

GETTING TO KNOW YOUR VEHICLE

4. Line up the rear window to the right side quarter 

window first, and engage the plastic retainers.

5. Repeat with the left side quarter window.

Step Five

6. Engage the rear window retainers in the lower right

and left corners.

Step Six

NOTE:

For information on removing your soft top, refer to the next 

section.

R

EMOVING

 T

HE

 S

OFT

 T

OP

Use this QR code to access your digital 

experience.

1. Fully lower the soft top 

Ú

page 75.

2. Make sure the lift assist mechanism on both the left 

and right sides are in the “lock” position, and an 

audible “click” is heard when pushing down on the #1

bow from each of the lift assist mechanisms before 

removing.

Step Two

3. Using the provided #40 Torx head driver and ratchet, 

unscrew the two Torx head screws on each lift assist 

mechanism, then lift the mechanism up and away 

from the vehicle.

Step Three

CAUTION!

Failure to follow the next steps could result in damage 

to the Soft Top or vehicle.

1 — Lock Position
2 — Torx Head Screw
3 — Torx Head Screw

GETTING TO KNOW YOUR VEHICLE

81

4. Pull the release lever on top of the rail rearward to 

release the side link from the track.

Step Four

Step Four

5. Repeat on the opposite side.
6. Utilizing two people, lift the soft top up and away from 

the vehicle, careful to avoid the vehicle’s sport bar, 

trim, and tire carrier. Store the soft top in a safe, 

clean, and dry location.

Step Six

7. Using the provided #50 Torx head driver and ratchet, 

unscrew the Torx screw on both rear corners of the 

vehicle, removing the retainers.

Step Seven

I

NSTALLING

 T

HE

 S

OFT

 T

OP

1. If currently installed, remove the hard top  

Ú

page 87.

2. Install the door rails, starting with the front, followed 

by the rear on each side. For instructions and 

appropriate torque specifications for the door rail 

Torx screws  

Ú

page 96.

3. Install the rear retainers on each side of the rear of 

the vehicle using the provided #50 Torx head driver 

and ratchet. Refer to the following table for 

recommended torque specifications.

Step Three

CAUTION!

Do not overtighten Torx screws. Damage to the 

retainers will occur.

2

82

GETTING TO KNOW YOUR VEHICLE


4. Making sure the lift assist mechanism is in the “lock” 

position, lift the soft top into the rear of the vehicle 

with the side links pointing toward the front. Lower 

the lift assist mechanisms onto its retainers on both 

sides (on the inside of the sport bar).

Step Four

Step Four

5. Using the provided #40 Torx head driver and ratchet, 

tighten the Torx screws by turning them clockwise. 

Secure them until they are snug (refer to the following 

table for recommended torque specifications), being 

careful not to cross-thread the screws or overtighten. 

Repeat on the opposite side.

Step Five

Torque 

Specification For 

Torx Screw

Maximum

Minimum

119.5 in-lb

150.5 in-lb

106.2 in-lb

13.5 N·m

17.0 N·m

12.0 N·m

CAUTION!

Failure to follow the next steps could result in damage 

to the Soft Top or vehicle.

1 — Lock Position
2 — Torx Head Screw
3 — Torx Head Screw

Torque 

Specification For 

Torx Screws

Maximum

Minimum

119.5 in-lb

150.5 in-lb

106.2 in-lb

13.5 N·m

17.0 N·m

12.0 N·m

CAUTION!

Do not overtighten the screws. You can strip the screws 

if they are overtightened.

GETTING TO KNOW YOUR VEHICLE

83

(Continued)

2

6. While pulling the release lever on the top of the rail 

rearward, place the side link into the guide track on 

the top of the rail then release the lever.

Step Six

7. Unsnap and remove the black boot cover. This cover 

should be discarded. It was intended as a protective 

cover for shipping only.

8. Raise the soft top  

Ú

page 77.

NOTE:

Be sure the wire harness in the left rear corner is not 

tangled in the soft top bows before you lift the top.

H

ARD

 T

OP

 F

RONT

 P

ANEL

(

S

) R

EMOVAL

Use this QR code to access your digital 

experience.

CAUTION!

The hard top is not designed to carry any additional 

loads, such as after-market roof racks, spare tires, 

building materials, hunting or camping supplies, etc. 

For optional Mopar® accessory roof racks  

Ú

page 102.

Do not move your vehicle until the top has been 

either fully attached to the front header, sport bar, 

and body side or fully removed.

Failure to follow these cautions may cause interior 

water damage, stains or mildew:

It is recommended that the top be free of water prior 

to panel removal. Removing the top, opening a door 

or lowering a window while the top is wet may allow 

water to drip into the vehicle’s interior.

The hard top assembly must be positioned properly 

to ensure sealing. Improper installation can cause 

water to leak into the vehicle’s interior.

Careless handling and storage of the removable roof 

panels may damage the seals, causing water to leak 

into the vehicle’s interior.

The front panel(s) must be positioned properly to 

ensure sealing. Improper installation can cause 

water to leak into the vehicle’s interior.

CAUTION!

84

GETTING TO KNOW YOUR VEHICLE


Four Door Hard Top Components

1 — Right Side Panel
2 — Left Side Panel
3 — Hard Top

GETTING TO KNOW YOUR VEHICLE

85

Two Door Hard Top Components

1 — Right Side Panel
2 — Left Side Panel
3 — Hard Top

2

86

GETTING TO KNOW YOUR VEHICLE


NOTE:

All hard top removal and installation instructions are 

applicable to both two and four door model vehicles.

Images shown are of four door models, and appear

-

ance of two door model components may differ.

The left side panel must be removed before removing 

the right side panel.

To remove the hard top front panel(s), proceed as follows:
1. Fold down the sun visor against the windshield.
2. Turn the three L-shaped locks on the left side panel 

(one at the front, the rear, and outside), unlocking 

them from the roof.

Step Two

3. Unlatch the left side header panel latch located at the 

top of the windshield.

Step Three

4. Remove the left side panel.
5. Repeat the previous steps to remove the right side 

panel.

Hard Top Panel(s) Storage Bag —

If Equipped

The Freedom Top panels storage bag allows you to store 

your hard top panels. The storage bag contains two 

compartments.
Lay the bag for the Freedom Top panels down so the loops 

and hooks are facing upward. Unzip the bag and fold back 

the outer flap.

NOTE:

Ensure the front panel latch is closed prior to inserting the 

panel into the panels bag.

1. Insert the left side hard top panel into the bag with 

the latches facing upward.

2. Unfold the black panel divider (ensure the divider is 

lying flat).

3. Insert the right side Freedom Top panel into the bag 

with the latches facing downward.

NOTE:

Ensure the front panel latch is closed prior to inserting the 

panel into the bag.
4. Unfold the outer flap and zip the hard top bag closed.

Step Four

5. Lift the Freedom Top bag into the vehicle with the 

hooks and straps facing the back of the rear seat. 

Attach the clip at the bottom of the bag to the child 

restraint anchorage, located at the base of the rear 

seat.

6. Wrap the upper strap around the rear head restraints 

and loop the strap through the buckle. Pull on the 

strap to tighten the Freedom Top bag securely 

against the rear seat.

1 — Header Panel Latched
2 — Unlatched Position

GETTING TO KNOW YOUR VEHICLE

87

H

ARD

 T

OP

 F

RONT

 P

ANEL

(

S

I

NSTALLATION

1. Open the header latch inside the vehicle, and the 

three L-shaped locks on each panel.

2. Set the right side panel on the windshield frame with 

the locating pin in the front receiver mounting hole 

followed by the left side panel, making sure there is 

no overhang. Also, make sure that the panels are 

sitting flush with the body.

3. Reinstall the panel(s) using the same steps for 

removal in reverse order.

NOTE:

To prevent water leaks, the seals and hard top panels 

should be clear of any dust and debris prior to reinstal

-

lation.

R

EMOVING

 T

HE

 H

ARD

 T

OP

1. Remove both front panels  

Ú

page 83.

2. Open both front doors.
3. Using the provided #50 Torx head driver and ratchet, 

remove the two Torx head screws that secure the 

hard top at the B-pillar (near the top of the front 

doors).

Step Three

4. Remove the six Torx head screws that secure the 

hard top to the vehicle (along the interior bodyside — 

three screws on each side) using the #50 Torx head 

driver.

Step Four

5. Open the swing gate all the way to ensure clearance 

of the rear window glass. Lift the rear window glass.

Step Five

6. Locate the wire harness and washer hose on the left 

rear inside corner of the vehicle.

Step Six

2

88

GETTING TO KNOW YOUR VEHICLE


7. Release the locking tab by pushing it downward.

Step Seven

8. To remove the wiring harness, push the tab inward 

while pulling downward to disconnect.

Step Eight

Step Eight

9. To remove the washer hose, push the release button 

on hose connector, and pull downward.

Step Nine

10. Secure the wire harness to the body side by plugging 

it into the receptacle and reengaging the locking tab.

Step Ten

11. Secure the washer hose by snapping it into the top of 

the body side receptacle.

Step Eleven


Content      ..     3      4      5      6     ..