Jeep Grand Cherokee (2023 year). Manual in english - page 2
 

  Index      Manuals     Jeep Grand Cherokee (2023 year). Manual in english


Search            copyright infringement  


Content      ..      1      2      3      ..


Jeep Grand Cherokee (2023 year). Manual in english - page 2


28

GETTING TO KNOW YOUR VEHICLE


NOTE:

When using the emergency key to unlock the 

outside door handle, make sure the handle of the 

emergency key is pointing toward the rear of the 

vehicle. This will ensure the handle can be pulled 

all the way out while the key is in the lock cylinder.
The rear doors can be manually unlocked with a 

double pull of the inside door handle.
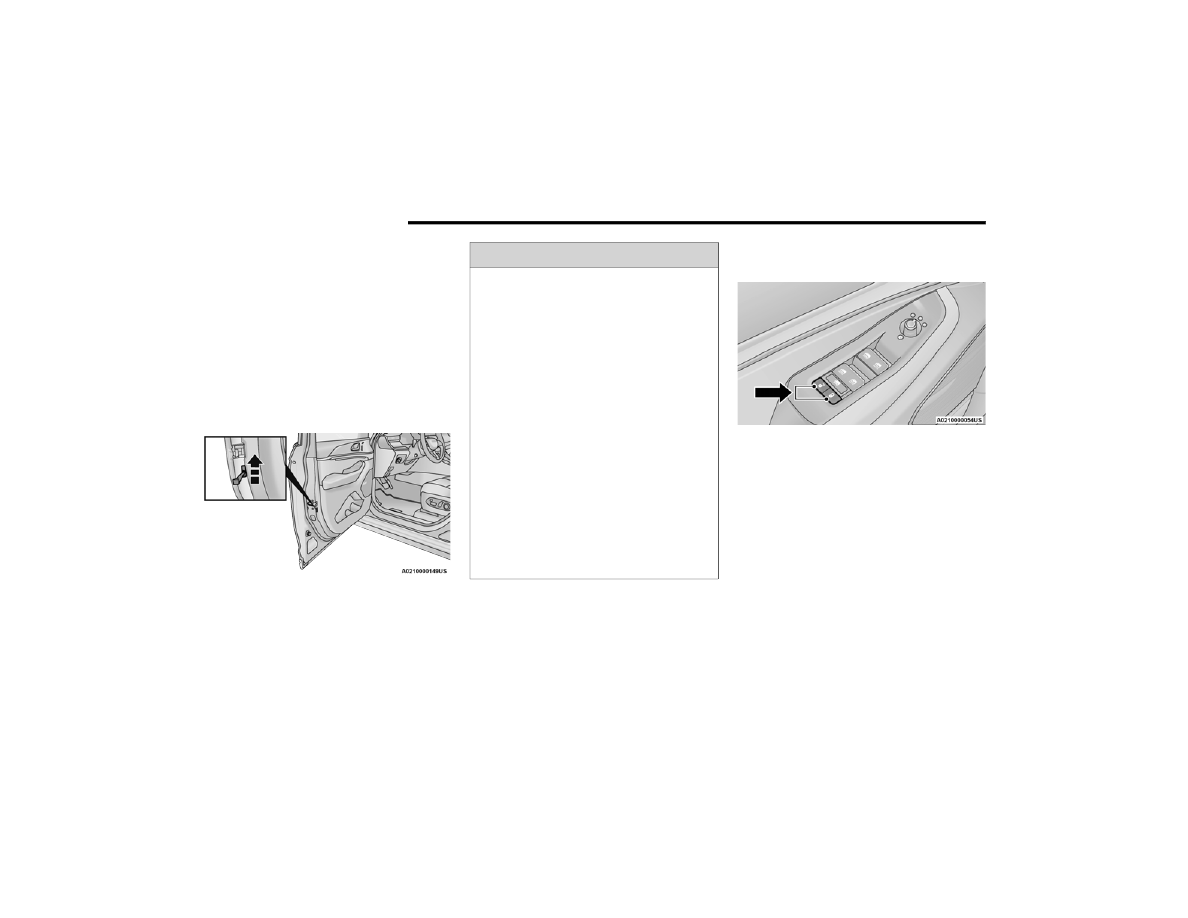
Each door can be manually locked by inserting the 

emergency key into the emergency lock lever and 

sliding the lever upward. The emergency lock lever 

is located on the door latch face of each door.

Emergency Lock Lever (Driver’s Door Shown)

NOTE:

The emergency lock lever is only accessible 

when the door is open.

Manually locking the vehicle will not arm the 

Vehicle Security system.

P

OWER

 D

OOR

 L

OCKS


The power door lock buttons are located on each 

front door panel. Push the lock button to lock all 

doors and liftgate, or the unlock button to unlock 

all doors and liftgate.

When the doors are locked, an indicator light in the 

lock button will illuminate.

Power Door Lock Switches

The driver’s door will unlock automatically if the 

key fob is detected inside the vehicle when the 

door lock button on the front door panel is used to 

lock the door, then the door is closed. The horn will 

also chirp to alert the driver. This will occur for two 

attempts. On the third attempt, the doors will lock 

even if the key fob is inside.

NOTE:

If the key fob is located next to a mobile phone, 

laptop, or other electronic device, the wireless 

signal may get blocked, and the driver’s door may 

not unlock automatically.
If the door lock button is pushed while the ignition 

is in the ON/RUN position and the driver's door is 

open, the doors will not lock.

WARNING!

For personal security and safety in the event 

of a collision, lock the vehicle doors before you 

drive as well as when you park and leave the 

vehicle.

When exiting the vehicle, always make sure 

the ignition is in the OFF position, remove the 

key fob from the vehicle and lock your vehicle.

Never leave children alone in a vehicle, or with 

access to an unlocked vehicle. Allowing chil

-

dren to be in a vehicle unattended is dangerous 

for a number of reasons. A child or others could 

be seriously or fatally injured. Children should 

be warned not to touch the parking brake, 

brake pedal or the gear selector.

Do not leave the key fob in or near the vehicle, 

or in a location accessible to children, and do 

not leave the Keyless Enter ‘n Go™ Ignition in 

the ON/RUN position. A child could operate 

power windows, other controls, or move the 

vehicle.

GETTING TO KNOW YOUR VEHICLE

29

Rear Passenger Power Door Locks
Power door lock buttons are located on each rear 

door trim panel. Push the lock button to lock the 

rear door or push the unlock button to unlock the 

rear door.

K

EYLESS

 E

NTER

 ‘

N

 G

O

™ — P

ASSIVE


E

NTRY


The Passive Entry system is an enhancement to 

the vehicle’s Remote Keyless Entry (RKE) system 

and a feature of Keyless Enter ‘n Go™. This feature 

allows you to lock and unlock the vehicle’s door(s) 

without having to push the key fob lock or unlock 

buttons.
If equipped, the rear doors will also have Passive 

Entry capabilities.

NOTE:

Passive Entry may be programmed on/off 

through Uconnect Settings  

Ú

page 204.

The key fob may not be detected by the vehicle 

Passive Entry system if it is located next to a 

mobile phone, laptop or other electronic device; 

these devices may block the key fob's wireless 

signal and prevent the Passive Entry handle 

from locking/unlocking the vehicle.

Passive Entry unlock initiates illuminated 

approach (low beams, license plate lamp, 

parking lights, door handle pocket lights [if 

equipped]) for a preset duration of 0, 30, 60 or 

90 seconds. Passive Entry unlock also initiates 

two flashes of the turn signal lights.

If wearing gloves, if it has been raining/snowing, 

or there is salt/dirt covering the Passive Entry 

door handle, the unlock and lock sensitivity can 

be affected, resulting in a slower response time.

The doors may lock and unlock when water is 

sprayed on the Passive Entry door handles, if 

the key fob is located outside of the vehicle 

within 5 ft (1.5 m) of the handle.

Passive Entry lock initiates one horn chirp and 

one flash of turn signal lights. These settings 

can be programmed on/off within Uconnect 

Settings  

Ú

page 204.

If the vehicle is unlocked by Passive Entry and 

no door is opened within 60 seconds, the 

vehicle will relock and will rearm the Vehicle 

Security system (if equipped).

To Unlock From The Driver Or Passenger Side
With a valid Passive Entry key fob within 5 ft 

(1.5 m) of the door handle, grab the handle to 

unlock the vehicle. Grabbing the driver’s door 

handle will unlock the driver door automatically. 

Grabbing the front passenger door handle (or a 

rear handle when equipped with four-door Passive 

Entry) will unlock all doors and the liftgate 

automatically.

Grab The Door Handle To Unlock

NOTE:

Either the driver door only or all doors will unlock 

when you grab hold of the front driver’s door 

handle, depending on the selected setting in the 

Uconnect system  

Ú

page 204.

All doors will unlock when the front passenger 

(or a rear door when equipped with four-door 

Passive Entry) door handle is grabbed regard

-

less of the driver’s door unlock preference 

setting.

Frequency Operated Button Integrated Key 

(FOBIK-Safe)
To minimize the possibility of unintentionally 

locking a Passive Entry key fob inside your vehicle, 

the Passive Entry system is equipped with an 

automatic door unlock feature which will function if 

the ignition switch is in the OFF position.

2

30

GETTING TO KNOW YOUR VEHICLE


There are five situations that trigger a FOBIK-Safe 

search in any Passive Entry vehicle:

A lock request is made by a valid Passive Entry 

key fob while a door is open.

A lock request is made by the Passive Entry door 

handle while a door is open.

A lock request is made by the door panel switch 

while the door is open.

When the Vehicle Security system is in pre-arm 

or armed status and the liftgate transitions from 

opened to closed.

When the liftgate transitions from open to 

closed and Remote Start is active.

When any of these situations occur, after all open 

doors are shut, the FOBIK-Safe search will be 

executed. If it detects a Passive Entry key fob 

inside the vehicle, the vehicle will unlock and alert 

the customer.

NOTE:

The vehicle will only unlock the doors when a valid 

Passive Entry key fob is detected inside the 

vehicle. The vehicle will not unlock the doors when 

any of the following conditions are true: 

The doors are manually locked using the emer

-

gency lock lever.

Three attempts are made to lock the doors 

using the door panel switch and then the doors 

are closed.

There is a valid Passive Entry key fob outside the 

vehicle within 5 ft (1.5 m) of a Passive Entry 

door handle.

To Lock The Vehicle’s Doors And Liftgate
With one of the vehicle’s Passive Entry key fobs 

within 5 ft (1.5 m) of a Passive Entry door handle, 

touch the lock icon on the door handle to lock all 

four doors and liftgate.

Touch The Door Handle Lock Icon To Lock

NOTE:

Do NOT grab the door handle when touching the 

lock icon. This could unlock the door(s).

Do NOT Grab The Door Handle When Locking

NOTE:

After touching the door handle lock icon, you 

must wait two seconds before you can lock or 

unlock the doors using any Passive Entry door 

handle. This is done to allow you to check if the 

vehicle is locked by pulling the door handle, 

without the vehicle unlocking.

If Passive Entry is disabled using the Uconnect 

Settings, the key fob protection described in 

"Frequency Operated Button Integrated Key 

(FOBIK-Safe)" remains active/functional.

The Passive Entry system will not operate if the 

key fob battery is depleted.

GETTING TO KNOW YOUR VEHICLE

31

To Unlock/Enter The Liftgate
The liftgate Passive Entry unlock feature is built 

into the electronic liftgate release button. With a 

valid Passive Entry key fob within 5 ft (1.5 m) of the 

liftgate, push the electronic liftgate release button 

for a power open on vehicles equipped with Power 

Liftgate. Pull the electronic liftgate handle and lift 

for Manual Liftgate vehicles.

Electronic Liftgate Handle

To Lock The Liftgate
With a valid Passive Entry key fob within 5 ft 

(1.5 m) of the liftgate, push the Passive Entry lock 

button located on the outside liftgate door handle.

NOTE:

The liftgate Passive Entry lock button will lock all 

doors and the liftgate  

Ú

page 408.

A

UTOMATIC

 U

NLOCK

 D

OORS

 O

N

 E

XIT

The doors will unlock automatically on vehicles 

with power door locks after the following sequence 

of actions:
1. The Automatic Unlock Doors On Exit feature is 

enabled within Uconnect Settings  

Ú

page 204.

2. All doors are closed.
3. The gear selector was not in PARK, then is 

placed in PARK.

4. Any door is opened.

A

UTOMATIC

 D

OOR

 L

OCKS

 —

I

F

 E

QUIPPED

The auto door lock feature default condition is 

enabled. When enabled, the door locks will lock 

automatically when the vehicle's speed exceeds 

15 mph (24 km/h). The auto door lock feature is 

enabled or disabled by an authorized dealer per 

written request of the customer. Please see an 

authorized dealer for service.

C

HILD

-P

ROTECTION

 D

OOR

 L

OCK


S

YSTEM

 — R

EAR

 D

OORS


To provide a safer environment for small children 

riding in the rear seats, the rear doors are 

equipped with a Child-Protection Door Lock 

system.
To use the system, open each rear door, use a flat 

blade screwdriver (or emergency key) and rotate 

the dial to the lock or unlock position. When the 

system on a door is engaged, that door can only be 

opened by using the outside door handle even if 

the inside door lock is in the unlocked position.

Child-Protection Door Lock Function

1 — Passive Entry Lock Button
2 — Electronic Liftgate Release Button

2

32

GETTING TO KNOW YOUR VEHICLE


NOTE:

When the Child-Protection Door Lock system is 

engaged, the door can be opened only by using 

the outside door handle even though the inside 

door lock is in the unlocked position.

After disengaging the Child-Protection Door 

Lock system, always test the door from the 

inside to make certain it is in the unlocked posi

-

tion.

After engaging the Child-Protection Door Lock 

system, always test the door from the inside to 

make certain it is in the locked position.

NOTE:

Always use this device when carrying children. 

After engaging the child lock on both rear doors, 

check for effective engagement by trying to open a 

door with the internal handle. Once the 

Child-Protection Door Lock system is engaged, it is 

impossible to open the doors from inside the 

vehicle. Before getting out of the vehicle, be sure to 

check that there is no one left inside.

STEERING WHEEL

M

ANUAL

 T

ILT

/T

ELESCOPING

 S

TEERING


C

OLUMN

 — I

F

 E

QUIPPED


This feature allows you to tilt the steering column 

upward or downward. It also allows you to lengthen 

or shorten the steering column. The tilt/

telescoping lever is located below the steering 

wheel at the end of the steering column.

Manual Tilt/Telescoping Steering Column Handle

To unlock the steering column, push the lever 

downward (toward the floor). To tilt the steering 

column, move the steering wheel upward or 

downward as desired. To lengthen or shorten the 

steering column, pull the steering wheel outward 

or push it inward as desired. To lock the steering 

column in position, push the lever upward until 

fully engaged.

P

OWER

 T

ILT

/T

ELESCOPING

 S

TEERING


C

OLUMN

 — I

F

 E

QUIPPED


This feature allows you to tilt the steering column 

upward or downward. It also allows you to lengthen 

or shorten the steering column. The power tilt/

telescoping steering column control is located 

below the multifunction lever on the steering 

column.

Power Tilt/Telescoping Steering Control Location

WARNING!

Avoid trapping anyone in a vehicle in a collision. 

Remember that the rear doors can only be 

opened from the outside with the 

Child-Protection locks engaged (locked).

WARNING!

Do not adjust the steering column while driving. 

Adjusting the steering column while driving or 

driving with the steering column unlocked, could 

cause the driver to lose control of the vehicle. 

Failure to follow this warning may result in 

serious injury or death.

GETTING TO KNOW YOUR VEHICLE

33

Use the four-way control to adjust the steering 

column.

NOTE:

For vehicles equipped with Driver Memory 

Settings, use the key fob or the memory switch on 

the driver's door trim panel to return the tilt/tele

-

scopic steering column to saved positions  

Ú

page 34.

H

EATED

 S

TEERING

 W

HEEL

 — 

I

F

 E

QUIPPED


The steering wheel contains a heating 

element that helps warm your hands in 

cold weather. The heated steering wheel 

has only one temperature setting. Once 

the heated steering wheel has been turned on, it 

will stay on until the operator turns it off. The 

heated steering wheel may not turn on when it is 

already warm.

The heated steering wheel button is located on the 

center of the instrument panel below the radio 

screen, and within the Comfort screen of the 

touchscreen.

Press the heated steering wheel button once to 

turn the heating element on.

Press the heated steering wheel button a 

second time to turn the heating element off.

NOTE:

The engine must be running for the heated 

steering wheel to operate.
For information on use with the Remote Start 

system, see  

Ú

page 25.

UCONNECT VOICE RECOGNITION QUICK 

TIPS — IF EQUIPPED  

I

NTRODUCING

 V

OICE

 R

ECOGNITION

Start using Uconnect Voice Recognition with these 

helpful quick tips. It provides the key Voice 

Commands and tips you need to know to control 

your vehicle’s Voice Recognition (VR) system.

B

ASIC

 V

OICE

 C

OMMANDS

The following basic Voice Commands can be given 

at any point while using your Uconnect system.
Push the VR button on the steering wheel or say 

the vehicle’s Wake Up word, “Hey Uconnect” or 

“Hey Jeep®”. The factory default Wake Up word is 

set to “Hey Uconnect” and can be reprogrammed 

through the Uconnect Settings. After the beep, say:

“Cancel” to stop a current voice session.

“Help” to hear a list of suggested Voice 

Commands.

“Repeat” to listen to the system prompts again.

Notice the visual cues that inform you of your Voice 

Recognition system’s status.

WARNING!

Do not adjust the steering column while driving. 

Adjusting the steering column while driving or 

driving with the steering column unlocked, could 

cause the driver to lose control of the vehicle. 

Failure to follow this warning may result in 

serious injury or death.

WARNING!

Persons who are unable to feel pain to the 

skin because of advanced age, chronic illness, 

diabetes, spinal cord injury, medication, 

alcohol use, exhaustion, or other physical 

conditions must exercise care when using the 

steering wheel heater. It may cause burns 

even at low temperatures, especially if used 

for long periods.

Do not place anything on the steering wheel 

that insulates against heat, such as a blanket 

or steering wheel covers of any type and mate

-

rial. This may cause the steering wheel heater 

to overheat.

2

34

GETTING TO KNOW YOUR VEHICLE


G

ET

 S

TARTED

The VR button   is used to activate/deactivate 

your Voice Recognition system. You can also use 

the system’s “Wake Up” word to activate voice 

recognition. The “Wake Up” word can be set 

through the Uconnect Settings  

Ú

page 204.

Helpful hints for using Voice Recognition:

Reduce background noise. Wind noise and 

passenger conversations are examples of noise 

that may impact recognition.

Speak clearly at a normal pace and volume 

while facing straight ahead.

Each time you give a Voice Command, first push 
the VR button   or say the “Wake Up” word, 

wait until after the beep, then say your Voice 

Command.

You can interrupt the help message or system 

prompts by pushing the VR button and saying a 

Voice Command from the current category.

You can also interrupt the help message or 

system prompts by speaking. This feature is 

called “barge-in” and can be set through the 

Uconnect Settings  

Ú

page 204.

Uconnect Voice Command Buttons

A

DDITIONAL

 I

NFORMATION

Uconnect are registered trademarks and Mopar 

Owner Connect is a trademark of FCA US LLC. 

SiriusXM® and all related marks and logos are 

trademarks of SiriusXM® Radio Inc.  

Ú

page 408.

For Uconnect system support, call 

1-877-855-8400 (24 hours a day 7 days a week) 

or visit 

DriveUconnect.com

 (US) or 

DriveUconnect.ca

 (Canada).

DRIVER AND PASSENGER MEMORY 

SETTINGS — IF EQUIPPED  

This feature allows the driver, and if equipped, also 

the front passenger to save up to two different 

memory profiles for easy recall through a memory 

switch. Each memory profile saves desired position 

settings for the following features:
Driver’s Side

Seat position

Easy Entry/Exit seat (if equipped)

Side mirrors

Power tilt and telescopic steering column (if 

equipped)

A set of desired radio station presets

1 — For Vehicles Equipped With Navigation: Push 

The Voice Recognition Button To Begin Radio,

Media, Navigation, Climate, Start Or Answer A 

Phone Call, And Send Or Receive A Text

1 — For Vehicles Not Equipped With Navigation: 

Push The Phone Button To Answer An Incoming 

Phone Call
2 — Push To Access Tile Mode On The Instrument 

Cluster
3 — Push The Hang Up Button To End A Call 

Currently In Progress

GETTING TO KNOW YOUR VEHICLE

35

Passenger’s Side (If Equipped)

Seat Position

The memory settings switches are located on the 

front door panels, next to the door handle, and 

consists of three buttons:

The set (S) button, which is used to activate the 

memory save function.

The (1) and (2) buttons which are used to recall 

either of two saved memory profiles.

Memory Setting Buttons

NOTE:

Your vehicle is equipped with two key fobs, each 

can be linked to either driver’s side memory 

position 1 or 2.

Front passenger memory settings cannot be 

linked to a key fob.

P

ROGRAMMING

 T

HE

 M

EMORY

 F

EATURE

To create a new memory profile, perform the 

following:

NOTE:

Saving a new memory profile will erase the 

selected profile from memory.
1. Place the vehicle’s ignition in the ON/RUN 

position (do not start the engine).

2. Adjust all memory profile settings to desired 

preferences (i.e., seat, side mirror, power tilt/

telescopic steering column [if equipped], and 

radio station presets).

3. Push and release the set (S) button on the 

memory switch.

4. Within five seconds, push and release either of 

the memory buttons (1) or (2). The instrument 

cluster display will indicate which memory 

position has been set.

NOTE:

Memory profiles can be set without the vehicle in 

PARK, but the vehicle must be below 5 mph 

(8 km/h) to recall a memory profile.

L

INKING

 A

ND

 U

NLINKING

 T

HE

 K

EY

 F

OB


T

O

 M

EMORY

Your key fobs can be programmed to recall one of 

two saved driver’s side memory profiles.
NOTE:

Before programming your key fobs you must select 

the “Personal Settings Linked To Key Fob” feature 

through the Uconnect Settings  

Ú

page 204.

To program your key fobs, perform the following:
1. Place the vehicle’s ignition in the OFF 

position.

2. Select a desired driver’s side memory profile, 

1 or 2.

3. Once the profile has been recalled, push and 

release the set (S) button on the memory 

switch.

4. Within five seconds, push and release button 

(1) or (2) accordingly. “Memory Profile Set”

(1 or 2) will display in the instrument cluster.

5. Push and release the lock button on the key 

fob within 10 seconds.

NOTE:

Your key fobs can be unlinked from your driver’s 

side memory settings by pushing the set (S) button, 

and within 10 seconds, pushing the unlock button 

on the key fob.

2

36

GETTING TO KNOW YOUR VEHICLE


(Continued)

M

EMORY

 P

OSITION

 R

ECALL

NOTE:

Memory Recall is available when not in PARK, if the 

vehicle speed is below 5 mph (8 km/h).

To recall a memory settings profile using the 

memory switches, push memory button (1) or 

(2) on the memory switch.

To recall the driver’s side memory settings using 

the key fob, push the unlock button on the key 

fob linked to memory position 1 or 2.

A recall can be canceled by pushing any of the 

memory buttons during a recall (S, 1, or 2), or by 

pushing any of the seat adjustment switches. 

When a recall is canceled, the seat and power tilt/

telescopic steering column (if equipped) will stop 

moving. A delay of one second will occur before 

another recall can be selected.

SEATS    

Seats are a part of the Occupant Restraint system 

of the vehicle.

M

ANUAL

 A

DJUSTMENT

 (F

RONT

 S

EATS

) — 

I

F

 E

QUIPPED

Manual Front Passenger Seat Forward/

Rearward Adjustment 

Some models may be equipped with a manual 

front passenger seat. The passenger seat can be 

adjusted forward or rearward by using a bar 

located by the front of the seat cushion, near the 

floor.

Adjustment Bar

While sitting in the seat, lift up on the bar located 

under the seat cushion and move the seat forward 

or rearward. Release the bar once you have 

reached the desired position. Then, using body 

pressure, move forward and rearward on the seat 

to be sure that the seat adjusters have latched.

WARNING!

It is dangerous to ride in a cargo area, inside 

or outside of a vehicle. In a collision, people 

riding in these areas are more likely to be seri

-

ously injured or killed.

Do not allow people to ride in any area of your 

vehicle that is not equipped with seats and 

seat belts. In a collision, people riding in these 

areas are more likely to be seriously injured or 

killed.

Be sure everyone in your vehicle is in a seat 

and using a seat belt properly.

WARNING!

Adjusting a seat while the vehicle is moving is 

dangerous. The sudden movement of the seat 

could cause you to lose control. The seat belt 

might not be adjusted properly and you could 

be injured. Adjust the seat only while the 

vehicle is parked.

Do not ride with the seatback reclined so that 

the shoulder belt is no longer resting against 

your chest. In a collision you could slide under 

the seat belt and be seriously or even fatally 

injured. Use the recliner only when the vehicle 

is parked.

WARNING!

GETTING TO KNOW YOUR VEHICLE

37

Manual Front Passenger Seatback 

Adjustment — Recline 

To recline, lean forward slightly and lift the lever 

located on the outboard side of the seat. Then, 

push the seat rearward to the desired position and 

release the lever. To return the seatback to its 

normal position, lean forward and lift the lever. To 

ensure the seatback is latched, use body pressure 

to lean forward and rearward.

Recline Lever

M

ANUAL

 A

DJUSTMENT

 (R

EAR

 S

EATS

)

Vehicles equipped with third row seating may have 

a second row bench seat, or second row captain’s 

chairs. Vehicles equipped with only second row 

seating, will have a second row bench seat.

NOTE:

You may experience deformation in the seat 

cushion from the seat belt buckles if the seats are 

left folded for an extended period of time. This is 

normal and by simply unfolding the seats to the 

open position, over time the seat cushion will 

return to its normal shape.

WARNING!

Adjusting a seat while driving may be 

dangerous. Moving a seat while driving could 

result in loss of control which could cause a 

collision and serious injury or death.

Seats should be adjusted before fastening the 

seat belts and while the vehicle is parked. 

Serious injury or death could result from a 

poorly adjusted seat belt.

WARNING!

Do not ride with the seatback reclined so that 

the shoulder belt is no longer resting against 

your chest. In a collision you could slide under 

the seat belt, which could result in serious injury 

or death.

WARNING!

Do not pile luggage or cargo higher than the top 

of the seatback. This could impair visibility or 

become a dangerous projectile in a sudden stop 

or collision.

2

38

GETTING TO KNOW YOUR VEHICLE


Second Row Bench Seat — If Equipped

SECOND ROW BENCH SEAT FORWARD/REAR

-

WARD ADJUSTMENT

Lift up on the adjusting bar located at the front of 

the seat near the floor and release it when the seat 

is at the desired position. Then, using body 

pressure, move forward and rearward on the seat 

to be sure that the seat adjusters have latched.

Rear Seat Adjustment Bar

SECOND ROW BENCH SEAT RECLINE ADJUSTMENT

To recline, lean forward slightly and lift the lever 

located on the outboard side of the seat. Then, 

push the seat rearward to the desired position and 

release the lever. To return the seatback to its 

normal position, lean forward and lift the lever. To 

ensure the seatback is latched, use body pressure 

to lean forward and rearward.

Rear Seat Recline Lever

SECOND ROW BENCH FOLD FLAT SEAT

To provide additional storage area, each rear seat 

can be folded flat. This allows for extended cargo 

space and still maintains some rear seating room.

NOTE:

Prior to folding the rear seat, it may be necessary 

to position the front seat to its mid-track position. 

Also, be sure that the front seats are fully upright 

and positioned forward. This will allow the rear seat 

to fold down easily.

To lower the seatback, pull upward on the recline 

lever located on the outboard side of the seat, and 

let the seatback fold forward automatically.

Second Row Bench Seat Folded Flat

To raise the seatback, fold the seatback up into its 

original position and lock it into place.

WARNING!

Do not ride with the seatback reclined so that 

the shoulder belt is no longer resting against 

your chest. In a collision you could slide under 

the seat belt, which could result in serious injury 

or death.

WARNING!

Be certain that the seatback is securely locked 

into position. If the seatback is not securely 

locked into position the seat will not provide the 

proper stability for child seats and/or 

passengers. An improperly latched seat could 

cause serious injury.

GETTING TO KNOW YOUR VEHICLE

39

SECOND ROW BENCH SEAT EASY ACCESS FOR 

THIRD ROW — IF EQUIPPED

If the vehicle is equipped with third row seating, the 

second row seats can tip forward to allow 

passengers to easily access the third row seats.
Pull upward on the easy entry lever located on the 

outboard side of the seatback, then tip and slide 

the entire seat forward.

Easy Entry Lever Location

Access To Third Row Seats

To return the seat to a sitting position, unfold the 

seatback upright until it locks and push the seat 

rearward until the track locks.

Second Row Captain’s Chairs —

If Equipped

Vehicles equipped with third row seating may be 

equipped with second row captain’s chairs.

SECOND ROW CAPTAIN’S CHAIRS FORWARD/

REARWARD ADJUSTMENT

Lift up on the adjusting bar located at the front of 

the seat near the floor and release it when the seat 

is at the desired position. Then, using body 

pressure, move forward and rearward on the seat 

to be sure that the seat adjusters have latched.

Rear Seat Adjustment Bar

2

40

GETTING TO KNOW YOUR VEHICLE


SECOND ROW CAPTAIN’S CHAIRS RECLINE 

ADJUSTMENT

To recline, lean forward slightly and lift the lever 

located on the outboard side of the seat. Then, 

push the seat rearward to the desired position and 

release the lever. To return the seatback to its 

normal position, lean forward and lift the lever. To 

ensure the seatback is latched, use body pressure 

to lean forward and rearward.

Rear Seat Recline Lever

SECOND ROW CAPTAIN’S CHAIRS FOLD FLAT 

SEATS

The second row seatbacks can be folded flat to 

carry cargo.
Pull upward on the recline lever located on the 

outboard side of each second row seat, and guide 

the seatback down into the folded position.

Second Row Captain’s Chairs Folded Flat

To Raise The Rear Seats
Fold the seatbacks upward to their original 

position, and lock them into place.

SECOND ROW CAPTAIN’S CHAIR EASY ACCESS 

FOR THIRD ROW

The second row seats can tip forward to allow 

passengers to easily access the third row seats.
Pull upward on the easy entry lever located on the 

outboard side of the seatback, then tip and slide 

the entire seat forward.

Easy Entry Lever Location

WARNING!

Do not ride with the seatback reclined so that 

the shoulder belt is no longer resting against 

your chest. In a collision you could slide under 

the seat belt, which could result in serious injury 

or death.

WARNING!

Be certain that the seatback is securely locked 

into position. If the seatback is not securely 

locked into position the seat will not provide the 

proper stability for child seats and/or 

passengers. An improperly latched seat could 

cause serious injury.

GETTING TO KNOW YOUR VEHICLE

41

Access To Third Row Seats

To return the seat to a sitting position, unfold the 

seatback upright until it locks and push the seat 

rearward until the track locks.

Manual Folding Third Row — If Equipped

Both third row seats can be folded forward to 

increase the cargo area. To lower either seat, pull 

on the release handle located on the back of the 

seat and lower the seat using the pull strap located 

next to the release handle.

NOTE:

The second row seats must be in their full upright 

position or folded flat when folding the third row 

seats.

Release Handles

Third Row Folded

To raise the seat, pull the seat toward you using 

the strap located on the back of the seat.

P

OWER

 A

DJUSTMENT

 (F

RONT

 S

EATS

) — 

I

F

 E

QUIPPED


Some models may be equipped with 12-way power 

driver and front passenger seats. The power seat 

switches are located on the outboard side of the 

seat. There are three switches that control the 

movement of the seat cushion and the seatback.

Power Seat Switches

WARNING!

Be certain that the seatback is securely locked into 

position. If the seatback is not securely locked into 

position the seat will not provide the proper 

stability for child seats and/or passengers. An 

improperly latched seat could cause serious injury.

1 — Cushion Extender Switch
2 — Seat Switch
3 — Seatback And Bolster Adjustment Switch

2

42

GETTING TO KNOW YOUR VEHICLE


Adjusting The Seat Forward Or Rearward

The seat can be adjusted both forward and 

rearward. Push the seat switch forward or 

rearward. The seat will move in the direction of the 

switch. Release the switch when the desired 

position has been reached.

Adjusting The Seat Up Or Down 

The height of the seats can be adjusted up or 

down. Pull upward or push downward on the rear of 

seat switch, the seat will move in the direction of 

the switch. Release the switch when the desired 

position has been reached.

Tilting The Seat Up Or Down

The angle of the seat cushion can be adjusted in 

two directions. Pull upward or push downward on 

the front of the seat switch, the front of the seat 

cushion will move in the direction of the switch. 

Release the switch when the desired position has 

been reached.

Reclining The Seatback

The angle of the seatback can be adjusted forward 

or rearward. Push the seatback switch forward or 

rearward, the seat will move in the direction of the 

switch. Release the switch when the desired 

position is reached.

Seatback Bolster Adjustment

The front driver and passenger seatback bolsters 

can be extended outward, or retracted inward by 

pushing the bolster adjustment button located in 

the center of the seatback switch.
Push the top of the button to extend the bolsters, 

or push the bottom of the button to retract the 

bolsters.

Seatback Bolster Adjustment Button

WARNING!

Adjusting a seat while driving may be 

dangerous. Moving a seat while driving could 

result in loss of control which could cause a 

collision and serious injury or death.

Seats should be adjusted before fastening the 

seat belts and while the vehicle is parked. 

Serious injury or death could result from a 

poorly adjusted seat belt.

Do not ride with the seatback reclined so that 

the shoulder belt is no longer resting against 

your chest. In a collision you could slide under 

the seat belt, which could result in serious 

injury or death.

CAUTION!

Do not place any article under a power seat or 

impede its ability to move as it may cause 

damage to the seat controls. Seat travel may 

become limited if movement is stopped by an 

obstruction in the seat's path.

1 — Extend Seatback Bolsters
2 — Retract Seatback Bolsters

GETTING TO KNOW YOUR VEHICLE

43

Cushion Extender

The cushion can be extended forward a few inches 

(centimeters) to increase thigh support. Push the 

cushion extender switch forward or rearward to 

extend or retract the cushion. Release the switch 

when the desired position has been reached.

Power Lumbar — If Equipped

Vehicles equipped with power driver or passenger 

seats may also be equipped with power lumbar. 

The power lumbar switch is located on the 

outboard side of the power seat. Push the switch 

forward to increase the lumbar support. Push the 

switch rearward to decrease the lumbar support. 

Pushing upward or downward on the switch will 

raise and lower the position of the support.

Power Lumbar Switch

Easy Entry/Exit Seat — If Equipped

This feature provides automatic driver seat 

positioning to enhance driver mobility when 

entering and exiting the vehicle.
The distance the driver seat moves depends on 

where you have the driver seat positioned when 

you place the vehicle’s ignition in the OFF position.

When you place the vehicle’s ignition in the OFF 

position, the driver seat will move about 

2.4 inches (6 cm) rearward if the driver seat 

position is greater than or equal to 2.7 inches 

(6.8 cm) forward of the rear stop. The seat will 

return to its previously set position when you 

place the vehicle’s ignition in the ON/RUN posi

-

tion.

The Easy Entry/Easy Exit feature is disabled 

when the driver seat position is less than 0.9 of 

an inch (2.3 cm) forward of the rear stop. At this 

position, there is no benefit to the driver by 

moving the seat for Easy Exit or Easy Entry.

When enabled in Uconnect Settings, Easy Entry 

and Easy Exit positions are stored in each memory 

setting profile  

Ú

page 34.

NOTE:

The Easy Entry/Exit feature is enabled or disabled 

within the Uconnect system  

Ú

page 204.

P

OWER

 A

DJUSTMENT

 (R

EAR

 S

EATS

) — 

I

F

 E

QUIPPED

WARNING!

Adjusting a seat while driving may be 

dangerous. Moving a seat while driving could 

result in loss of control which could cause a 

collision and serious injury or death.

Seats should be adjusted before fastening the 

seat belts and while the vehicle is parked. 

Serious injury or death could result from a 

poorly adjusted seat belt.

Do not ride with the seatback reclined so that 

the shoulder belt is no longer resting against 

your chest. In a collision you could slide under 

the seat belt, which could result in serious 

injury or death.

Do not place the seat belt webbing behind the 

third row stow clip when using the seat belt to 

restrain an occupant. The seat belt will not be 

positioned properly on the occupant and they 

could be more seriously injured in an accident 

as a result.

2


Content      ..      1      2      3      ..