Jeep Renegade (2022 year). Manual in english - page 12
 

  Index      Manuals     Jeep Renegade (2022 year). Manual in english


Search            copyright infringement  


Content      ..     10      11      12      13     ..


Jeep Renegade (2022 year). Manual in english - page 12


MULTIMEDIA


185

5. To display the options for a favorite 

destination, press the Options icon that looks 

like a gear.
The following options are available for each fa

-

vorite destination:

Edit Name

Phone Number

Move Up

Move Down

Delete

Where To? — Point of Interest 

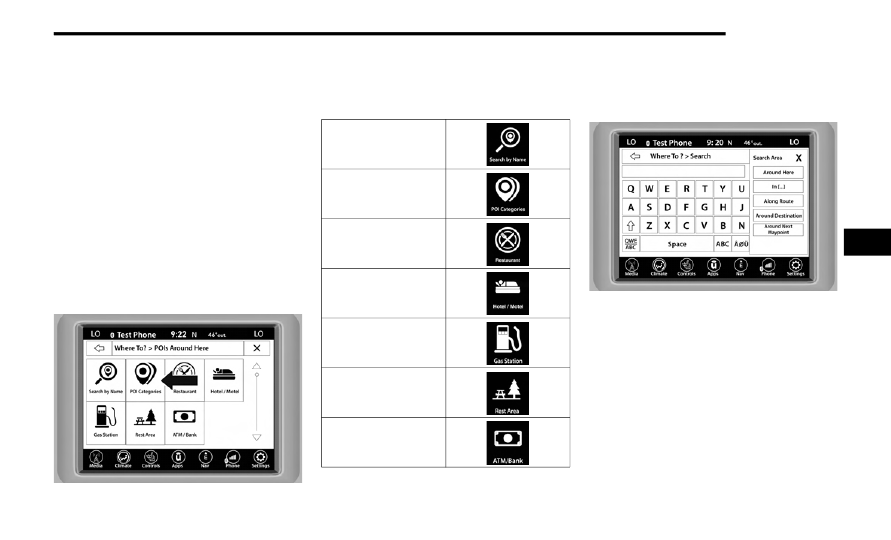
To enter a destination by Point of Interest (POI), 

press the Where To? button from the Nav Main 

Menu, then press the POI Categories button.

POI Categories Button

The Point of Interest database allows you to select 

a destination from a list of locations and public 

places, or points of interest.
You have the following POIs to choose from:

You can also change your POI search area by 

pressing any of the category buttons and pressing 

the Along Route button to access the Search Area 

option.

Search Area

You will have the following options to change your 

search area:

Around Here

In [...] (In a City or a Zip Code)

Along Route (only available during route guid

-

ance)

Around Destination (only available during route 

guidance)

Around Next Waypoint

Search By Name

POI Categories

Restaurant

Hotel/Motel

Gas Station

Rest Area

ATM/Bank

5

186


MULTIMEDIA


POI — SEARCH BY NAME

1. Press the Search by Name button.

A keyboard will appear on the screen. Type in 

the POI that you want to search and press the 

OK button to display available items.

2. Press the desired POI and press “Route To” to 

confirm the route.

3. Press the GO! button to confirm the 

destination and begin the route.

POI — POI CATEGORIES

1. Press the POI Categories button.

You can search through the available POI cate

-

gories to find your desired POI.
The available categories are:

List All POIs

Airport

ATM or Banking

Automotive

Coffee Shops

Community

Entertainment

Gas Stations

Highway Exit

Hospital

Hotels or Motels

Local Services

Medical

Parking

Parks and Recreation

Restaurants

Shopping

Travel and Transportation

Truck

2. Select a category and then select a 

subcategory if necessary. Press the ABC 

button to activate a keyboard to search within 

the POI categories.

ABC Keyboard

3. Press the desired POI and press “Route To” to 

confirm the route.

4. Press the GO! button to confirm the 

destination and begin the route.

POI — RESTAURANT, HOTEL/MOTEL, GAS 

STATIONS, REST AREA, AND ATM/BANKING

1. Press the corresponding button for the POI 

category you would like to navigate to.
You can search for a POI by the following cate

-

gories, which are button tabs at the top of the 

screen:

Name

Distance

ABC (Search)

POIs Around Here


MULTIMEDIA


187

2. Press the desired POI destination and press 

“Route To” to confirm the route.

3. Press the GO! button to confirm the 

destination and begin the route.

Where To? — Trips

1. Press the Trips button
2. To add a Trip, follow these steps:

a. Press the Create New Trip button.
b. Press the Destination button, and then 

press “Pick Destination”.

c. Press “Add Destination” or “Insert Final 

Destination” to add waypoints and destina

-

tions to your trip.

d. Choose from the following options to add a 

destination:
• Address
• Recent
• Point of Interest
• Favorites
• Home
• Intersection
• Geo-Coordinates
• Point on Map
• City Center

• Closest Cities
• Phone Number

NOTE:


Refer to the individual section of the chosen option 

for further information.

e. To save your Trip, you must press “Calculate 

Route” and press “Save”.

f. Your new Trip will appear on the Trips list.

3. To route to a saved Trip, follow these steps:

a. Press the button with the name of the 

desired Trip and press the first destination 

in the list.

b. Confirm the route by pressing “Route To”, 

and then press “GO!” to confirm the desti

-

nation and to start the route guidance.

4. To delete a Trip from the list, press the Gear 

icon and then select “Delete” from the pop-up 

menu.

5. To display the options for a trip, press the Gear 

icon.

6. The following Options are available for each 

trip:

Edit Name

Move Up

Move Down

Delete

Where To? — Point on Map And Intersection

POINT ON MAP

1. Press the Point On Map button.
2. Use the touchscreen to drag over to the 

desired destination, and press the 

touchscreen to select a location.

Point On Map

3. To enter a destination by Point On Map, follow 

these steps:
a. Once your cross is where you want it, press 

“Route To”, or select “Places Nearby” to 

select a nearby destination. 

b. Press “GO!” to confirm the destination and 

begin route guidance.

5

188


MULTIMEDIA


INTERSECTION

1. Press the Intersection button.
2. Press the Spell City, Spell Street, or Select 

Country button to enter the desired city, street 

name, or country.

NOTE:


If the system automatically recognizes the city, or 

street, it will populate a list of recognized cities or 

streets. If not, press the List button to select from 

the available options.

Select Street

3. If “Spell Street” was selected, you must select 

the correct street. You will then be asked to 

spell the intersecting street, and then the 

desired city.

4. Press the Route To button to confirm your 

route, and then press “GO!” to confirm the 

destination and begin your route.

Where To? — Home And Work

HOME

1. Press the Home button. If there is no Home 

Address entered, press “Yes” to enter it now.

2. To enter your Home Address, choose one of 

the following options:

Spell City

Spell Street

Select Country

NOTE:


Refer to the individual section of the chosen option 

for further information.

Once you have generated your Home Address, 

you will be asked to Save it.
a. Press the Save Home button to confirm your 

destination and begin the route to your 

Home Address.

b. This address will be saved as your Home 

Address, and it can be accessed by pressing 

the Home button in the Where To? Menu.

3. To delete a saved Home location (or other 

saved locations), so you can save a new Home 

location, follow these steps:
a. Press the Nav button, and in the “Where To” 

screen, press “Edit Where To”.

b. Press the Home button.
c. Under the Manage screen, press the Reset 

Location button.

NOTE:


A confirmation screen will appear asking, “Are you 

sure you want to reset this location?”. Press 

“Reset” to confirm the deletion and then set a new 

Home location by following the previous instruc

-

tions.

WORK

1. Press the Work button. If there is no Work 

Address entered, press “Yes” to enter it now.

2. To set your Work Address, choose one of the 

following options:

Spell City

Spell Street

Select Country

NOTE:


Refer to the individual section of the chosen option 

for further information.
3. Once you have generated your Work Address, 

you will be asked to Save it.


MULTIMEDIA


189

4. Press the Save Work button to confirm your 

destination and begin the route to your Work 

Address.

5. This address will be saved as your Work 

Address, and it can be accessed by pressing 

the Work button in the Where To? Menu.

Where To? — City Center And Closest Cities

CITY CENTER

1. Press the City Center button.
2. To enter a destination by City Center, follow 

these steps:
a. Enter the name of the City you would like to 

route to.

Select City Or Zip Code

b. Press the desired city from the list.
c. Press the Route To button to confirm your 

route, and then press “GO!” to confirm your 

destination and begin your route.

CLOSEST CITIES

1. Press the Closest Cities button.
2. Press the desired city from the list.
3. Press the Route To button to confirm your 

route, and then press “GO!” to confirm your 

destination and begin your route.

Where To? — Phone, Geo-Coordinates, And 

Trails

PHONE

1. Press the Phone Number button.
2. To enter a destination by Phone Number, 

follow these steps:
a. Enter the Phone Number of the business 

you would like to route to.

b. Press the desired destination from the list.
c. Press the Route To button to confirm your 

route, and then press “GO!” to confirm your 

destination and begin your route.

GEO-COORDINATES

1. Press the Geo-Coordinates button.
2. Enter the Latitude by typing in the numbers. 

Use the dial pad to select specific numbers in 

the location shown.

Geo-Coordinates

3. Press the OK button.
4. Enter the Longitude by typing in the numbers. 

Use the dial pad to select specific numbers in 

the location shown.

5. Press “OK” to confirm the destination.
6. Press the Route To button to confirm your 

route, and then press “GO!” to confirm your 

destination and begin your route.

5

190


MULTIMEDIA


TRAILS

1. Press the Trails button.
2. Press “Start Recording”.

Start Recording Trails

3. When you want to end the recording of a route, 

press the Record button, and press “Yes” to 

confirm.
The trip you recorded will be added to the Re

-

cent Trails list.

Before Route Guidance 

Before confirming the destination with the GO! 

button, it is possible to select options different 

from the standard route settings.

Route Options — Press the Route Options button 

to display a list of options to alter your route. To 

make a selection, press and release the desired 

setting.

Route Options Button

Route Options

1 — Round Trip
2 — Expressways Allowed
3 — Toll Roads Allowed
4 — Ferries Allowed
5 — Carpool Lanes Allowed
6 — Car Shuttle Trains Allowed


MULTIMEDIA


191

Avoid — Press the Avoid button to choose road 

types to avoid during your route. To make a 

selection press and release the desired setting.

Avoid Button

Detour Types

NOTE:


Since toll roads, tunnels and ferries are built for 

the purpose of shortening travel distances, 

avoiding these road types may increase distance 

and travel time.

Accept — Press the Accept button to confirm 

desired detoured route.

Save — Press the Save button to save the desti

-

nation as a Trip.

Press the GO! button to confirm your destination 

and to start your route guidance.

V

IEW

 M

AP


View Map — Main Menu 

Press the View Map button from the Nav Main 

Menu to display a map of your current position.

View Map Button

With the map displayed you have the following 

features available:
Menu
Press this button to return to the Nav Main Menu.
Zoom In +/Zoom Out –
Press the Zoom In (+) or Zoom Out (–) buttons to 

change the zoom level. Roads with lower 

functional classification are not shown in higher 

zoom levels (e.g., residential streets, 

lightly-traveled county roads).
Time of Arrival/Time to Destination/Distance (only 

during route guidance)
Press the button in the upper right area of the 

screen to the display items available. Press the 

desired option button:

Time of Arrival

Time to Destination

Distance

Turn List (only during route guidance)
Press the area in the upper center part of the 

screen that displays your next turn to see a Turn 

List for your current route.
Press a turn in the displayed Turn List for the 

following options:

Show on Map

Avoid Street

5

192


MULTIMEDIA


Options (only during route guidance)
Press the Options button to display the following 

options. Press the desired button:

2D North Up/Map View 2D/Map View 3D
Press this button to scroll between the three 

viewing options.

Repeat Directions
Press this button to repeat the current voice 

prompt.

Mute Guidance
Press this button to mute the voice prompts.

Stop Guidance
Press this button to stop route guidance.

Settings
Press this button to view all the available 

settings  

Ú


page


192.

View Map — Settings 

With the Map displayed, press the button on the 

bottom right of the map that has three horizontal 

lines on it. Then press the Settings button.

View Map Settings Icon

View Map Settings Button

The following Map Settings are available:

Map Settings

Map Setup — Press this button to display items to 

customize how your map is viewed  

Ú


page


193.

Speed Limit — Press this button to turn on/off 

speed limit warning announcements and to 

enter a predefined speed limit for your route.

Guidance — Press this button to display items to 

customize your route guidance  

Ú


page


196.

Traffic — Press this button to set how you 

receive traffic information updates.

GPS (DMS) — Press this button to change the 

GPS display. Press the desired button:

Decimal

Degrees-Minutes-Seconds (DMS)

Degrees-Minutes (DM)


MULTIMEDIA


193

Map Updates — Press the button to view map 

updates for the Navigation system.

About — Press the button to view information 

about the Navigation system.

SETTINGS — MAP SETUP

With the Map displayed, press the button in the 

bottom right corner of the map that has three 

horizontal bars on it, then press the Settings 

button and then the Map Setup button.

Map Setup

The following Map Setup options are available:

Map Setup Options

Map View

Press this button to change how the Map View is displayed. Press the desired 

button:

3D (Must Select 3D City Models Or 3D Landmarks For 3D Map View To 

Display)

2D

2D North Up

Map Appearance

Press this button to select different themes for your map.

Display Current Street

Press this button to turn on/off the current street display on the lower center 

of the Map View. Press and release the button until a check mark appears, 

showing the setting has been selected.

Display Current City

Press this button to turn on/off the current city display in the lower right of the 

Map View. Press and release the button until a check mark appears, showing 

the setting has been selected.

5

194


MULTIMEDIA


Destination Information

Press this button to change the Destination Information that is displayed in 

the upper right corner of the Map View. Press the desired button:

Time of Arrival

Time to Destination

Distance

Auto Zoom

Press this button to change how the Auto Zoom feature adjusts the zoom level 

during guidance in Map View. Press the desired button:

Far

Medium

Low

Off

Vehicle Icon

Press this button to change the Vehicle icon that is displayed while in Map 

View. Press “Previous” or “Next” to view the available icons. Press the Back 

button when you've made your selection.

Show POI Icons

Press this button within the Map Setup screen to show the selected Point of 

Interest icons while in Map View. Press and release the button until a check 

mark appears, showing the setting has been selected.

POI Categories

Press this button within the Map Setup screen to display the available Point of 

Interest icons you would like displayed while in Map View. Press and release 

the desired selection until a check mark appears, showing the setting has 

been selected.

Traffic Incidents — If Equipped

Press the Traffic button within the Map Setup screen to show Traffic Message 

Channel (TMC) Incidents while in Map View. Press and release the button until 

a check mark appears, showing the setting has been selected.


MULTIMEDIA


195

Speed And Flow

Press the Speed Limit button within the Map Setup screen to show the Speed 

and Flow of traffic while in Map View. Press and release the button until a 

check mark appears, showing the setting has been selected.

3D City Models

Press the 3D City Models button within Map Setup screen to display 3D City 

Models while in Map View. Press and release the button until a check mark 

appears, showing the setting has been selected.

3D Landmarks

Press the 3D Landmarks within the Map Setup screen to display 3D 

Landmarks while in Map View. Press and release the button until a check 

mark appears, showing the setting has been selected.

Digital Terrain Model

Press this button within the Map Setup screen to display the area’s terrain 

while in Map View. Press and release the button until a check mark appears, 

showing the setting has been selected.

Park Areas

Press this button within the Map Setup screen to display Park Areas while in 

Map View. Press and release the button until a check mark appears, showing 

the setting has been selected.

Railroads

Press this button within the Map Setup screen to display Railroad Tracks while 

in Map View. Press and release the button until a check mark appears, 

showing the setting has been selected.

City Areas

Press this button within the Map Setup screen to display City Areas while in 

Map View. Press and release the button until a check mark appears, showing 

the setting has been selected.

River Names

Press this button within the Map Setup screen to display River Names while in 

Map View. Press and release the button until a check mark appears, showing 

the setting has been selected.

5

196


MULTIMEDIA


SETTINGS — GUIDANCE

With the Map displayed, press the Options button, then press the Settings button and then the Guidance button. You can also access this menu by pressing the 

Settings button in the lower right of the Nav Main Menu.

Guidance Button

The following Guidance options are available:

Play Voice Guidance

Press this button to enable Voice Guidance prompts during route guidance. 

Press and release the button until a check mark appears, showing the setting 

has been selected.

Nav Guidance Volume

Press the + or – buttons to adjust the Nav Guidance Volume.

Lane Recommendation

Press this button to enable Lane Recommendation during route guidance. 

Press and release the button until a check mark appears, showing the setting 

has been selected.


MULTIMEDIA


197

Junction View

Press this button to enable Junction View during route guidance. Press and 

release the button until a check mark appears, showing the setting has been 

selected.

TMC Route Mode — If Equipped

Press this button to change how the Traffic Message Channel (TMC) Route 

Mode functions during route guidance. Select from:

Automatic

By Delay Time

Manual

Off

TMC Avoidance Types — If Equipped

Press this button to display the available Traffic Message Channel (TMC) 

Avoidance Types you would like displayed while in route guidance. Press and 

release the desired selection button until a check mark appears, showing the 

setting has been selected.

Signposts

Press this button to display the Signposts types you would like displayed while 

in route guidance. Press and release the desired selection button until a 

check mark appears, showing the setting has been selected.

Route Progress Bar

Press this button to display the Route Progress Bar while in route guidance. 

Press and release the selection button until a check mark appears, showing 

the setting has been selected.

Route Options

Press this button to determine which road types are OK to travel on while in 

route guidance. Press and release the desired selection button until a check 

mark appears, showing the setting has been selected.

5

198


MULTIMEDIA


Highway Mode

Press this button to activate Highway Mode. Selectable options are “On” and 

“Off”. Having this setting on will allow you to select the setting “Highway 

Services”.

Offered Services

Press this button to display the available Offered Services types you would like 

displayed while in route guidance. Press and release the desired selection 

button until a check mark appears, showing the setting has been selected. 

Available selections are “Gas Stations”, “Restaurants”, “Rest Area”, and “Auto 

Services And Maintenance”.

Use Real Time Traffic

Press this button to display Real Time Traffic Updates while in route guidance. 

Press and release the desired selection button until a check mark appears, 

showing the setting has been selected.

Provide Detours on Traffic Events

Press this button to display Detours On Traffic Events while in route guidance. 

Press and release the desired selection button until a check mark appears, 

showing the setting has been selected.

Confirm Detours Manually

Press this button to make it mandatory for you to have to Confirm Detours 

Manually while in route guidance. Press and release the desired selection 

button until a check mark appears, showing the setting has been selected.

Provide Detours That Save More Than X Min.

Press this button to allow the Navigation system to display the available 

detours if they save you a predetermined amount of minutes, while in route 

guidance. Press and release the desired plus or minus button until you have 

selected the desired number of minutes saved, from five minutes to one hour 

in increments of five minutes.


MULTIMEDIA


199

I

NFORMATION


Information Button

From the Nav Main Menu, press the Information button and select one of the following options to view additional information:

Traffic

“Traffic” displays detailed traffic information.

Weather — If Equipped

“Weather” displays detailed weather information about your current position.

Where Am I?

“Where Am I?” displays the address and Geo-Coordinates of your current location.
1. Press the Show GPS Info button to view the GPS information.
2. Press the Save button to save the location in your Favorites.

Country Info

Select the desired country on the touchscreen. Information, such as average 

speed limits and specific phone number country codes, will be provided about the 

selected country.

5

200


MULTIMEDIA


E

MERGENCY


From the Nav Main Menu, press the Emergency 

button and press one of the following options to 

search and route to a specific location.

Emergency Button

Emergency Nearby Options

Press the “Where Am I?” button to display your 

exact current location.
Press the Save button to save your current location 

in Favorites.
You can search for a Hospital, Police Department, 

or Fire Department by the following categories, 

which are button tabs at the top of the screen:

Name

Distance

ABC (Search)

NOTE:


In case of emergency, please contact the facility to 

verify their availability before proceeding.

Select the desired Hospital, Police Department, 

or Fire Department and press “Route To” to 

confirm your route, and then press “GO!” to 

confirm the destination and begin route guid

-

ance.

M

AP

 U

PDATES


The map data available in your vehicle is the most 

up-to-date information that was available when 

your vehicle was built. Map data is updated 

periodically as map information changes. Follow 

the steps below if you wish to obtain an update for 

your vehicle.
1. Please visit chryslergroup.navigation.com to 

obtain your map update. At the top of the 

page, click the brand of your vehicle. Then, at 

the drop down menu, select your vehicle 

model and its model year. You will then be 

directed to a page that will let you know if your 

vehicle needs a map update or not.

2. Or, visit DriveUconnect.com (US) or DriveU

-

connect.ca (Canada) and follow these steps:

Under the “Help & Support” tab, select your 

vehicle brand, model, and year. Then, click 

“SYSTEM UPDATES.” Simply follow the 

steps and place your order.

1 — Hospital
2 — Police
3 — Fire Department


Content      ..     10      11      12      13     ..