Jeep Renegade (2022 year). Manual in english - page 11
 

  Index      Manuals     Jeep Renegade (2022 year). Manual in english


Search            copyright infringement  


Content      ..     9      10      11      12     ..


Jeep Renegade (2022 year). Manual in english - page 11


170


MULTIMEDIA


Phone Call Features

The following features can be accessed through 

the Uconnect Phone if the feature(s) are available 

and supported by Bluetooth® on your mobile 

service plan. For example, if your mobile service 

plan provides three-way calling, this feature can be 

accessed through the Uconnect Phone. Check with 

your mobile service provider for the features that 

you have.
Listed below are the phone options with Uconnect:

Redial

Dial by pressing in the number

Voice Commands (Dial by Saying a Name, Call 

by Saying a Phonebook Name, Redial or Call 

Back)

Favorites

Mobile Phonebook

Recent Call Log

SMS Message Viewer

CALL CONTROLS

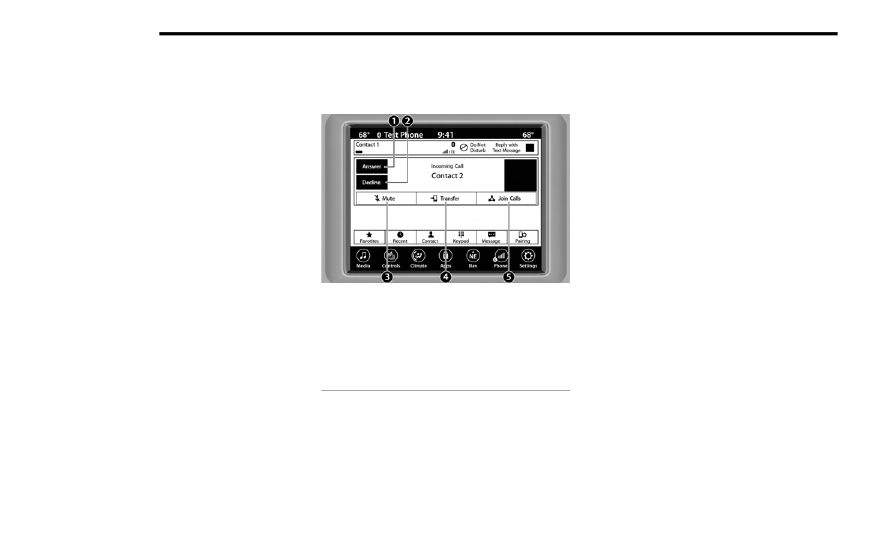
The touchscreen allows you to control the following 

call features:

Uconnect 4/4C/4C NAV With 8.4-inch Display

Other phone call features include:

End Call

Hold/Unhold/Resume

Swap two active calls

KEY PAD NUMBER ENTRY

1. Press the Phone button.
2. Press the Dial/Keypad button on the 

touchscreen.

3. The Touch-Tone screen will be displayed.
4. Use the numbered buttons on the 

touchscreens to enter the number and press 

“Dial/Call”.

RECENT CALLS — IF EQUIPPED

You may browse a list of the most recent of each of 

the following call types: 

All Calls

Incoming Calls or Calls Received

Outgoing Calls or Calls Made

Missed Calls

These can be accessed by pressing the Recent 

Calls button on the phone main screen.
You can also push the VR button on your steering 

wheel and perform the above operation. For 

example, say “Show my incoming calls”.

1 — Answer
2 — Ignore/Decline
3 — Mute/Unmute
4 — Transfer
5 — Join Calls


MULTIMEDIA


171

ANSWER OR IGNORE AN INCOMING CALL — NO 

CALL CURRENTLY IN PROGRESS

When you receive a call on your mobile phone, the 

Uconnect Phone will interrupt the vehicle audio 

system. Push the Phone button on the steering 

wheel, press the Answer button on the 

touchscreen.
You can also press the Caller ID box to place the 

current call on hold or answer the incoming call.

Uconnect 4/4C/4C NAV With 8.4-inch Display

ANSWER OR IGNORE AN INCOMING CALL — 

CALL CURRENTLY IN PROGRESS

If a call is currently in progress and you have 

another incoming call, you will hear the same 

network tones for call waiting that you normally 

hear when using your mobile phone. Push the 

Phone button on the steering wheel, press the 

Answer button on the touchscreen, or press the 

Caller ID box to place the current call on hold and 

answer the incoming call.
NOTE:


Phones that are compatible with the Uconnect 

system in the market today do not support 

rejecting an incoming call when another call is in 

progress. Therefore, the user can only answer an 

incoming call or ignore it.

DO NOT DISTURB 

With Do Not Disturb, you can disable notifications 

from incoming calls and texts, allowing you to keep 

your eyes on the road and hands on the wheel. For 

your convenience, there is a counter display to 

keep track of your missed calls and text messages 

while Do Not Disturb is active.
Do Not Disturb can automatically reply with a text 

message, a call, or both when declining an 

incoming call and send it to voicemail.

Automatic reply messages can be:

“I am driving right now, I will get back to you 

shortly”.

Create a custom auto reply message up to 160 

characters.

NOTE:


Only the first 25 characters can be seen on the 

touchscreen while typing a custom message.
While in Do Not Disturb, Conference Call can be 

selected so you can still place a second call 

without being interrupted by incoming calls.
NOTE:

Reply with text message is not compatible with 

iPhone® devices.

Auto reply with text message is only available on 

phones that support Bluetooth® Message 

Access Profile (MAP).

PLACE/RETRIEVE A CALL FROM HOLD

During an active call, press the Hold or Call On Hold 

button on the Phone main screen.

1 — Answer Button
2 — Caller ID Box

5

172


MULTIMEDIA


MAKING A SECOND CALL WHILE CURRENT 

CALL IS IN PROGRESS

You can place a call on hold by pressing the Hold 

button on the Phone main screen, then dial a 

number from the keypad (if supported by your 

mobile phone), recent calls, SMS Inbox or from the 

phonebooks.

TOGGLING BETWEEN CALLS

Uconnect 4/4C/4C NAV With 8.4-inch Display

If two calls are in progress (one active and one on 

hold), press the Swap Calls button on the phone 

main screen. Only one call can be placed on hold 

at a time.
You can also push the Phone button to toggle 

between the active and held phone call.

JOIN CALLS

When two calls are in progress (one active and one 

on hold), press the Join/Merge Calls button on the 

Phone main screen to combine all calls into a 

conference call.

CALL TERMINATION

To end a call in progress, momentarily press the 

End Call button on the touchscreen or the Phone 

End button on the steering wheel. Only the active 

call(s) will be terminated and if there is a call on 

hold, it will become the new active call.

REDIAL

Push the VR button and after the 

“Listening” prompt and the following 

beep, say “Redial.”

The Uconnect Phone will call the last number that 

was dialed from your mobile phone.

CALL CONTINUATION

Call continuation is the progression of a phone call 

on the Uconnect Phone after the vehicle ignition 

has been switched to OFF.
NOTE:


The call will remain within the vehicle audio system 

until the phone becomes out of range for the 

Bluetooth® connection. It is recommended to 

press the Transfer button on the touchscreen 

when leaving the vehicle.

Advanced Phone Connectivity

TRANSFER CALL TO AND FROM MOBILE 

PHONE

The Uconnect Phone allows ongoing calls to be 

transferred from your mobile phone without 

terminating the call. To transfer an ongoing call 

from your connected mobile phone to the 

Uconnect Phone or vice versa, press the Transfer 

button on the Phone main screen.

Things You Should Know About Uconnect 

Phone

VOICE COMMAND

For the best performance:

Always wait for the beep before speaking

Speak normally, without pausing, just as you 

would speak to a person sitting a few feet/

meters away from you

Ensure that no one other than you is speaking 

during a voice command period

Low-To-Medium Blower Setting

Low-To-Medium Vehicle Speed

Low Road Noise

Smooth Road Surface

Fully Closed Windows

Dry Weather Conditions


MULTIMEDIA


173

Even though the system is designed for many 

languages and accents, the system may not always 

work for some.
NOTE:


It is recommended that you do not store names in 

your Favorites phonebook while the vehicle is in 

motion.
Number and name recognition rate is optimized 

when the entries are not similar. You can say “O” 

(letter “O”) for “0” (zero).
Even though international dialing for most number 

combinations is supported, some shortcut dialing 

number combinations may not be supported.
Audio Performance
Audio quality is maximized under:

Low-To-Medium Blower Setting

Low-To-Medium Vehicle Speed

Low Road Noise

Smooth Road Surface

Fully Closed Windows

Dry Weather Conditions

Operation From The Driver's Seat

Performance such as audio clarity, echo, and 

loudness to a large degree rely on the phone and 

network, and not the Uconnect Phone.
Echo at the far end can sometimes be reduced by 

lowering the in-vehicle audio volume.

PHONE VOICE COMMANDS

Making and answering hands-free phone calls is 

easy with Uconnect. When the Phonebook button 

is illuminated on your touchscreen, your system is 

ready. Check UconnectPhone.com for mobile 

phone compatibility and pairing instructions.
Push the Phone button   and wait for the beep to 

say a command. See the following examples:

“Call John Smith”

“Dial 123 456 7890”

“Redial” (call previous outgoing phone number)

“Call back” (call previously answered incoming 

phone number)

Did You Know: When providing a Voice Command, 

push the Phone button   and say “Call”, then 

pronounce the name exactly as it appears in your 

phonebook. When a contact has multiple phone 

numbers, you can say “Call John Smith work”.

VOICE TEXT REPLY — IF EQUIPPED

Uconnect can announce incoming text messages. 

Push the VR button   or Phone button   and 

say:
1. “Listen” to have the system read an incoming 

text message. (Must have compatible mobile 

phone paired to Uconnect system.)

2. “Reply” after an incoming text message has 

been read.
Listen to the Uconnect prompts. After the 

beep, repeat one of the predefined messages 

and follow the system prompts.

WARNING!


ALWAYS drive safely with your hands on the 

wheel. You have full responsibility and assume 

all risks related to the use of the Uconnect 

features and applications in this vehicle. Only 

use Uconnect when it is safe to do so. Failure to 

do so may result in an accident involving serious 

injury or death.

PRE-DEFINED VOICE TEXT REPLY 

RESPONSES

Yes.

Stuck in 

traffic.

See you later.

No.

Start without 

me.

I’ll be late.

Okay.

Where are 

you?

I will be 5 <or 

10, 15, 20, 

25, 30, 45, 

60> minutes 

late.

Call me.

Are you there 

yet?

5

174


MULTIMEDIA


NOTE:


Only use the numbering listed in the provided 

table. Otherwise, the system will not transpose the 

message.
Did You Know: Your mobile phone must have the 

full implementation of the Message Access Profile 

(MAP) to take advantage of this feature. For details 

about MAP, visit UconnectPhone.com.
Apple® iPhone® iOS 5 or later supports reading 

incoming text messages only. For further 

information on how to enable this feature on your 

Apple® iPhone®, refer to your iPhone® “User 

Manual”.
Did You Know: Voice Text Reply is not compatible 

with iPhone®, but if your vehicle is equipped with 

Siri® Eyes Free, you can use your voice to send a 

text message.

SIRI® EYES FREE — IF EQUIPPED

When used with your Apple® iPhone® connected 

to your vehicle via Bluetooth®, Siri lets you use 

your voice to send text messages, select media, 

place phone calls and much more. Siri uses your 

natural language to understand what you mean 

and responds back to confirm your requests. The 

system is designed to keep your eyes on the road 

and your hands on the wheel by letting Siri help you 

perform useful tasks.
To enable Siri, push and hold, then release the 

Uconnect Voice Recognition (VR) button on the 

steering wheel. After you hear a double beep, you 

can ask Siri to play podcasts and music, get 

directions, read text messages, and many other 

useful requests.

BLUETOOTH® COMMUNICATION LINK

Mobile phones may lose connection to the 

Uconnect Phone. When this happens, the 

connection can generally be re-established by 

restarting the mobile phone. Your mobile phone is 

recommended to remain in Bluetooth® ON mode.

POWER-UP

After switching the ignition key from OFF to either 

the ON/RUN or ACC position, or after a language 

change, you must wait at least 15 seconds prior to 

using the syste

Ú


page


349.

ANDROID AUTO™ & APPLE CARPLAY® — 


IF EQUIPPED  

A

NDROID

 A

UTO

™ 

Use this QR code to access your 

digital experience.
Android Auto™ is a feature of your 

Uconnect system, and your 

Android™ 6.0 or higher powered 

smartphone with a data plan, that 

allows you to project your 

smartphone and a number of its apps onto the 

touchscreen radio display. Android Auto™ brings 

you useful information, and organizes it into simple 

cards that appear just when they are needed. 

Android Auto™ can be used with speech 

technology, the steering wheel controls, the knobs 

and buttons on your radio faceplate, and the radio 

display’s touchscreen to control many of your 

apps. To use Android Auto™, perform the following 

procedure:
NOTE:


Feature availability depends on your carrier and 

mobile phone manufacturer. Some Android Auto™ 

features may or may not be available in every 

region and/or language.

I’ll call you 

later.

I need 

directions.

See you in 5 

<or 10, 15, 

20, 25, 30, 

45, 60> 

minutes.

I’m on my way. Can’t talk right 

now.

I’m lost.

Thanks.

PRE-DEFINED VOICE TEXT REPLY 

RESPONSES


MULTIMEDIA


175

1. Download the Android Auto™ app from the 

Google Play store on your Android™-powered 

smartphone.

2. Connect your Android™-powered smartphone 

to one of the media USB ports in your vehicle. 

If the Android Auto™ app was not downloaded, 

the first time you plug your device in the app 

begins to download. Your vehicle should be in 

PARK the first time you use the app.

NOTE:


Be sure to use the factory-provided USB cable that 

came with your phone, as aftermarket cables may 

not work.

Android Auto™

NOTE:


To use Android Auto™, make sure you are in an 

area with cellular coverage. Android Auto™ may 

use cellular data and your cellular coverage is 

shown in the upper right corner of the radio screen. 

Data plan rates apply.
3. Once the device is connected and recognized, 

the Phone icon on the drag & drop menu bar 

changes to the Android Auto™ icon.

NOTE:


Android Auto™ is set to launch immediately once a 

compatible device is connected. You can also 

launch it by pressing the Android Auto™ icon on the 

touchscreen.
NOTE:


The automatic launching of Android Auto™ can be 

deactivated through the Smartphone Projection 

Manager setting  

Ú


page


178.

Once Android Auto™ is up and running on your 

Uconnect system, the following features can be 

utilized using your smartphone’s data plan:

Google Maps™ for navigation

YouTube Music, Spotify, iHeart Radio, etc. for 

music

Hands-free calling and texting for communica

-

tion

Various compatible apps

Maps

Push and hold the Voice Recognition (VR) 

button on the steering wheel until the 

beep or tap the Microphone icon to ask 

Google to take you to a desired 

destination by voice. You can also touch the 

Navigation icon in Android Auto™ to access other 

navigation apps.
NOTE:


If the VR button is not held, and is only pushed, the 

built-in Uconnect Navigation system (if equipped) 

will launch instead of Android Auto™ Google 

Maps™.
While using Android Auto™, Google Maps™ 

provides voice-guided:

Navigation

Live traffic information

Lane guidance

NOTE:


A pop-up also appears, asking if you’d like to 

switch, if Android Auto™ is currently in use and you 

attempt to launch a built-in Uconnect route. 

Selecting “Yes” switches the navigation type to the 

newly used method of navigation and a route is 

planned for the new destination. If “No” is 

selected, the navigation type remains unchanged.
For further information, refer to www.android.com/

auto/ (US) or https://www.android.com/intl/

en_ca/auto/ (Canada).

1 — LTE Data Coverage
2 — Android Auto™ Icon

5

176


MULTIMEDIA


For further information on the navigation function, 

please refer to https://support.google.com/

android or https://support.google.com/

androidauto/.

Music

Android Auto™ allows you to access and 

stream your favorite music with apps like 

YouTube Music, iHeartRadio, and Spotify. 

Using your smartphone’s data plan, you 

can stream endless music on the road.
NOTE:


Music apps, playlists, and stations must be set up 

on your smartphone prior to using Android Auto™ 

for them to work with Android Auto™.
NOTE:


To see the track details for the music playing 

through Android Auto™, select the Uconnect 

system’s media screen.
For further information, refer to https://

support.google.com/androidauto.

Communication

With Android Auto™ connected, push and 

hold the VR button on the steering wheel 

to activate voice recognition specific to 

Android Auto™. This allows you to send 

and reply to text messages, have incoming text 

messages read out loud, and place and receive 

hands-free calls.

Apps

The Android Auto™ App displays all the compatible 

apps that are available to use with Android Auto™, 

every time it is launched. You must have the 

compatible app downloaded, and you must be 

signed in to the app through your mobile device for 

it to work with Android Auto™.
Refer to https://play.google.com/store/apps/ to 

see the latest list of available apps for Android 

Auto™.

Android Auto™ Voice Command 

NOTE:


Feature availability depends on your carrier and 

mobile phone manufacturer. Some Android Auto™ 

features may or may not be available in every 

region and/or language.
Android Auto™ allows you to use your voice to 

interact with its best-in-class speech technology 

through your vehicle’s voice recognition system, 

and use your smartphone’s data plan to project 

your Android™-powered smartphone and a 

number of its apps onto your Uconnect 

touchscreen. Connect your Android™ 6.0 or higher 

to one of the media USB ports, using the 

factory-provided USB cable, and press the new 

Android Auto™ icon that replaces your Phone icon 

on the main menu bar to begin Android Auto™. 

Push and hold the VR button on the steering wheel, 

or press and hold the Microphone icon within 

Android Auto™, to activate its VR, which recognizes 

natural voice commands, to use a list of your 

smartphone’s features:

Maps

Music

Phone

Text Messages

Additional Apps

NOTE:

To use Android Auto™ on your car display, you’ll 

need an Android™ phone running Android™ 6.0 

or higher, an active data plan, and the Android 

Auto™ app.

To wirelessly use Android Auto™ on your car 

display, you need a compatible Android™ smart

-

phone with an active data plan. You can check 

which smartphones are compatible at g.co/

androidauto/requirements.

Android™ is a trademark of Google Inc.

A

PPLE

 C

AR

P

LAY

®

Use this QR code to access your 

digital experience.
Uconnect works seamlessly with 

Apple CarPlay®, the smarter, 

more secure way to use your 

iPhone® in the car, and stay 

focused on the road. Use your 


MULTIMEDIA


177

Uconnect Touchscreen display, the vehicle's knobs 

and controls, and your voice with Siri to get access 

to Apple Music®, Maps, Messages, and more.
NOTE:


Feature availability depends on your carrier and 

mobile phone manufacturer. Some Apple 

CarPlay® features may or may not be available in 

every region and/or language.
To use Apple CarPlay®, make sure you are using 

iPhone® 5 or later, have Siri enabled in Settings, 

ensure your iPhone® is unlocked for the very first 

connection only, and then use the following 

procedure:
1. Connect your iPhone® to one of the media 

USB ports in your vehicle.

NOTE:


Be sure to use the factory-provided Lightning cable 

that came with your phone, as aftermarket cables 

may not work.
2. Once the device is connected and recognized, 

the Phone icon on the drag & drop menu bar 

changes to the Apple CarPlay® Icon.

NOTE:


Apple CarPlay® is set to launch immediately. You 

can also launch it by pressing the Apple CarPlay® 

icon on the touchscreen.

Apple CarPlay®

NOTE:


To use Apple CarPlay®, make sure that cellular 

data is turned on, and that you are in an area with 

cellular coverage. Your data and cellular coverage 

is shown on the left side of the radio screen. Data 

plan rates apply.
Once Apple CarPlay® is up and running on your 

Uconnect system, the following features can be 

utilized using your iPhone® data plan:

Phone

Music

Messages

Maps

Phone

With Apple CarPlay®, push and hold the 

VR button on the steering wheel to 

activate a Siri voice recognition session. 

You can also press and hold the Home 

button within Apple CarPlay® to start talking to Siri. 

This allows you to make calls or listen to voicemail 

as you normally would using Siri on your iPhone®.
NOTE:


Only temporarily pushing the VR button on the 

steering wheel launches a built-in Uconnect VR 

session, not a Siri session, and it will not function 

with Apple CarPlay®.

Music

Apple CarPlay® allows you to access all 

your artists, playlists, and music from 

iTunes® or any third party application 

installed on your device. Using your 

iPhone® data plan, you can also use select third 

party audio apps including music, news, sports, 

podcasts, and more.

Messages

Push and hold the VR button on the 

steering wheel to activate a Siri voice 

recognition session. Apple CarPlay® 

allows you to use Siri to send or reply to 

text messages. Siri can also read incoming text 

messages, but drivers will not be able to read 

messages, as everything is done via voice.

1 — LTE Data Coverage
2 — Apple CarPlay® Icon

5

178


MULTIMEDIA


Maps

Push and hold the VR button on the 

steering wheel until the beep or tap the 

Microphone icon to ask Apple® Siri to 

take you to a desired destination by 

voice. You can also touch the Navigation icon in 

Apple CarPlay® to access Apple® Maps.
If the VR button is not held, and is only pushed, the 

built-in Uconnect Navigation system (if equipped) 

will launch instead of Apple CarPlay® Apple® 

Maps.
NOTE:


A pop-up also appears, asking if you’d like to 

switch, if an Apple CarPlay® navigation is currently 

in use and you attempt to launch a built-in 

Uconnect route. Selecting “Yes” switches the navi

-

gation type to the newly used method of navigation 

and a route is planned for the new destination. If 

“No” is selected, the navigation type remains 

unchanged.

Apps

The Apple CarPlay® App plays all compatible apps 

that are available to use, every time it is launched. 

You must have the compatible app downloaded, 

and you must be signed in to the app through your 

mobile device for it to work with Apple CarPlay®.
Refer to http://www.apple.com/ios/carplay/ (US) 

or https://www.apple.com/ca/ios/carplay/ 

(Canada) to see the latest list of available apps for 

Apple CarPlay®.

Apple CarPlay® Voice Command 

NOTE:


Feature availability depends on your carrier and 

mobile phone maker. Some Apple CarPlay® 

features may not be available in every region and/

or language.
Apple CarPlay® allows you to use your voice to 

interact with Siri through your vehicle’s voice 

recognition system, and use your smartphone’s 

data plan to project your iPhone® and a number of 

its apps onto your Uconnect touchscreen. Connect 

your iPhone® 5 or higher to one of the media USB 

ports, using the factory-provided Lightning cable, 

and press the new Apple CarPlay® icon that 

replaces your Phone icon on the main menu bar to 

begin Apple CarPlay®. Push and hold the VR 

button on the steering wheel, or press and hold the 

Home button within Apple CarPlay®, to activate 

Siri, which recognizes natural voice commands to 

use a list of your iPhone® features:

Phone

Music

Messages

Maps — If Equipped

Additional Apps — If Equipped

NOTE:


Apple CarPlay® is a trademark of Apple® Inc. 

iPhone® is a trademark of Apple® Inc., registered 

in the US and other countries. Apple® terms of use 

and privacy statements apply.

A

NDROID

 A

UTO

™ A

ND

 A

PPLE


C

AR

P

LAY

® T

IPS

 A

ND

 T

RICKS

Smartphone Device Mirroring — If Equipped
Once downloaded or activated, Android Auto™ and 

Apple CarPlay® will automatically start when your 

smartphone is plugged into a USB port. This 

function can be activated/deactivated through the 

Smartphone Projection Manager.

Smartphone Projection Manager


MULTIMEDIA


179

Smartphone Device Mirroring

To activate/deactivate this feature, connect your 

smartphone with the manufacturer’s USB cable to 

the vehicle’s USB ports.
1. Press the Phone/Bluetooth® button in the 

Settings menu, or press the Apps button.

2. Press “Smartphone Projection Manager”.
3. The setting, “Smartphone Device Mirroring”, 

will display with a check mark. To deactivate 

Android Auto™ and Apple CarPlay® for all 

devices, press the check box. To reactivate 

Android Auto™ and Apple CarPlay® for all 

devices, press the check box again until a 

check mark appears.

Android Auto™ and Apple CarPlay® can also be 

activated/deactivated on specific devices.
1. In “Smartphone Projection Manager”, select 

the name of the device you would like to 

activate/deactivate Android Auto™ or Apple 

CarPlay®.

2. The setting, “Enable Android Auto™” or 

“Enable Apple CarPlay®”, will display 

depending on your smartphone. Press the 

check box to deactivate these features. To 

reactivate Android Auto™ or Apple CarPlay®, 

press the check box until a check mark 

appears.

Enable Apple CarPlay® or Android Auto™

Android Auto™ And Apple CarPlay® Automatic 

Bluetooth® Pairing
After connecting to Android Auto™ or Apple 

CarPlay® for the first time and undergoing the 

setup procedure, the smartphone pairs to the 

Uconnect system via Bluetooth® without any setup 

required every time it is within range, if Bluetooth® 

is turned on.
NOTE:


Apple CarPlay® uses a USB connection while 

Android Auto™ uses both USB and Bluetooth® 

connections to function. The connected device is 

unavailable to other devices when connected 

using Android Auto™ or Apple CarPlay®.
Multiple Devices Connecting To The Uconnect 

System — If Equipped
It is possible to have multiple devices connected to 

the Uconnect system. For example, if using Android 

Auto™/Apple CarPlay®, the connected device will 

be used to place hands-free phone calls or send 

hands-free text messages. However, another 

device can also be paired to the Uconnect system, 

via Bluetooth®, as an audio source, so the 

passenger can stream music.
NOTE:


Apple CarPlay® and Android Auto™ can only be 

launched from the front and center console USB 

ports.

5

180


MULTIMEDIA


NAVIGATION MODE — IF EQUIPPED 

(UCONNECT 4C NAV ONLY) 

O

PERATING

 N

AVIGATION


Navigation Icon

To access the Navigation system, press the Nav 

button on the touchscreen.

Press “Where To?” to find or route to a destina

-

tion.

Press “View Map” to view the map.

Press “Home” to navigate to a preset home 

address. If not already set, the system will 

prompt you to add a home address.

Press “Work” to navigate to a preset work 

address. If not already set, the system will 

prompt you to add a work address.

Press “Information” to view Traffic, Where 


Am I?, and Country Info.

Press “Emergency” to search for Hospitals, and 

Police and Fire Stations near your current loca

-

tion. You can also display your current location 

and save any Emergency facility location to your 

Favorites.

Press the search bar at the top of the screen to 

search for a specific address to route to.

Press “Route Options” and select from a list of 

options to alter your route such as “Express

-

ways”, “Toll Roads”, “Ferries”, “Carpool Lanes”, 

and more.

NOTE:


During route guidance, at any time you can return 

to the Navigation Main Menu by selecting Menu.

W

HERE

 T

O

Where To? — Main Menu 

Where To? Button

Document Outline


MULTIMEDIA


181

From the Nav Main Menu, press the Where To? button and select one of the following methods to program a route guidance.

NOTE:


Refer to the individual section of the chosen option for further information.

Search All

Press this button to search all “Where To?” categories for a location.

Address

Press this button to search by a street address or a street name with house number.

Recent

Press this button to access previously routed addresses or locations.

Favorites

Press this button to access previously saved addresses or locations.

POI (Point of Interest)

Press this button when you want to route to a point of interest. The POI database 

allows you to select a destination from a list of locations and public places, or points 

of interest.

Trips

Press this button to program a new trip or recall a saved trip.

Intersection

Press this button to enter in two street names as a destination.

5

182


MULTIMEDIA


Point on Map

Press this button to select a destination directly from the Map screen. By selecting a 

street segment or icon, you can quickly enter a destination without the need to input 

the city name or street.

Home

Press this button to program or confirm a route to the saved home address.

Work

Press this button to program or confirm a route to the saved work address.

City Center

Press this button to route to a particular city. The Navigation system will calculate a 

route with the destination at the center of the city.

Closest Cities

Press this button to route to a nearby city. The screen will display an alphabetical 

listing of nearby cities. The Navigation system will calculate a route with the 

destination at the center of the nearby city.

Phone Number

Press this button to route to a location or point of interest by the phone number.

Geo-Coordinates

Press this button to route to a Geo-Coordinate. A Geo-Coordinate is a coordinate 

used in geography. You can determine a Geo-Coordinate with the help of a handheld 

GPS receiver, a map, or the Navigation system.

Trails

Press the Trails button and select the option to start trail recording to track the route 

you are driving. Select the option to “stop trail recording” to end tracking. This gives 

you a point of reference for a particular route if needed.

Edit Where To

Press this button and select which “Where To?” categories you would like to appear 

in the “Where To?” menu, and which ones you don’t.


MULTIMEDIA


183

Where To? — Search All, Address, Recent, 

And Favorite Destinations

SEARCH ALL

1. Press the Search All button.
2. Enter the location name, street address, city, 

etc., you wish to search for, to search all 

“Where To?” categories for the entered 

location, and press “OK”.

Search

3. Select the desired location from the list of 

locations that appears. Once the correct 

location has been selected, you will be asked 

to confirm your route by pressing “Route To”.

4. Press the GO! button on the touchscreen to 

begin your route.

ADDRESS

1. Press the Address button.
2. Press “Spell City” or “Spell Street” to begin 

entering the address of your destination.

Enter Address

If you press “Spell City”, you will have to enter 

and select/press the desired city name, fol

-

lowed by the desired street name, and then 

the house number.
If you press “Spell Street”, you will have to en

-

ter and select/press the desired street name 

in the correct city, and then you will have to en

-

ter the house number.

Select Street

To change the state and/or country, press the 

state and/or country button and follow the 

prompts to change the state and/or country.
Once the correct city, street and number have 

been entered, you will be asked to confirm 

your route by pressing “Route To”.

3. Press the GO! button to confirm your 

destination and begin your route.

5

184


MULTIMEDIA


RECENT

1. Press the Recent button.
2. Press the button with the name of the desired 

destination.
To display the options for a destination from 

the list, press the Gear icon, which opens a 

pop-up menu with the options for that destina

-

tion.

Gear Icon

To delete a destination from the list, press “De

-

lete” in that pop-up menu.
The following options are available for each 

destination:

Manage Destinations

Edit Name

Phone Number

Move Up

Move Down

Place Pin (saves the spot on the list)

Delete

3. Select “Route To” to confirm your route.
4. Press “GO!” to confirm your destination, and 

begin your route.

If you are currently on a route guidance and you 

select “Recent”, the system will ask you to choose 

one of the following:

“Cancel Previous Route”

“Add to Current Route”

Within “Add to Current Route”, you can add the 

destination to your current route or set it as the 

final destination.

NOTE:


You can press the Back Arrow button to return to 

the previous screen or the X button to exit.

FAVORITE DESTINATIONS

1. Press the Favorites button.
2. To save a favorite destination, press the Add 

Favorite button and follow the steps to route a 

destination.

3. To delete a destination from the list, press the 

Gear icon next to the destination and select 

“Delete” in the pop-up menu on the 

touchscreen.

4. Press the button with the name of the desired 

favorite destination and confirm the route with 

“Route To”. Press “GO!” to confirm the 

destination, and start the route guidance.


Content      ..     9      10      11      12     ..