Jeep Gladiator (2022 year). Manual in english - page 28
 

  Index      Manuals     Jeep Gladiator (2022 year). Manual in english


Search            copyright infringement  


Content      ..     26      27      28      29     ..


Jeep Gladiator (2022 year). Manual in english - page 28


SERVICING AND MAINTENANCE

443

STORING THE VEHICLE   

If you are storing your vehicle for more than 

3 weeks, we recommend that you take the 

following steps to minimize the drain on your 

vehicle's battery:

Disconnect the negative cable from the battery.

If your vehicle is equipped with Stop/Start 

system then disconnect both the main and 

supplemental negative battery cables.

Any time you store your vehicle or keep it out of 

service (i.e., vacation) for two weeks or more, 

run the air conditioning system at idle for about 

five minutes in the fresh air and high blower 

setting. This will ensure adequate system lubri

-

cation to minimize the possibility of compressor 

damage when the system is started again.

If assistance is needed to disconnect the 

battery system, see an authorized dealer.

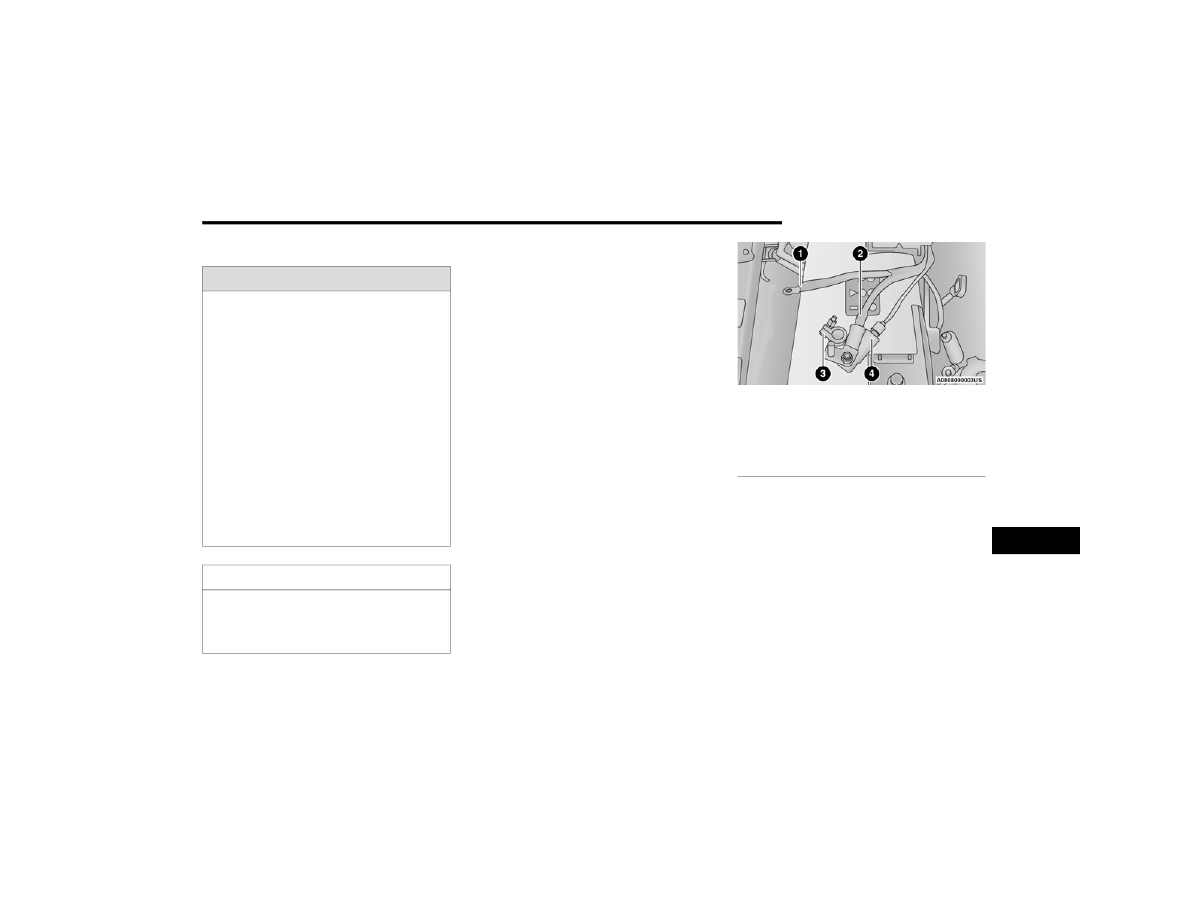
Battery Cable Disconnect

NOTE:

You must isolate the supplemental battery 

connection point, as well as the main battery 

terminal from the post, as shown in the image, 

to fully de-energize both batteries for storage. If 

assistance is needed to disconnect the battery 

system, see an authorized dealer.

Do not disconnect the Intelligent Battery Sensor 

(IBS), or your Stop/Start system may not func

-

tion for up to 24 hours, due to the IBS being set 

into learn mode.

WARNING!

Take care to avoid the radiator cooling fan 

whenever the hood is raised. It can start 

anytime the ignition switch is ON. You can be 

injured by moving fan blades.

Remove any metal jewelry such as rings, 

watch bands and bracelets that could make 

an inadvertent electrical contact. You could be 

seriously injured.

Vehicles with the Stop/Start system will be 

equipped with two batteries. Both the main 

and the supplemental batteries must be 

disconnected to completely de-energize the 

12 Volt electrical system.

Serious injury or death could result if you do 

not disconnect both batteries. To learn how to 

properly disconnect, see an authorized dealer.

CAUTION!

If the negative battery cables are not isolated 

properly it can cause a potential power spike or 

surge in the system, resulting in damage to 

essential electrical components.

1 — Supplemental Negative Battery Cable
2 — Main Negative Battery Cable
3 — Main Negative Battery Terminal
4 — Intelligent Battery Sensor (IBS)

8

444

SERVICING AND MAINTENANCE


BODYWORK

P

ROTECTION

 F

ROM

 A

TMOSPHERIC


A

GENTS


Vehicle body care requirements vary according to 

geographic locations and usage. Chemicals that 

make roads passable in snow and ice and those 

that are sprayed on trees and road surfaces during 

other seasons are highly corrosive to the metal in 

your vehicle. Outside parking, which exposes your 

vehicle to airborne contaminants, road surfaces on 

which the vehicle is operated, extreme hot or cold 

weather, and other extreme conditions will have an 

adverse effect on paint, metal trim, and underbody 

protection.
The following maintenance recommendations will 

enable you to obtain maximum benefit from the 

corrosion resistance built into your vehicle.

What Causes Corrosion?

Corrosion is the result of deterioration or removal 

of paint and protective coatings from your vehicle.
The most common causes are:

Road salt, dirt and moisture accumulation

Stone and gravel impact.

Insects, tree sap and tar.

Salt in the air near seacoast localities.

Atmospheric fallout/industrial pollutants.

B

ODY

 A

ND

 U

NDERBODY

 M

AINTENANCE

Cleaning Headlights 

Your vehicle is equipped with plastic headlights 

and fog lights that are lighter and less susceptible 

to stone breakage than glass headlights.
Plastic is not as scratch resistant as glass and 

therefore different lens cleaning procedures must 

be followed.
To minimize the possibility of scratching the lenses 

and reducing light output, avoid wiping with a dry 

cloth. To remove road dirt, wash with a mild soap 

solution followed by rinsing.
Do not use abrasive cleaning components, 

solvents, steel wool, or other aggressive material 

to clean the lenses.

P

RESERVING

 T

HE

 B

ODYWORK

Washing  

Wash your vehicle regularly. Always wash your 

vehicle in the shade using Mopar® Car Wash, or 

a mild car wash soap, and rinse the panels 

completely with water.

If insects, tar, or other similar deposits have 

accumulated on your vehicle, use Mopar® 

Super Kleen Bug and Tar Remover to remove.

Use a high quality cleaner wax, such as Mopar® 

Cleaner Wax, to remove road film and stains, 

and to protect your paint finish. Use precautions 

to not scratch the paint.

Avoid using abrasive compounds and power 

buffing that may diminish the gloss or thin out 

the paint finish.

Special Care

If you drive on salted or dusty roads or if you 

drive near the ocean, hose off the undercarriage 

at least once a month.

It is important that the drain holes in the lower 

edges of the doors, rocker panels, and trunk be 

kept clear and open.

If you detect any stone chips or scratches in the 

paint, touch them up immediately.

CAUTION!

Do not use abrasive or strong cleaning mate

-

rials, such as steel wool or scouring powder, 

that will scratch metal and painted surfaces.

Use of power washers exceeding 1,200 psi 

(8,274 kPa) can result in damage or removal 

of paint and decals.

SERVICING AND MAINTENANCE

445

(Continued)

If your vehicle is damaged due to a collision or 

similar cause that destroys the paint and protec

-

tive coating, have your vehicle repaired as soon 

as possible.

If you carry special cargo such as chemicals, 

fertilizers, de-icer salt, etc., be sure that such 

materials are well packaged and sealed.

If a lot of driving is done on gravel roads, 

consider mud or stone shields behind each 

wheel.

Use Mopar® Touch Up Paint on scratches as 

soon as possible. An authorized dealer has 

touch up paint to match the color of your 

vehicle.

Appearance Care For Fabric Top Models 

To maintain the appearance of your vehicle's 

interior trim and top, follow these precautions:

Do not run a fabric top through an automatic car 

wash. Window scratches and wax build-up may 

result.

Avoid leaving your vehicle unattended with the 

top down, as exposure to sun or rain may 

damage interior trim.

Do not use harsh cleaners or bleaching agents 

on top material, as damage may result.

Do not allow any vinyl cleaner to run down and 

dry on the paint, leaving a streak.

After cleaning your vehicle's fabric top, always 

make sure it is completely dry before lowering.

Be especially careful when washing the 

windows by following the directions for “Care of 

Fabric Top Windows.”

Washing – Use Mopar® Car Wash or equivalent, or 

mild soap suds, lukewarm water, and a brush with 

soft bristles. If extra cleaning is required, use 

Mopar® Convertible Cloth Top Cleaner or 

equivalent, or a mild foaming cleaner on the entire 

top, but support the top from underneath.
Rinsing – Be sure to remove all traces of cleaner by 

rinsing the top thoroughly with clean water. 

Remember to allow the top to dry before 

lowering it.

CAUTION!

Failure to follow these cautions may cause 

interior water damage, stains, or mildew of the 

top material:

Do not run a fabric top through an automatic 

car wash. Window scratches and wax build-up 

may result.

It is recommended that the top be free of 

water prior to opening it. Operating the top, 

opening a door or lowering a window while the 

top is wet may allow water to drip into the 

vehicle’s interior.

Use care when washing the vehicle, water 

pressure directed at the weather strip seals 

may cause water to leak into the vehicle’s 

interior.

Careless handling and storage of the remov

-

able roof panels may damage the seals, 

causing water to leak into the vehicle’s 

interior.

The front panel(s) must be positioned properly 

to ensure sealing. Improper installation can 

cause water to leak into the vehicle’s interior.

Avoid (if at all possible) parking the vehicle 

under trees; remove vegetable resins immedi

-

ately as, when dried, it may only be possible to 

remove them with abrasive products and/or 

polishes, which is highly inadvisable as they 

could alter the typical opaqueness of the 

paint.

Do not use pure windshield washer fluid for 

cleaning the front windshield and rear 

window; dilute it min. 50% with water. Only 

use pure windshield washer fluid when strictly 

necessary due to outside temperature 

conditions.

CAUTION!

8

446

SERVICING AND MAINTENANCE


(Continued)

Care Of Fabric Top Windows

Your vehicle's fabric top has pliable plastic 

windows that can be scratched unless special care 

is taken by following these directions:

Never use a dry cloth to remove dust. Instead, 

use a microfiber towel or soft cotton cloth moist

-

ened with cold or warm, clean water, and wipe 

across the window, not up and down. Mopar® 

Jeep® Soft Glass Window Cleaner or equivalent 

will safely clean all the plastic windows without 

scratching. It removes fine scratches to improve 

visibility and provides UV protection to help 

prevent yellowing.

When washing, never use hot water or anything 

stronger than a mild soap. Never use solvents 

such as alcohol or harsh cleaning agents.

Always rinse thoroughly with cold water, then 

wipe with a soft and slightly moist, clean cloth.

When removing frost, snow, or ice, never use a 

scraper or de-icing chemicals. Use warm water 

only if you must clean the window quickly.

Debris (sand, mud/dirt, dust, or salt) from 

off-road driving will have an impact on plastic 

retainer operation. Even normal on-road driving 

and vehicle washing will eventually impact 

window plastic retainer operation. To maintain 

ease of use of the window plastic retainers, 

each window plastic retainer should be cleaned 

and lubricated regularly. Clean them with a mild 

soap solution and a small brush. Cleaning prod

-

ucts are available through an authorized dealer.

Never paste stickers, gummed labels or any 

tape to the windows. Adhesives are hard to 

remove and may damage the windows.

INTERIORS 

C

ARPET

 S

AFETY

 I

NFORMATION

Always use carpet designed to fit your vehicle. Only 

use carpet that does not interfere with the 

operation of the pedal assemblies. Only operate 

the vehicle when the carpet is securely attached by 

the grommets so it cannot slip out of position and 

interfere with the pedal assemblies or impair safe 

operation of your vehicle in other ways.

WARNING!

If operating the vehicle without carpet in place 

the floor may become hot, and there is a risk 

of burns.

An improperly attached, damaged, folded, or 

damaged grommets may cause your carpet to 

interfere with the accelerator, brake, or clutch 

pedals and cause a loss of vehicle control. To 

prevent SERIOUS INJURY or DEATH: ALWAYS 

securely attach your carpet using the grom

-

mets.

ALWAYS make sure objects cannot fall or slide 

into the driver’s side floor area when the 

vehicle is moving. Objects can become 

trapped under accelerator, brake, or clutch 

pedals and could cause a loss of vehicle 

control.

NEVER place any objects under the carpet 

(e.g., towels, keys, etc.). These objects could 

change the position of the carpet and may 

cause interference with the accelerator, 

brake, or clutch pedals.

SERVICING AND MAINTENANCE

447

C

ARPET

 R

EMOVAL

Front Carpets:
1. Remove the front grommets.

Front Carpet

2. Pull the carpet out from the front to the rear.

Front Carpet Pulled Away

3. Remove the grommets under the front seat. 

First for the rear carpet and then the front 

carpet.

Front And Rear Carpet Split

ONLY install carpet designed to fit your 

vehicle. NEVER install carpet that cannot be 

properly attached and secured to your vehicle. 

If the carpet needs to be replaced, only use 

manufacturer approved carpet for the specific 

make, model, and year of your vehicle.

If the vehicle carpet has been removed and 

re-installed, always properly attach carpet to 

the floor and check that the floor mat 

fasteners are secure to the vehicle carpet. 

Fully depress each pedal to check for interfer

-

ence with the accelerator, brake, or clutch 

pedals then re-install the floor mats.

WARNING!

1 — Grommets

8

448

SERVICING AND MAINTENANCE


4. Under the back of the front seat, open the 

carpet split and then pull out the rear edge and 

slide the carpet to the front (do not remove the 

harness).

Rear Underside Of Front Seat

5. Finally open the carpet split around seat 

bracket and then remove the last two 

grommets.

6. When reinstalling carpet, perform these steps 

in reverse order, making sure that the carpet is 

tucked under the scuffs, B-pillar, and console, 

and then refasten the grommets.

Rear Carpet
1. Remove the grommets under the front seat 

(one left and one right).

Carpet Split

2. Then pull the carpet out, to the rear and open 

the carpet split around the front seat brackets.

3. Remove the rear Under Seat storage bin (if 

equipped), by removing the four bolts that hold 

it to the floor.

4. Remove the fastener bin from the rear floor, it 

is held in by clips.

5. Remove the jack and tools by turning the wing 

bolt counterclockwise, remove the wing bolt 

and then lift the assembly out from under the 

seat.

6. Lift carpet off of the rear retainers (one left and 

one right).

Rear Retainers

7. Remove carpet from the vehicle.
8. When reinstalling the carpet, perform these 

steps in reverse order making sure that the 

carpet is tucked under the scuffs, B-pillar, 

console, and then refasten the grommets.

1 — Harness
2 — Carpet Split

1 — Grommet

SERVICING AND MAINTENANCE

449

S

EATS

 A

ND

 F

ABRIC

 P

ARTS

Use Mopar® Total Clean to clean fabric upholstery 

and carpeting.

Seat Belt Maintenance

If the belts need cleaning, use a mild soap solution 

or lukewarm water. Do not remove the belts from 

the vehicle to wash them. Dry with a soft cloth.
Replace the belts if they appear frayed or worn or 

if the buckles do not work properly.

P

LASTIC

 A

ND

 C

OATED

 P

ARTS

Use Mopar® Total Clean to clean vinyl upholstery.

WARNING!

Do not use volatile solvents for cleaning 

purposes. Many are potentially flammable, and 

if used in closed areas they may cause 

respiratory harm.

CAUTION!

Do not bleach, dye or clean the belts with 

chemical solvents or abrasive cleaners. This will 

weaken the fabric. Sun damage can also 

weaken the fabric

WARNING!

A frayed or torn seat belt could rip apart in a 

collision and leave you with no protection. 

Inspect the seat belt system periodically, 

checking for cuts, frays, or loose parts. 

Damaged parts must be replaced immediately. 

Do not disassemble or modify the seat belt 

system. If your vehicle is involved in a collision, 

or if you have questions regarding seat belt or 

retractor conditions, take your vehicle to an 

authorized FCA dealer or authorized FCA 

Certified Collision Care Program facility for 

inspection.

CAUTION!

Direct contact of air fresheners, insect repel

-

lents, suntan lotions, or hand sanitizers to the 

plastic, painted, or decorated surfaces of the 

interior may cause permanent damage. Wipe 

away immediately.

Damage caused by these type of products 

may not be covered by your New Vehicle 

Limited Warranty.

8

450

SERVICING AND MAINTENANCE


Cleaning Plastic Instrument Cluster 

Lenses 

The lenses in front of the instruments in this 

vehicle are molded in clear plastic. When cleaning 

the lenses, care must be taken to avoid scratching 

the plastic.
Clean with a wet soft cloth. A mild soap solution 

may be used, but do not use high alcohol content 

or abrasive cleaners. If soap is used, wipe clean 

with a clean damp cloth. Dry with a soft cloth.

L

EATHER

 S

URFACES

Mopar® Total Clean is specifically recommended 

for leather upholstery.

Your leather upholstery can be best preserved by 

regular cleaning with a damp soft cloth. Small 

particles of dirt can act as an abrasive and damage 

the leather upholstery and should be removed 

promptly with a damp cloth. Stubborn soils can be 

removed easily with a soft cloth and Mopar® Total 

Clean. Care should be taken to avoid soaking your 

leather upholstery with any liquid. Please do not 

use polishes, oils, cleaning fluids, solvents, 

detergents, or ammonia-based cleaners to clean 

your leather upholstery.
NOTE:

If equipped with light colored leather, it tends to 

show any foreign material, dirt, and fabric dye 

transfer more so than darker colors. The leather is 

designed for easy cleaning, and the manufacturer 

recommends Mopar® Total Clean leather cleaner 

applied on a cloth to clean the leather seats as 

needed.

G

LASS

 S

URFACES


All glass surfaces should be cleaned on a regular 

basis with Mopar® Glass Cleaner, or any 

commercial household-type glass cleaner. Never 

use an abrasive type cleaner. Use caution when 

cleaning the inside rear window equipped with 

electric defrosters or windows equipped with radio 

antennas. Do not use scrapers or other sharp 

instruments that may scratch the elements.
When cleaning the rear view mirror, spray cleaner 

on the towel or cloth that you are using. Do not 

spray cleaner directly on the mirror.

CAUTION!

Do not use Alcohol and Alcohol-based and/or 

Ketone based cleaning products to clean leather 

upholstery, as damage to the upholstery may 

result.

451

TECHNICAL SPECIFICATIONS

VEHICLE IDENTIFICATION NUMBER (VIN)

The VIN is found on the left front corner of the 

A-pillar, visible from outside of the vehicle through 

the windshield.

Vehicle Identification Number

NOTE:

It is illegal to remove or alter the VIN plate.

BRAKE SYSTEM 

Your vehicle is equipped with dual hydraulic brake 

systems. If either of the two hydraulic systems lose 

normal capability, the remaining system will still 

function. However, there will be some loss of 

overall braking effectiveness. You may notice 

increased pedal travel during application, greater 

pedal force required to slow or stop, and potential 

activation of the Brake Warning Light.
In the event power assist is lost for any reason (i.e., 

repeated brake applications with the engine off) 

the brakes will still function. However, the effort 

required to brake the vehicle will be much greater 

than that required with the power system 

operating.

WHEEL AND TIRE TORQUE SPECIFICATIONS  

Proper lug nut/bolt torque is very important to 

ensure that the wheel is properly mounted to the 

vehicle. Any time a wheel has been removed and 

reinstalled on the vehicle, the lug nuts/bolts 

should be torqued using a properly calibrated 

torque wrench using a six-sided (hex) deep wall 

socket.

T

ORQUE

 S

PECIFICATIONS

**Use only authorized dealer recommended lug 

nuts/bolts and clean or remove any dirt or oil 

before tightening.
Inspect the wheel mounting surface prior to 

mounting the tire and remove any corrosion or 

loose particles.

Wheel Mounting Surface

Tighten the lug nuts/bolts in a star pattern until 

each nut/bolt has been tightened twice. Ensure 

that the socket is fully engaged on the lug nut/bolt 

(do not insert it halfway).

Lug Nut/Bolt 

Torque

**Lug Nut/

Bolt Size

Lug Nut/Bolt 

Socket Size

130 Ft-Lb 

(176 N·m)

M14 x 

1.50 mm

22 mm

9

452

TECHNICAL SPECIFICATIONS


Torque Patterns

After 25 miles (40 km), check the lug nut/bolt 

torque to be sure that all the lug nuts/bolts are 

properly seated against the wheel.

FUEL REQUIREMENTS — GASOLINE ENGINE   

While operating on gasoline with the required 

octane number, hearing a light knocking sound 

from the engine is not a cause for concern. 

However, if the engine is heard making a heavy 

knocking sound, see an authorized dealer 

immediately. Use of gasoline with an octane 

number lower than recommended octane can 

cause engine failure and may void the New Vehicle 

Limited Warranty.
Poor quality gasoline can cause problems such as 

hard starting, stalling, and hesitations. If you 

experience these symptoms, try another brand of 

gasoline before considering service for the vehicle.

3.6L E

NGINE

This engine is designed to meet all 

emission regulations and provide 

excellent fuel economy and performance 

when using high-quality unleaded regular 

gasoline having an octane rating of 87 as specified 

by the (R+M)/2 method. The use of higher octane 

premium gasoline will not provide any benefit over 

regular gasoline in these engines.

R

EFORMULATED

 G

ASOLINE


Many areas of the country require the use of 

cleaner-burning gasoline referred to as 

“reformulated gasoline”. Reformulated gasoline 

contains oxygenates and are specifically blended 

to reduce vehicle emissions and improve air 

quality.
The use of reformulated gasoline is recommended. 

Properly blended reformulated gasoline will 

provide improved performance and durability of 

engine and fuel system components.

M

ATERIALS

 A

DDED

 T

O

 F

UEL


Besides using unleaded gasoline with the proper 

octane rating, gasolines that contain detergents, 

corrosion and stability additives are 

recommended. Using gasolines that have these 

additives will help improve fuel economy, reduce 

emissions, and maintain vehicle performance.

Designated TOP TIER Detergent Gasoline 

contains a higher level of detergents to 

further aide in minimizing engine and 

fuel system deposits. When available, 

the usage of TOP TIER Detergent Gasoline is 

recommended. Visit 

www.toptiergas.com for a list 

of TOP TIER Detergent Gasoline Retailers.

WARNING!

To avoid the risk of forcing the vehicle off the 

jack, do not tighten the lug nuts/bolts fully until 

the vehicle has been lowered. Failure to follow 

this warning may result in personal injury.

TECHNICAL SPECIFICATIONS

453

Indiscriminate use of fuel system cleaning agents 

should be avoided. Many of these materials 

intended for gum and varnish removal may contain 

active solvents or similar ingredients. These can 

harm fuel system gasket and diaphragm materials.

G

ASOLINE

/O

XYGENATE

 B

LENDS


Some fuel suppliers blend unleaded gasoline with 

oxygenates such as ethanol.

Problems that result from using gasoline 

containing more than 15% ethanol (E-15) or 

gasoline containing methanol are not the 

responsibility of the manufacturer and may void 

the New Vehicle Limited Warranty.

D

O

 N

OT

 U

SE

 E-85 I

N

 N

ON

-F

LEX

 F

UEL


V

EHICLES

Non-Flex Fuel Vehicles (FFV) are compatible with 

gasoline containing up to 15% ethanol (E-15). Use 

of gasoline with higher ethanol content may void 

the New Vehicle Limited Warranty.
If a Non-FFV vehicle is inadvertently fueled with 

E-85 fuel, the engine will have some or all of these 

symptoms:

Operate in a lean mode.

OBD II Malfunction Indicator Light on.

Poor engine performance.

Poor cold start and cold drivability.

Increased risk for fuel system component corro

-

sion.

CNG A

ND

 LP F

UEL

 S

YSTEM


M

ODIFICATIONS

Modifications that allow the engine to run on 

Compressed Natural Gas (CNG) or Liquid Propane 

(LP) may result in damage to the engine, 

emissions, and fuel system components. Problems 

that result from running CNG or LP are not the 

responsibility of the manufacturer and may void 

the New Vehicle Limited Warranty.

M

ETHYLCYCLOPENTADIENYL


M

ANGANESE

 T

RICARBONYL

 (MMT) I

N


G

ASOLINE

MMT is a manganese-containing metallic additive 

that is blended into some gasoline to increase 

octane. Gasoline blended with MMT provides no 

performance advantage beyond gasoline of the 

same octane number without MMT. Gasoline 

blended with MMT reduces spark plug life and 

reduces emissions system performance in some 

vehicles. The manufacturer recommends that 

gasoline without MMT be used in your vehicle. The 

MMT content of gasoline may not be indicated on 

the gasoline pump; therefore, you should ask your 

gasoline retailer whether the gasoline contains 

MMT. MMT is prohibited in Federal law and 

California reformulated gasoline.

CAUTION!

DO NOT use E-85, gasoline containing methanol, 

or gasoline containing more than 15% ethanol 

(E-15). Use of these blends may result in starting 

and drivability problems, damage critical fuel 

system components, cause emissions to exceed 

the applicable standard, and/or cause the 

Malfunction Indicator Light to illuminate. Please 

observe pump labels as they should clearly 

communicate if a fuel contains greater than 

15% ethanol (E-15).

9

454

TECHNICAL SPECIFICATIONS


F

UEL

 S

YSTEM

 C

AUTIONS

NOTE:

Intentional tampering with the emissions control 

system can result in civil penalties being assessed 

against you.

FUEL REQUIREMENTS – DIESEL ENGINE    

Federal law requires that you must fuel this vehicle 

with Ultra Low Sulfur Highway Diesel fuel (15 ppm 

Sulfur maximum) and prohibits the use of Low 

Sulfur Highway Diesel fuel (500 ppm Sulfur 

maximum) to avoid damage to the emissions 

control system.
Use good quality diesel fuel from a reputable 

supplier in your vehicle. For most year-round 

service, Number 2 diesel fuel meeting ASTM 

(formerly known as the American Society for 

Testing and Materials) specification D-975 Grade 

S15 will provide good performance. If the vehicle is 

exposed to extreme cold (below 20°F or -7°C), or 

is required to operate at colder-than-normal 

conditions for prolonged periods, use climatized 

Number 2 diesel fuel or dilute the Number 2 diesel 

fuel with 50% Number 1 diesel fuel. This will 

provide better protection from fuel gelling or 

wax-plugging of the fuel filters.

Diesel fuel is seldom completely free of water. 

To prevent fuel system trouble, drain the 

accumulated water from the fuel/water separator 

using the fuel/water separator drain provided on 

the fuel filter housing. If you buy good quality fuel 

and follow the cold weather advice above, fuel 

conditioners should not be required in your vehicle. 

If available in your area, a high cetane “premium” 

diesel fuel may offer improved cold-starting and 

warm-up performance.

CAUTION!

Follow these guidelines to maintain your 

vehicle’s performance:

The use of leaded gasoline is prohibited by 

Federal law. Using leaded gasoline can impair 

engine performance and damage the emis

-

sions control system.

An out-of-tune engine, certain fuel or ignition 

malfunctions can cause the catalytic 

converter to overheat. If you notice a pungent 

burning odor or some light smoke, your engine 

may be out-of-tune or malfunctioning and may 

require immediate service. Contact an autho

-

rized dealer for service assistance.

The use of fuel additives, which are now being 

sold as octane enhancers, is not recom

-

mended. Most of these products contain high 

concentrations of methanol. Fuel system 

damage or vehicle performance problems 

resulting from the use of such fuels or addi

-

tives is not the responsibility of The manufac

-

turer and may void or not be covered under 

the New Vehicle Limited Warranty.

WARNING!

Do not use alcohol or gasoline as a fuel blending 

agent. They can be unstable under certain 

conditions and hazardous or explosive when 

mixed with diesel fuel.

CAUTION!

If the Water in Fuel Indicator Light remains on, 

DO NOT START engine before you drain the water 

from the fuel filter(s) to avoid engine damage  

Ú

page 399.

TECHNICAL SPECIFICATIONS

455

D

IESEL

 F

UEL

 S

PECIFICATIONS

This diesel engine has been developed to take 

advantage of the high energy content and 

generally lower cost Number 2 Ultra Low Sulfur 

diesel fuel or Number 2 Ultra Low Sulfur climatized 

diesel fuels.
NOTE:

If you accidentally fill the fuel tank with gasoline 

or DEF on your diesel vehicle, do not start the 

engine. Damage to the engine and fuel system 

could occur. Please call an authorized dealer for 

service.

A maximum blend of 5% biodiesel meeting 

ASTM specification D-975 may be used with 

your diesel engine without any adjustments to 

regular service schedules.

Commercially available fuel additives are not 

necessary for the proper operation of your 

diesel engine.

Number 1 Ultra Low Sulfur diesel fuel should 

only be used where extended arctic conditions 

(-10°F or -23°C) exist.

B

IODIESEL

 F

UEL

 R

EQUIREMENTS

A maximum blend of 5% biodiesel meeting ASTM 

specification D975 is recommended for use with 

your diesel engine. If frequent operation with 

biodiesel blends that are between 6% and 20% 

(B6–B20) is desired, the maintenance schedule is 

subject to shorter intervals.
The oil and filter change along with fuel filter 

replacement is subject to shorter intervals when 

operating your engine on biodiesel greater than 

5%. Do not use biodiesel greater than 20%.
For regular use of biodiesel blends between 6% 

and 20% (B6–B20) it is important that you 

understand and comply with these requirements  

Ú

page 390.

Biodiesel is a fuel produced from renewable 

resources typically derived from animal fat, 

rapeseed oil (Rapeseed Methyl Ester (RME) base), 

or soybean oil (Soy Methyl Ester (SME or SOME) 

base).

Biodiesel fuel has inherent limitations which 

require that you understand and adhere to the 

following requirements if you use blends of 

biodiesel between 6% and 20% (B6–B20). There 

are no unique restrictions for the use of B5.

CAUTION!

Failure to comply with Oil Change requirements 

for vehicles operating on biodiesel blends 

between 6% and 20% (B6–B20) will result in 

premature engine wear. Such wear is not 

covered by the New Vehicle Limited Warranty.

CAUTION!

Use of blends greater than 20% is not approved. 

Use of blends greater than 20% can result in 

engine damage. Such damage is not covered by 

the New Vehicle Limited Warranty.

CAUTION!

In the event that the vehicle is filled with 

biodiesel and not used for more than a month, 

the fuel should either be used up by driving (up 

to quarter tank) and filled with standard diesel 

blends with less than 5% that is normally 

available. This will help prevent the fuel filter 

clogging and potential damage to the fuel 

injection system due to degraded biodiesel, 

which is not covered by the New Vehicle Limited 

Warranty.

9

456

TECHNICAL SPECIFICATIONS


Biodiesel Fuel Properties — Low Ambient 

Temperatures

Biodiesel fuel may gel or solidify at low ambient 

temperatures, which may pose problems for both 

storage and operation. Precautions can be 

necessary at low ambient temperatures, such as 

storing the fuel in a heated building or a heated 

storage tank, or using cold temperature additives.

Fuel Quality — Must Comply With ASTM 

Standards

The quality of Biodiesel fuel may vary widely. Only 

fuel produced by a BQ9000 supplier to the 

following specifications may be blended to meet 

biodiesel blend B6 – B20 fuel meeting ASTM 

specification D-7467:

Petrodiesel fuel meeting ASTM specification 

D-975 and biodiesel fuel (B100) meeting ASTM 

specification D-6751

Fuel Oxidation Stability — Must Use Fuel 

Within Six Months Of Manufacture

Biodiesel fuel has poor oxidation stability which 

can result in long term storage problems. Fuel 

produced to approved ASTM standards, if stored 

properly, provides for protection against fuel 

oxidation for up to six months.

Fuel Water Separation — Must Use 

Mopar® Approved Fuel Filter Elements

Biodiesel fuel has a natural affinity to water and 

water accelerates microbial growth. Your Mopar® 

filtration system is designed to provide adequate 

fuel water separation capabilities.

Fuel In Oil Dilution — Must Adhere To 

Required Oil Change Interval

Fuel dilution of lubricating oil has been observed 

with the use of biodiesel fuel. Fuel in oil must not 

exceed 5%. To ensure this limit is met your oil 

change interval must be maintained with in the 

suggested schedule. The regular use of biodiesel 

between 6% and 20% requires intervals shorter 

than the outlined 10,000 miles (16,000 km) and 

must not exceed the suggested schedule. When 

routinely operating on biodiesel between 6% and 

20%, oil and filter replacement intervals must not 

exceed 8,000 Miles (13,000 km) or six months, 

which ever comes first.

Biodiesel Fuel Filter Change Intervals

The use of biodiesel requires more frequent fuel 

filter change intervals. When operating on 

biodiesel between 6% and 20%, fuel filter 

replacement intervals should be every second oil 

change, and must not exceed 16,000 miles 

(25,750 km).
NOTE:

Under no circumstances should oil change 

intervals exceed 8,000 miles (12,875 km) or six 

months, if regular operation occurs with 6% - 20% 

biodiesel blends. Under no circumstances should 

fuel filter replacement intervals exceed every 

second oil change and must not exceed 16,

000 miles (25,750 km), if regular operation occurs 

with 6% - 20% biodiesel blends. Failure to comply 

with these Oil Change and fuel filter requirements 

for vehicles operating on biodiesel blends up to 

B20 may result in premature engine wear. Such 

wear is not covered by the New Vehicle Limited 

Warranty. The engine may suffer severe damage if 

operated with concentrations of biodiesel higher 

than 20%.

TECHNICAL SPECIFICATIONS

457

FLUID CAPACITIES    

US

Metric

Fuel (Approximate)

22.0 Gallons

83.0 Liters

Engine Oil with Filter
3.6L Gasoline Engine

5.0 Quarts

4.7 Liters

Cooling System *
3.6L Gasoline Engine

13.0 Quarts

12.3 Liters

*Includes coolant recovery bottle filled to MAX level.

US

Metric

Fuel (Approximate)
3.0L Diesel Engine

19.0 Gallons

72.0 Liters

Diesel Exhaust Fluid Tank

5.1 Gallons

19.3 Liters

Engine Oil With Filter
3.0L Diesel Engine

9.0 Quarts

8.5 Liters

Cooling System
3.0L Diesel Engine

14.5 Quarts

13.7 Liters

9

458

TECHNICAL SPECIFICATIONS


ENGINE FLUIDS AND LUBRICANTS           

Component

Fluid, Lubricant, or Genuine Part

 
Engine Coolant
 

We recommend using Mopar® Antifreeze/Coolant 10 Year/150,000 Mile 

(240,000 km) Formula OAT (Organic Additive Technology) or equivalent 

meeting the requirements of the manufacturer Material Standard MS.90032.

Engine Oil — 3.6L Gasoline Engine

We recommend using Mopar® SAE 0W-20 Full Synthetic Engine Oil which 

meets the requirements of the manufacturer Material Standard MS-6395. 

Equivalent full synthetic SAE 0W-20 engine oil can be used but must have the 

API Starburst trademark  

Ú

page 396.

Engine Oil Filter

We recommend using a Mopar® Engine Oil Filter. If a Mopar® Engine Oil Filter 

is unavailable only use filters that meet or exceed SAE/USCAR-36 Filter 

Performance Requirements.

Fuel Selection — 3.6L Gasoline Engine

87 Octane (R+M)/2 Method, 0-15% Ethanol.

CAUTION!

Mixing of engine coolant (antifreeze) other than specified Organic Additive Technology (OAT) engine coolant (antifreeze), may result in engine damage and 

may decrease corrosion protection. Organic Additive Technology (OAT) engine coolant is different and should not be mixed with Hybrid Organic Additive Tech

-

nology (HOAT) engine coolant (antifreeze) or any “globally compatible” coolant (antifreeze). If a non-OAT engine coolant (antifreeze) is introduced into the 

cooling system in an emergency, the cooling system will need to be drained, flushed, and refilled with fresh OAT coolant (conforming to MS.90032), by an 

authorized dealer as soon as possible.

Do not use water alone or alcohol-based engine coolant (antifreeze) products. Do not use additional rust inhibitors or antirust products, as they may not be 

compatible with the radiator engine coolant and may plug the radiator.

This vehicle has not been designed for use with propylene glycol-based engine coolant (antifreeze). Use of propylene glycol-based engine coolant (antifreeze) 

is not recommended.


Content      ..     26      27      28      29     ..