Jeep Cherokee (2019 year). Instruction - part 23


  Index      Jeep     Jeep Cherokee - instruction 2019 year in english


Search            


Content   ..  21  22  23  24   ..


Jeep Cherokee (2019 year). Instruction - part 23


During the maneuver, the system asks to shift to REVERSE,
select the direction indicator in the direction you want to
exit. Let go of the steering wheel and press the dedicated
pedals, while the system handles the steering automati-
cally for exiting the parking space. If the driver continues
to carry out a voluntary or involuntary action on the
steering wheel during the exit maneuver (touching or
holding the steering wheel to prevent its movement), the
maneuver will be interrupted.

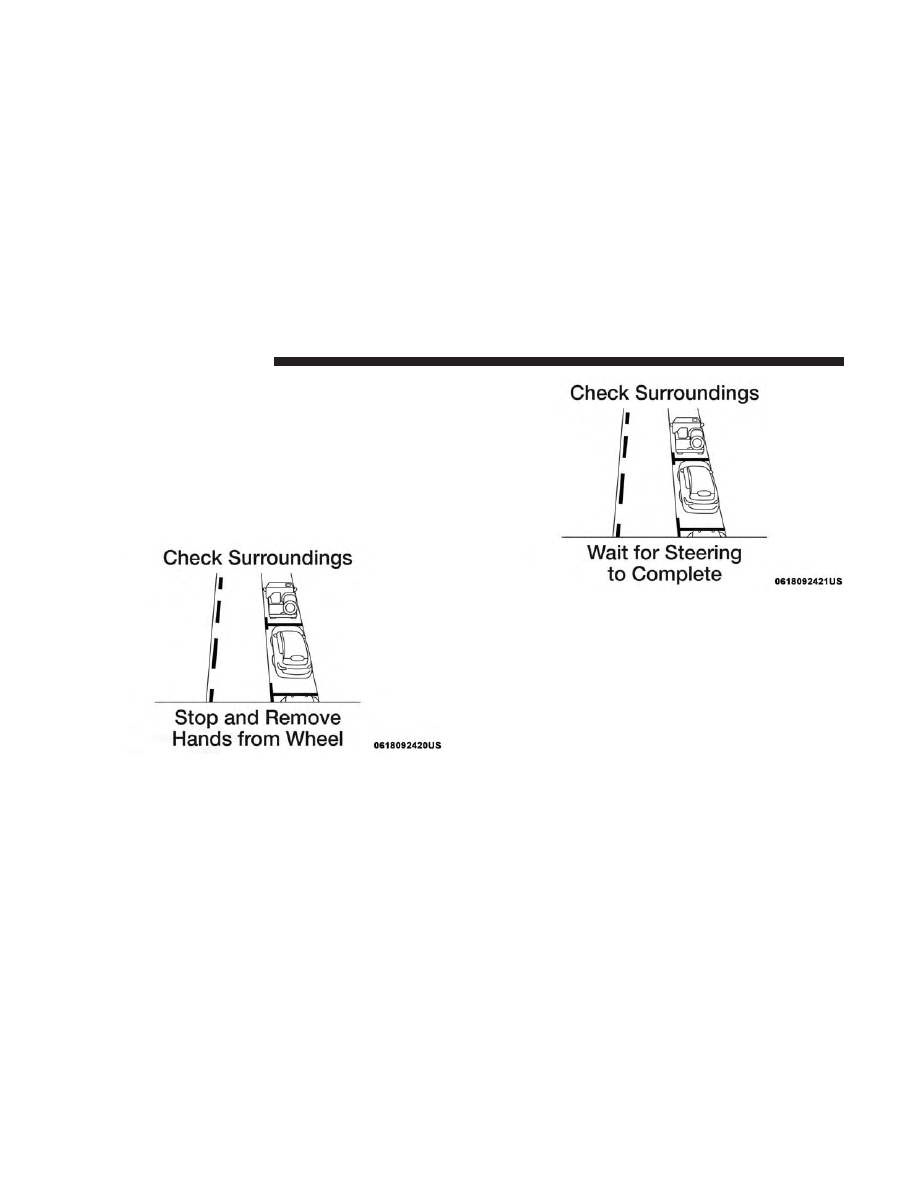
Check Surroundings — Stop And Remove Hands From

Wheel

Check Surroundings — Wait For Steering To Complete

356

STARTING AND OPERATING

Check Surroundings — Move Backward

Check Surroundings — Stop

6

STARTING AND OPERATING

357

Check Surroundings — Shift To Drive

Check Surroundings — Wait For Steering To Complete

358

STARTING AND OPERATING

Check Surroundings — Move Forward

Check Surroundings — Stop

6

STARTING AND OPERATING

359

Check Surroundings — Shift To Reverse

Check Surroundings — Wait For Steering To Complete

360

STARTING AND OPERATING

End Of Maneuver

The semi-automatic maneuver ends when the display
shows the message of a completed maneuver. At the end of
the maneuver, the system gives back the vehicle control to
the driver.

Check Surroundings — Move Backward

Active ParkSense Complete Check Surroundings

6

STARTING AND OPERATING

361

LANESENSE — IF EQUIPPED

LaneSense Operation

The LaneSense system is operational at speeds above
37 mph (60 km/h) and below 112 mph (180 km/h). The
LaneSense system uses a forward looking camera to detect
lane markings and measure vehicle position within the
lane boundaries.

When both lane markings are detected and the driver
unintentionally drifts out of the lane (no turn signal
applied), the LaneSense system provides a haptic warning
in the form of torque applied to the steering wheel, as well
as a visual warning in the instrument cluster display, to
prompt the driver to remain within the lane boundaries.

The driver may manually override the haptic warning by
applying torque into the steering wheel at any time.

When only a single lane marking is detected and the driver
unintentionally drifts across the lane marking (no turn
signal applied), the LaneSense system provides a visual
warning through the instrument cluster display to prompt
the driver to remain within the lane. When only a single
lane marking is detected, a haptic (torque) warning will not
be provided.

NOTE:

When operating conditions have been met, the

LaneSense system will monitor if the driver’s hands are on
the steering wheel and provide an audible and visual
warning to the driver when the driver’s hands are not
detected on the steering wheel. The system will cancel if
the driver does not return their hands to the wheel.

Turning LaneSense On Or Off

The default status of LaneSense is “off”.

The LaneSense button is located on the switch panel below
the Uconnect display.

To turn the LaneSense system on, push the
LaneSense button (LED turns off). A “LaneSense
On” message is shown in the instrument cluster
display.

362

STARTING AND OPERATING

To turn the LaneSense system off, push the LaneSense
button once (LED turns on).

NOTE:

The LaneSense system will retain the last system

state, on or off, from the last ignition cycle when the
ignition is changed to the ON/RUN position.

LaneSense Warning Message

The LaneSense system will indicate the current lane drift
condition through the instrument cluster display.

Base Instrument Cluster Display — If Equipped

When the LaneSense system is on; the lane lines are gray
when both of the lane boundaries have not been detected
and the LaneSense telltale is solid white.

Left Lane Departure — Only Left Lane Detected
• When the LaneSense system is on, the LaneSense telltale

is solid white when only the left lane marking has been
detected and the system is ready to provide visual
warnings in the instrument cluster display if an unin-
tentional lane departure occurs.

LaneSense On Message

System On (Gray Lines/White Telltale)

6

STARTING AND OPERATING

363

• When the LaneSense system senses the lane has been

approached and is in a lane departure situation, the left
thick lane line flashes from white to gray, the left thin
line remains solid white and the LaneSense telltale
changes from solid white to flashing yellow.

NOTE:

The LaneSense system operates with the similar

behavior for a right lane departure when only the right
lane marking has been detected.

Left Lane Departure — Both Lanes Detected
• When the LaneSense system is on, the lane lines turn

from gray to white to indicate that both of the lane
markings have been detected. The LaneSense telltale is
solid green when both lane markings have been detected
and the system is “armed” to provide visual warnings in
the instrument cluster display and a torque warning in
the steering wheel if an unintentional lane departure
occurs.

Lane Approached (Flashing White To Gray Thick

Line/Flashing Yellow Telltale)

Lanes Sensed (White Lines/Green Telltale)

364

STARTING AND OPERATING

• When the LaneSense system senses a lane drift situation,

the left thick lane line and the left thin line turn solid
white. The LaneSense telltale changes from solid green
to solid yellow. At this time torque is applied to the
steering wheel in the opposite direction of the lane
boundary.

• For example: If approaching the left side of the lane the

steering wheel will turn to the right.

• When the LaneSense system senses the lane has been

approached and is in a lane departure situation, the left
thick lane line flashes from white to gray, the left thin
line remains solid white and the LaneSense telltale
changes from solid yellow to flashing yellow. At this
time torque is applied to the steering wheel in the
opposite direction of the lane boundary.

• For example: If approaching the left side of the lane the

steering wheel will turn to the right.

NOTE:

The LaneSense system operates with the similar

behavior for a right lane departure.

Lane Sensed (Solid White Thick Line, Solid White Thin

Line/Solid Yellow Telltale)

Lane Approached (Flashing White To Gray Thick Line,

Solid White Thin Line/Flashing Yellow Telltale)

6

STARTING AND OPERATING

365

Premium Instrument Cluster Display — If Equipped

When the LaneSense system is on; the lane lines are gray
when both of the lane boundaries have not been detected
and the LaneSense telltale is solid white.

Left Lane Departure — Only Left Lane Detected
• When the LaneSense system is on, the LaneSense telltale

is solid white when only the left lane marking has been
detected and the system is ready to provide visual
warnings in the instrument cluster display if an unin-
tentional lane departure occurs.

• When the LaneSense system senses the lane has been

approached and is in a lane departure situation, the left
thick lane line flashes yellow (on/off), the left thin line
remains solid yellow and the LaneSense telltale changes
from solid white to flashing yellow.

NOTE:

The LaneSense system operates with the similar

behavior for a right lane departure when only the right
lane marking has been detected.

System On (Gray Lines/White Telltale)

Lane Approached (Flashing Yellow Thick Line, Solid

Yellow Thin Line/Flashing Yellow Telltale)

366

STARTING AND OPERATING

Left Lane Departure — Both Lanes Detected
• When the LaneSense system is on, the lane lines turn

from gray to white to indicate that both of the lane
markings have been detected. The LaneSense telltale is
solid green when both lane markings have been detected
and the system is “armed” to provide visual warnings in
the instrument cluster display and a torque warning in
the steering wheel if an unintentional lane departure
occurs.

• When the LaneSense system senses a lane drift situation,

the left thick lane line and left thin line turn solid yellow.
The LaneSense telltale changes from solid green to solid

yellow. At this time torque is applied to the steering
wheel in the opposite direction of the lane boundary.

• For example: If approaching the left side of the lane the

steering wheel will turn to the right.

• When the LaneSense system senses the lane has been

approached and is in a lane departure situation, the left
thick lane line flashes yellow (on/off) and the left thin
line remains solid yellow. The LaneSense telltale changes
from solid yellow to flashing yellow. At this time torque
is applied to the steering wheel in the opposite direction
of the lane boundary.

Lanes Sensed (White Lines/Green Telltale)

Lane Sensed (Solid Yellow Thick Line, Solid Yellow Thin

Line/Solid Yellow Telltale)

6

STARTING AND OPERATING

367

• For example: If approaching the left side of the lane the

steering wheel will turn to the right.

NOTE:

The LaneSense system operates with the similar

behavior for a right lane departure.

Changing LaneSense Status

The LaneSense system has settings to adjust the intensity of
the torque warning and the warning zone sensitivity
(early/late) that you can configure through the Uconnect
system screen. Refer to “Uconnect Settings” in “Multime-
dia” for further information.

NOTE:
• When enabled the system operates above 37 mph

(60 km/h) and below 112 mph (180 km/h).

• Use of the turn signal suppresses the warnings.
• The system will not apply torque to the steering wheel

whenever a safety system engages (anti-lock brakes,
traction control system, electronic stability control, for-
ward collision warning, etc.).

PARKVIEW REAR BACK UP CAMERA

Your vehicle is equipped with the ParkView Rear Back Up
Camera that allows you to see an on-screen image of the
rear surroundings of your vehicle whenever the gear
selector is put into REVERSE. The image will be displayed
in the touchscreen display along with a caution note to
“check entire surroundings” across the top of the screen.
After five seconds this note will disappear. The ParkView
camera is located on the rear of the vehicle above the rear
license plate.

Lane Approached (Flashing Yellow Thick Line, Solid

Yellow Thin Line/Flashing Yellow Telltale)

368

STARTING AND OPERATING

Manual Activation Of The Rear View Camera

1. Press the “Controls” button located on the bottom of the

Uconnect display.

2. Press the “Backup Camera” button to turn the Rear

View Camera system on.

NOTE:

The ParkView Rear Back Up Camera has program-

mable modes of operation that may be selected through the
Uconnect System.

Refer to “Uconnect Settings” in “Multimedia” for further
information.

When the vehicle is shifted out of REVERSE (with camera
delay turned off), the rear camera mode is exited and the
previous screen appears again. When the vehicle is shifted
out of REVERSE (with camera delay turned on), the camera
image will continue to be displayed for up to ten seconds
after shifting out of REVERSE unless the vehicle speed
exceeds 8 mph (13 km/h), the vehicle is shifted into PARK,
the vehicle’s ignition is cycled to the OFF position, or the
user presses image defeat [X] to exit out from the camera
video display.

NOTE:
• If the vehicle speed remains below 8 mph (13 km/h), the

Rear View Camera image will be displayed continuously
until deactivated via the touchscreen button “X”, the
vehicle is shifted into PARK, or the ignition is placed in
the OFF position.

• The touchscreen button “X” to disable display of the

camera image is made available ONLY when the vehicle
is not in REVERSE.

When enabled, active guide lines are overlaid on the image
to illustrate the width of the vehicle and its projected
backup path based on the steering wheel position. A
dashed center line overlay indicates the center of the
vehicle to assist with parking or aligning to a hitch/
receiver.

Different colored zones indicate the distance to the rear of
the vehicle.

6

STARTING AND OPERATING

369

The following table shows the approximate distances for
each zone:

Zone

Distance To The Rear Of The Vehicle

Red

0 - 1 ft (0 - 30 cm)

Yellow

1 ft - 6.5 ft (30 cm - 2 m)

Green

6.5 ft or greater (2 m or greater)

WARNING!

Drivers must be careful when backing up even when
using the ParkView Rear Back Up Camera. Always
check carefully behind your vehicle, and be sure to
check for pedestrians, animals, other vehicles, obstruc-
tions, or blind spots before backing up. You are re-
sponsible for the safety of your surroundings and must
continue to pay attention while backing up. Failure to
do so can result in serious injury or death.

CAUTION!

• To avoid vehicle damage, ParkView should only be

used as a parking aid. The ParkView camera is
unable to view every obstacle or object in your drive
path.

• To avoid vehicle damage, the vehicle must be driven

slowly when using ParkView to be able to stop in
time when an obstacle is seen. It is recommended
that the driver look frequently over his/her shoulder
when using ParkView.

NOTE:

If snow, ice, mud, or any foreign substance builds

up on the camera lens, clean the lens, rinse with water, and
dry with a soft cloth. Do not cover the lens.

370

STARTING AND OPERATING

REFUELING THE VEHICLE

The Capless Fuel System uses a flapper placed at the filler
pipe of the fuel tank; it opens and closes automatically
upon insertion/extraction of the fuel nozzle. The Capless
Fuel System is designed so that it prevents the filling of an
incorrect type of fuel.

1. Open the fuel filler door by pushing on the rear edge of

the Fuel Door.

2. There is no fuel filler cap. A flapper door inside the pipe

seals the system.

3. Insert the fuel nozzle fully into the filler pipe; the nozzle

opens and holds the flapper door while refueling.

4. Fill the vehicle with fuel, and when the fuel nozzle

“clicks” or shuts off, the fuel tank is full.

5. Wait ten seconds before removing the fuel nozzle to

allow fuel to drain from nozzle.

6. Remove the fuel nozzle and close the fuel door.

Fuel Door

Fuel Filler

6

STARTING AND OPERATING

371


Content   ..  21  22  23  24   ..