Isuzu N-Series. Manual - part 727


  Index      Isuzu     Isuzu N-Series - service repair manual


Search            


Content   ..  725  726  727  728   ..


Isuzu N-Series. Manual - part 727


6E-330    Engine Control System (4HK1) 

Repair Instructions

Engine Control Module (ECM)
Replacement / Fuel Injector ID Code Data
Programming

If the ECM is replaced the Fuel Injector ID Code Data
(24, 0-9 or A-F characters for each fuel injector) MUST
be reprogrammed into the new ECM.

Uploading the Fuel Injector ID Code Data from the
ECM
Important:
Only perform this procedure if the ECM is being
replaced. The current fuel injector ID code data can be
determined with the Tech 2. If the ECM does not
communicate with the Tech 2, go to the next procedure.

1. Install the Tech 2.
2. Turn ON the ignition, with the engine OFF.
3. Select Diagnostics > appropriate vehicle

identification > 4HK1 (Common Rail) >
Programming > Injector ID Code > Upload ID
Code.

4. After complete the upload, turn OFF the Tech 2.
5. Turn OFF the ignition.

Retrieving the Fuel Injector ID Code Data with a
Non-communicating ECM
Important:
Only perform following procedure if the ECM is being
replaced and the Tech 2 does not communicate. The
current fuel injector ID code data can not be
determined with the Tech 2, the fuel injector numbers
must be recorded from the factory affixed label on the
cylinder head cover or each fuel injector ID plate.

Recording from the label on cylinder head cover;
Important:
Only perform this procedure if the fuel injectors are not
being replaced in the past.

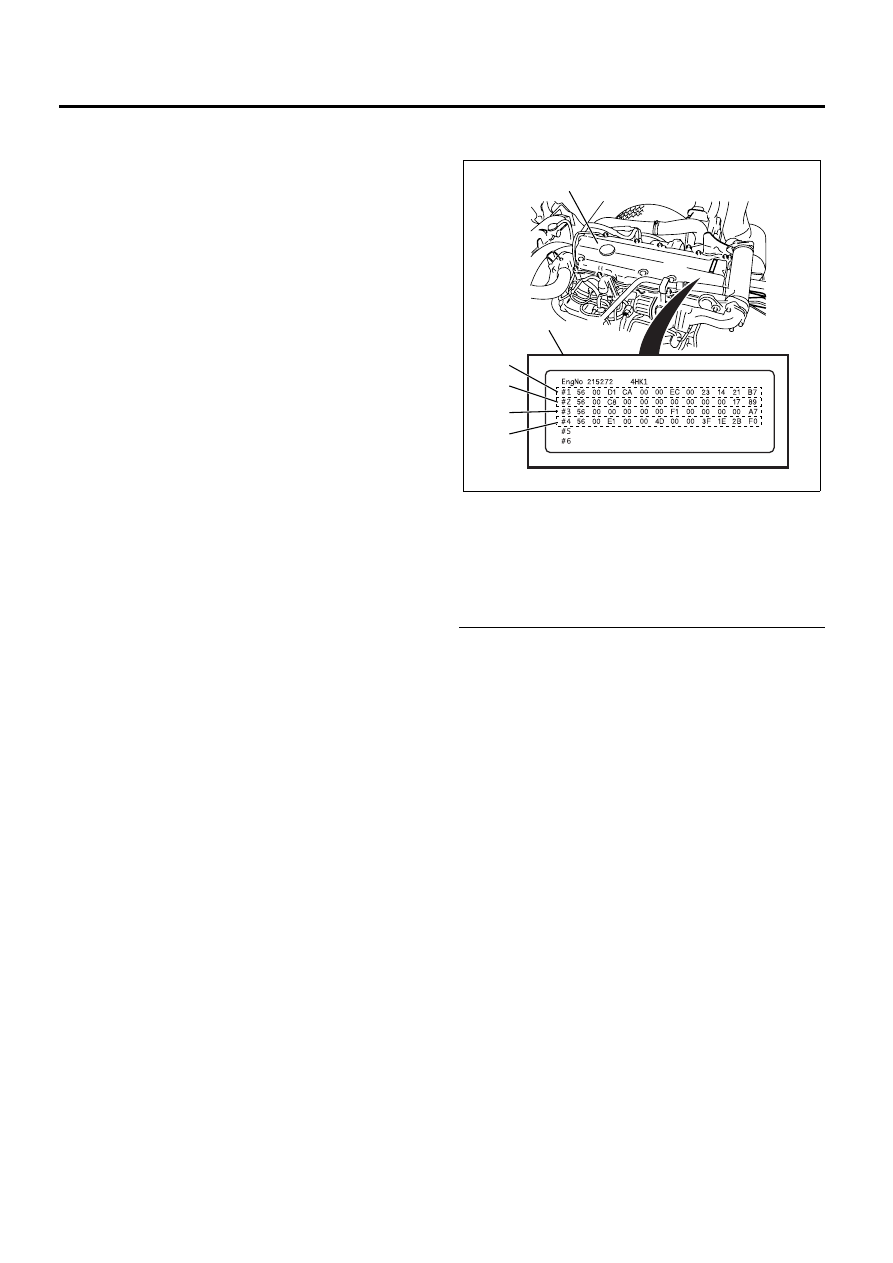
1. Record all numbers of each cylinder on the label.

Legend

1. Cylinder Number 1 Fuel Injector ID Code
2. Cylinder Number 2 Fuel Injector ID Code
3. Cylinder Number 3 Fuel Injector ID Code
4. Cylinder Number 4 Fuel Injector ID Code
5. Injector ID Code Label
6. Cylinder Head Cover


Recording from the each fuel injector ID plate

1. Remove the cylinder head cover. Refer to Fuel

Injector replacement in this section.

2. Record 24 figures of each fuel injector ID plate.

The correct order for the fuel injector ID code for
the following illustration is as follows:
56 00 D1 CA 00 00 EC 00 23 14 21 B7

N6A6477E

1

2

3

4

5

6

 Engine Control System (4HK1)    6E-331

Legend

1. Fuel Injector ID Plate
2. Fuel Injector ID Code
3. Fuel Injector


Removal Procedure
Important:
Take care not to give a strong impact to the ECM.

1. Turn OFF the ignition. 
2. Disconnect the negative battery cable.
3. Disconnect the ECM connectors.
4. Remove the ECM bracket fixing nuts.
5. Remove the ECM bracket with the ECM.
6. Remove the ECM fixing bolts.
7. Remove the ECM.

Legend

1. ECM Bracket
2. ECM


Installation Procedure
Important:
Do not use a fallen ECM or the ECM that received a
strong impact.

1. Install the ECM on the ECM bracket.

Tighten:
Bolts to 8.6 — 13.5 N

⋅m (0.88 — 1.38 kg⋅m / 6.4 —

10.0 lb

⋅ft)

2. Install the ECM bracket with the ECM.
3. Tighten the ECM bracket fixing nuts.
4. Connect the ECM connectors.
5. Connect the negative battery cable. 

Fuel Injector ID Code Data Programming Procedure
Important:
Only perform this procedure if the fuel injector ID code
data can be uploaded with the Tech 2. If the ECM can
not be uploaded with the Tech 2, go to the next
procedure.

1. Install the Tech 2.
2. Turn ON the ignition, with the engine OFF.
3. Select Diagnostics > appropriate vehicle

identification > 4HK1 (Common Rail) >
Programming > Injector ID Code > Download ID
Code.

4. After complete the download, turn OFF the ignition

for 30 second.

5. Turn ON the ignition.
6. Select Diagnostics > appropriate vehicle

identification > 4HK1 (Common Rail) >
Programming > Injector ID Code > Injector ID
Code. At this point, all downloaded fuel injector ID
code data can be verified. Compare the ID code
values downloaded into the ECM and each fuel
injector.

7. Start the engine and let idle.

Important:
In order to make the fuel supply pump characteristic
learn into the replaced ECM, let the engine idle until
warm-up. If the fuel system DTC’s stored in the
meantime, once clear DTC and warm-up the engine
again.

8. Inspect for a proper engine running condition and

for no DTC’s. Refer to the Diagnostic System
Check-Engine Controls if needed.

Important:
If the current injector ID code data can not be uploaded
with the Tech 2, the recorded all numbers must be
entered into the Tech 2.

1. Install the Tech 2.
2. Turn ON the ignition, with the engine OFF.

D1CA
EC00
2100
B7

5600
0000
2314
0000

1

2

3

N6A6524E

N6A6561E

6E-332    Engine Control System (4HK1) 

3. Select Diagnostics > appropriate vehicle

identification > 4HK1 (Common Rail) >
Programming > Injector ID Code > ID Code
Registration.

4. Select the cylinder 1 to 4 and press Change. If the

ID code data are recorded from the label on
cylinder head cover, go to a..
If the ID code data are recorded from the each fuel
injector ID plate, go to b..
a. Input 22 figures. The correct order for the

cylinder number 1 fuel injector ID code for the
following illustration is as follows:
56 00 D1 CA 00 00 EC 00 23 14 21

Important:
The number of places required for input is 22 figures
except last 2 figures.

Legend

1. Cylinder Number 1 Fuel Injector ID Code
2. Cylinder Number 2 Fuel Injector ID Code
3. Cylinder Number 3 Fuel Injector ID Code
4. Cylinder Number 4 Fuel Injector ID Code
5. Injector ID Code Label
6. Cylinder Head Cover


b. Input 22 figures. Then, input in order from the

left edge of upper sequence to the right edge of
lower sequence. The correct order for the fuel
injector ID code for the following illustration is
as follows:
56 00 D1 CA 00 00 EC 00 23 14 21

Important:
The number of places required for input is 22 figures
except last 2 figures.

Legend

1. Fuel Injector ID Plate
2. Fuel Injector ID Code
3. Fuel Injector


5. After complete the registration, turn OFF the

ignition for 30 second.

6. Turn ON the ignition.
7. Select Diagnostics > appropriate vehicle

identification > 4HK1 (Common Rail) >
Programming > Injector ID Code > Injector ID
Code. At this point, all registered fuel injector ID
code data can be verified. Compare the ID code
values registered into the ECM and each fuel
injector including the last 2 figures. If the registered
ID code is incorrect, go back to Step 4 ID Code
Registration.

8. Start the engine and let idle.

Important:
In order to make the fuel supply pump characteristic
learn into the replaced ECM, let the engine idle until
warm-up. If the fuel system DTC’s stored in the
meantime, once clear DTC and warm-up the engine
again.

9. Inspect for a proper engine running condition and

for no DTC’s. Refer to the Diagnostic System
Check-Engine Controls if needed.

Accelerator Pedal Position (APP) Sensor
Replacement

Removal Procedure

1. Turn off the ignition.
2. Disconnect the negative battery cable.
3. Remove the control link bracket assembly (1)

fixing nuts.

N6A6477E

1

2

3

4

5

6

D1CA
EC00
2100
B7

5600
0000
2314
0000

1

2

3

N6A6525E

 Engine Control System (4HK1)    6E-333

• LHD Model

• RHD Model

4. Remove the pedal assembly (2) fixing bolts.

5. Disconnect the accelerator pedal position (APP)

sensor (3) connector.

6. Remove the APP sensor (3) fixing nuts.

Installation Procedure

• LHD Model

N6A6564E

N6A6562E

N6A6564E


Content   ..  725  726  727  728   ..