Isuzu N-Series. Manual - part 145
 

  Index      Isuzu     Isuzu N-Series - service repair manual


Search            


Content   ..  143  144  145  146   ..


Isuzu N-Series. Manual - part 145


REAR SUSPENSION 3D-3

ON-VEHICLE SERVICE

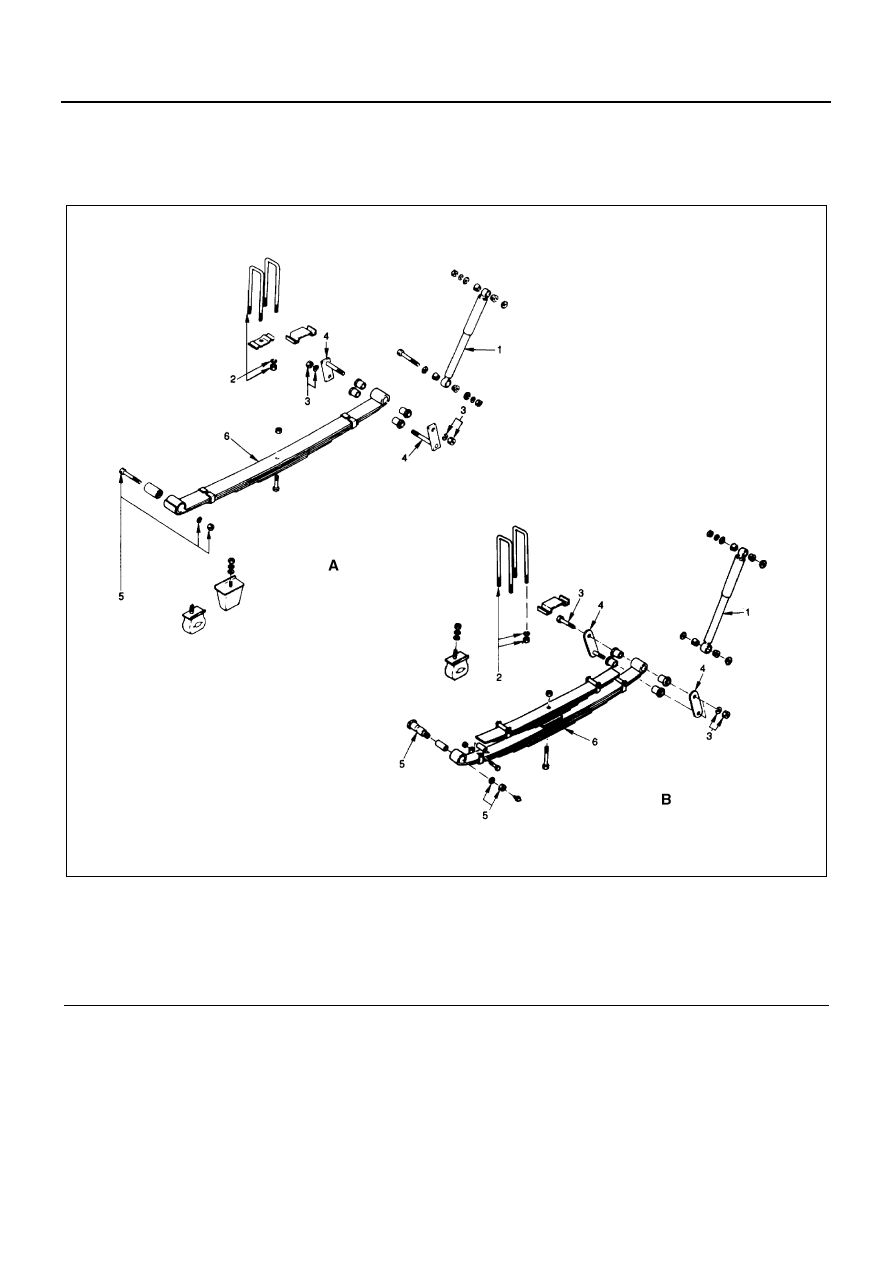
Rear Suspension

Leaf Spring

Legend

A. NHR, NKR

3. Shackle pin, nut and washer

B. NPR, NPS

4. Shackle

1. Shock absorber

5. Spring pin, nut and washer

2. U-bolt, nut and washer

6. Leaf spring

N3A0441E

3D-4 REAR SUSPENSION

Removal

Preparation
Make the following preparation before removing the leaf
spring.

1) Brace the front wheels.
2) Jack up the rear axle until the rear wheels are

lifted off the ground and position safety stand
under the chassis frame.
Refer to “Lifting Instruction” in Section 0A for
acceptable lifting point and supportable point
location.

3) Position a garage jack under the rear axle.
4) For the vehicle model with a stabilizer, remove

the mounting portion on the axle side of the sta-
bilizer in advance before removing the leaf
spring. (Refer to the removal procedure of the
stabilizer.)

1. Shock Absorber
2. U-bolt, Nut and Washer

If the U-bolt are heavily rusted, apply a generous
amount of oil to the threads before loosening them
to prevent seizure.

3. Shackle Pin, Nut and Washer
4. Shackle

Take out the rubber bushings after removal of the
shackle.

5. Spring Pin, Nut and Washer

Drive out the shackle pin with a hammer using a
brass bar after removal of the shackle pin nut.

N3A0413E

N3A0414E

N3A0415E

REAR SUSPENSION 3D-5

6. Leaf Spring

Lower the garage jack slowly and remove the rear
spring assembly. When removing the rear spring
assembly, exercise care not to cause damage to
the brake flexible hoses. AIso, exercise care not to
cause the spring to come down.

Installation and Repair

Make necessary correction or parts replacement if wear,
damage or any other abnormal conditions are found
through inspection.
Visual Check
Inspect the following parts for wear, damage or other ab-
normal conditions.

• Leaf spring assembly
• Clip
• Center  bolt
• U-bolt
• Spring pin
• Shackle pin
• Shock absorber
• Helper rubber
• Rubber bushing
• Sub spring stopper rubber
• Helper rubber seat

Shock Absorber

1. Inspect for extreme oil leakage. Slight oil leakage

is allowed.

2. Inspect for temperature after running. Unchanged

temperature indicates deteriorated function.

3. Inspect if large resistance is felt when the shock

absorber is expanded and contracted by holding
either end, or if play is eliminated after several
times of expansion and contraction. The function
has deteriorated if the above condition is not ob-
served.

4. Inspect the bushing for wear or deterioration.

Replace if abnormality is found.

Leaf Spring Assembly Replacement

• Apply a setting mark (1) across the springs before

disassembling the leaf spring assembly.

• Apply grease to both faces of each leaf spring at

reassembly.

• Use a bench press for disassembly and reassem-

bly.

• Discard removed center bolt and install a new one.

When replacing the leaf spring assembly, use the leaf
spring with the same camber represented by “+, 

−, ❍”

on both right and left sides.

Center Bolt

Tighten:

• Center bolt to 39 N

⋅m (4 kg⋅m/29 lb⋅ft)

Clip Bolt

Tighten:

• Clip bolt to 20 N

⋅m (2 kg⋅m/14 lb⋅ft)

N3A0416E

N3A0355E

N3A0356E

3D-6 REAR SUSPENSION

Bushing Replacement
When replacing bushing, drive out the bushing using a
bench press.
Leaf Spring Rubber Bush Remover & Installer: 5-8840-
2048-1
Leaf Spring Metal Bush Remover & Installer: 5-8840-
2049-1

Measurement of Outer Diameter of Spring Pin
Standard: 25 mm (0.98 in)
Limit: 24.7 mm (0.97 in)
CIearance between Shackle Pin and Bushing
Standard: 0.1 mm (0.0039 in)
Limit: 0.5 mm (0.019 in)

Installation

1. Leaf Spring

Install the leaf spring assembly with the camber
mark (1) turned to front side (2) on the rear axle.

2. U-bolt, Nut and Washer

Position the U-bolts and clamp on the leaf spring
assemblies and jack up the rear axle.
When tightening the nuts, apply oil as necessary to
prevent damaging the threads.

Tighten:

• U-bolt nut to 

NQR: 284 N

⋅m (29 kg⋅m/210 lb⋅ft)

Except NQR: 177 N

⋅m (18 kg⋅m/130 lb⋅ft)

3. Spring Pin, Nut and Washer
4. Shackle

Finger tighten first, and tighten to specified torque
after lowering the vehicle to ground.

N3A0357E

N3A0421E

N3A0358E

N3A0414E


Content   ..  143  144  145  146   ..