Infiniti M37 (2011 year). Manual - part 12


  Index      Infiniti     Infiniti M37 (2011 year) - manual in english


Search            copyright infringement  


Content      ..     10      11      12      13     ..


Infiniti M37 (2011 year). Manual - part 12


method is to push and hold the “

OFF”

button for more than 2 seconds.

When any mode button is pushed with the
screen off, the screen turns on for further
operation. The screen will turn off automatically
5 seconds after the operation is finished.

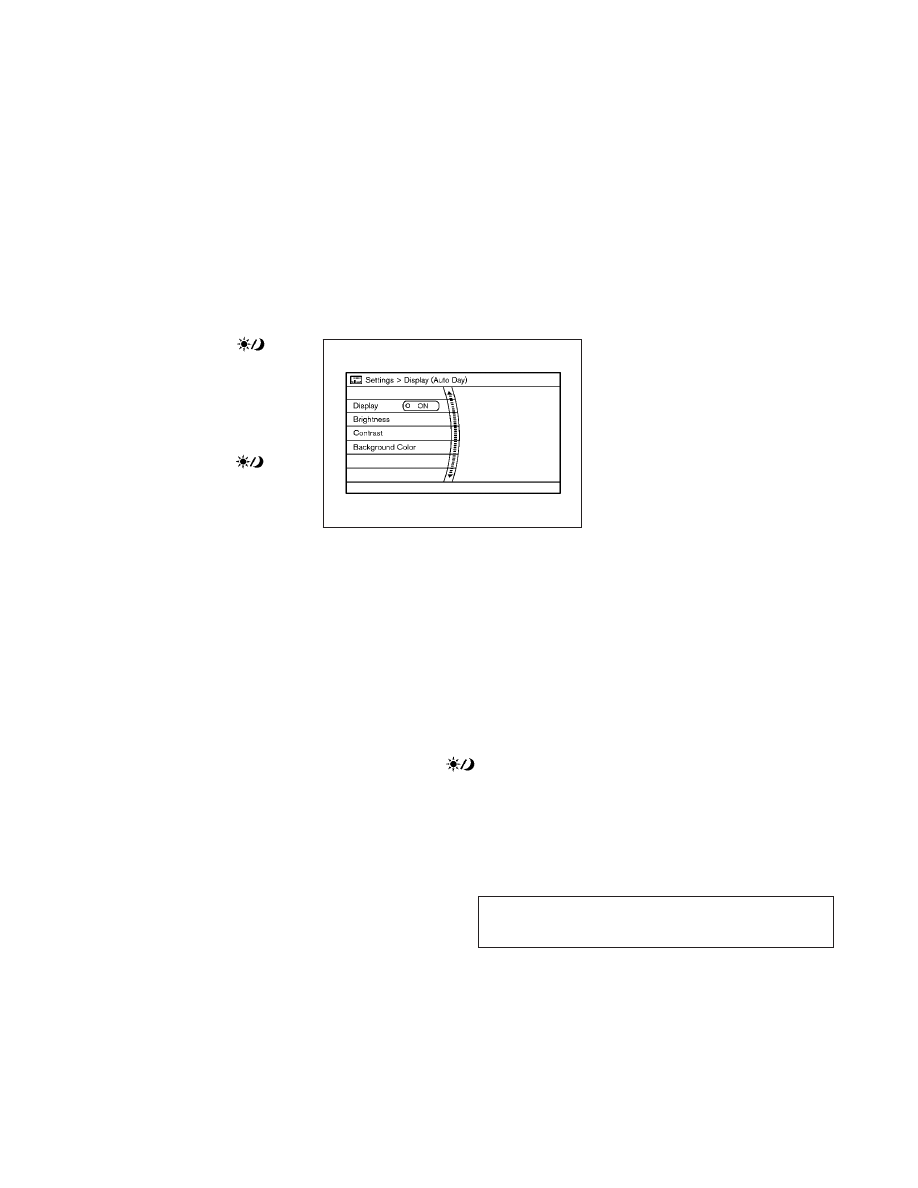
To turn on the screen, set this item to the ON

position, or push and hold the “

OFF”

button.

● Brightness/Contrast/Background Color
To adjust the brightness and contrast of the
screen, select the “Brightness” or “Contrast”
key.

Then, you can adjust the brightness and the
contrast using the INFINITI controller.

For information on the “Background Color” key,
refer to the separate Navigation System Own-
er’s Manual.

Color Theme :

Choose the theme color of the menu screen
from “Black”, “Brown” or “Silver”.

Display settings (models without
navigation system)

The “Display” screen will appear when pushing
the DISP button on the control panel.

Display :

To turn off the screen, push the ENTER button
and turn the “ON” indicator off.

When any mode button is pushed with the
screen off, the screen turns on for further
operation. The screen will turn off automatically
5 seconds after the operation is finished.

To turn on the screen, set this item to the “ON”

position or push the “

” button.

Brightness/Contrast/Background Color :

To adjust the brightness, contrast and back-
ground color of the screen, select the appropri-
ate “Brightness”, “Contrast” or “Background
Color” key and push the ENTER button.

Then, you can adjust the brightness, and the
contrast using the INFINITI controller. Switch
the background color to the daytime mode or
the nighttime mode by pushing the ENTER
button.

SAA2115

4-18

Monitor, climate, audio, phone and voice recognition systems


01/12/10—pattie

-------------------------------------------------------------------------------------------------------------------------------------------------------------

Comfort settings

Models with navigation system

The display as illustrated will appear when
pushing the SETTING button and selecting the
“Others” key, and then selecting the “Comfort”
key. This key does not appear on the display
until the ignition switch is pushed to the ON
position.

Models without navigation system

The display as illustrated will appear when
pushing the SETTING button and selecting the
“Comfort” key. This key does not appear on the
display until the ignition switch is pushed to the
ON position.

Auto Interior Illumination :

When this item is turned to ON, the interior
lights will illuminate if any door is unlocked.

Light Sensitivity :

Adjust the sensitivity of the automatic head-
lights higher (right) or lower (left).

Lift Steering Wheel on Exit (if so equipped) :

When this item is turned to ON, the steering
wheel moves upward for easy exit if the ignition
switch is in the LOCK position and the driver’s
door is opened. After getting into the vehicle

and pushing the ignition switch to the ACC
position, the steering wheel moves to the pre-
vious position.

Slide Driver Seat Back on Exit (if so equipped) :

When this item is turned to ON, the driver’s seat
moves backward for easy exit if the ignition
switch is in the OFF position and the driver’s
door is opened. After getting into the vehicle
and pushing the ignition switch to the ACC
position, the driver’s seat moves to the previous
position.

Light Off Delay :

Choose the duration of the automatic headlight
off timer from 0, 30, 45, 60, 90, 120, 150 and
180 second periods.

Selective Door Unlock :

When this item is turned to ON, only the driver’s
door is unlocked first after the door unlock
operation. When the door handle request
switch on the driver’s or front passenger’s side
door is pushed to be unlocked, only the corre-
sponding door is unlocked first. All the doors
can be unlocked if the door unlock operation is
performed again within 60 seconds.

When this item is turned to OFF, all the doors
will be unlocked after the door unlock operation
is performed once.

Models with navigation system

SAA3151

Models without navigation system

SAA3150

Monitor, climate, audio, phone and voice recognition systems

4-19


01/12/10—pattie

-------------------------------------------------------------------------------------------------------------------------------------------------------------

Intelligent Key Lock/Unlock :

When

this

item

is

turned

to

ON,

door

lock/unlock function by pushing the door
handle request switch will be activated.

Return All Settings to Default :

Select this item and then select “YES” to return
all settings to the default.

Clock settings (models with
navigation system)

The display as illustrated will appear when
pushing the SETTING button and selecting the
“Others” key, and then selecting the “Clock”
key.

On-screen Clock :

When this item is turned to ON, a clock is
always displayed in the upper right corner of
the screen.

This clock will indicate the time almost exactly
because it is always adjusted by the GPS sys-
tem.

Clock Format (24h) :

When this item is turned to ON, the 24-hour
clock is displayed. When this item is not turned
to ON, the 12-hour clock is displayed.

Offset (hour)/(min) :

Adjust the time by increasing or decreasing per
hour or per minute.

Daylight Saving Time :

Turn this item to ON for daylight saving time
application.

Time Zone :

Choose the time zone from the following

● Pacific
● Mountain
● Central
● Eastern
● Atlantic
● Newfoundland
● Hawaii
● Alaska

SAA2487

4-20

Monitor, climate, audio, phone and voice recognition systems


01/12/10—pattie

-------------------------------------------------------------------------------------------------------------------------------------------------------------

Language & Units settings

The Language & Units settings display will
appear when pushing the SETTING button, se-
lecting the “Language & Units” key with the
INFINITI controller and pushing the ENTER but-
ton.

For models with the navigation system, select
the “Others” key to show the “Language &
Units” key.

Select Language :

Select the “Select Language” key. Choose “En-
glish”, “Français” or “Español” for your favorite
display appearance.

If you select the “Français” key, the French
language will be displayed, so please use the
French Owner’s Manual. To obtain a French
Owner’s

Manual,

see

“OWNER’S

MANUAL/SERVICE MANUAL ORDER INFORMA-
TION” in the “9. Technical and consumer infor-
mation” section.

Select Units :

Select the “Select Units” key. Choose “US”
(Mile, °F, MPG) or “Metric” (km, °C, L/100 km)
for your favorite display appearance.

Select Units (Tire Pressure) :

Choose the “Select Units (Tire Pressure)” key
and push the ENTER button. From the following
display, select “kPa” or “psi”. *When the igni-
tion switch in the ACC position, the “Select
Units (Tire Pressure)” key is not displayed.

Voice Recognition settings (models
with navigation system)

For details about the “Voice Recognition” set-
tings, see “INFINITI VOICE RECOGNITION SYS-
TEM (models with navigation system)” later in
this section.

Models with navigation system

SAA3007

Models without navigation system

SAA3014

Monitor, climate, audio, phone and voice recognition systems

4-21


01/12/10—pattie

-------------------------------------------------------------------------------------------------------------------------------------------------------------

Camera settings

The “CAMERA” screen will appear when select-
ing the “Camera” key with the INFINITI control-
ler and pushing the ENTER button.

For the details about the camera system opera-
tion, see “REARVIEW MONITOR” later in this
section.

Predictive Course Lines :

When this item is turned to ON, the predicted
course lines will be displayed on the monitor
when the selector/shift lever is in the “R”
(Reverse) position.

Image Viewer (models with
navigation system)

The image files in the USB memory will be
displayed. To display the Image Viewer, push
the SETTING button, select the “Other” key and
then select the “Image Viewer” key. The image
of the selected file is displayed on the right side
of the screen.

When a number of folders are included in the
USB memory, select a folder from the list to
display the file list.

Images will not be shown on the display while the
vehicle is in any drive position to reduce driver
distraction. To view images, stop the vehicle in a
safe location and apply the parking brake.

Models with navigation system

SAA2404

Models without navigation system

SAA2606

SAA2491

4-22

Monitor, climate, audio, phone and voice recognition systems


01/12/10—pattie

-------------------------------------------------------------------------------------------------------------------------------------------------------------

Full Screen Display :

The full screen display will appear when select-
ing the “Full Screen Display” key.

To operate the Image Viewer or to change the
settings, select the desired key using the
INFINITI controller.

(Start)

Select the “

” key to start playing the

slideshow.

(Stop)

Select the “

” key to stop the slide-

show.

(Next)

Select the “

” key to display the next

file.

(Previous)

Select the “

” key to display the previ-

ous file.

Setting the Image Viewer :

The Image Viewer setting display will appear
when selecting the “Settings” key on the full
screen display. The following settings are avail-
able for the full screen display.

● Slideshow Speed

Select the “Slideshow Speed” key. From the
following display, select the changing time
from 5, 10, 30, 60 seconds or “No Auto
Change”.

● Slideshow Order

Select the “Slideshow Order” key. From the
following display, select “Random” or “Or-
der List”. For “Order List”, the image order is
the order of the files as stored on the USB
memory.

Operating tips :
● Only files that meet the following conditions

will be displayed.

– Image type: JPEG

– File Extensions: *.jpg, *jpeg

– Maximum Resolution: 2048 × 1536 pixels

– Maximum Size: 2-MB

– Colors: 32768 (15-bit)

– Maximum File Name lengths: 253-Bytes

– Maximum Folders: 500

– Maximum Images per Folder: 1024

● If an electronic device (such as a digital

camera) is directly connected to the vehicle
using a USB cable, no image will be dis-
played on the screen.

● If the file name is too long, some file names

may not be entirely displayed.

● When the total number of characters in the

file name exceeds 100 or if 1 file name in a
directory exceeds 100 characters, all files
will show a shortened 8-character version.
The image will still be displayed when se-
lected.

SAA2492

Monitor, climate, audio, phone and voice recognition systems

4-23


01/12/10—pattie

-------------------------------------------------------------------------------------------------------------------------------------------------------------

HOW TO USE CLIMATE BUTTON

To display the setting climate control screen,
push the CLIMATE button.

For details of the “CLIMATE” settings, see “AU-
TOMATIC CLIMATE CONTROL” later in this sec-
tion.

When the selector lever is shifted into the “R”
(Reverse) position, the monitor display shows
view to the rear of the vehicle.

The system is designed as an aid to the driver in
detecting large stationary objects to help avoid
damaging the vehicle. The system will not de-
tect small objects below the bumper and may
not detect objects close to the bumper or on the
ground.

WARNING

● The rearview camera is a convenience but it

is not a substitute for proper backing up.
Always turn and check that it is safe to do so
before backing up. Always back up slowly.

● Objects viewed in the RearView Monitor dif-

fer from actual distance because a wide-
angle lens is used. Objects in the RearView
Monitor will appear visually opposite like
ones viewed in the inside and outside
mirrors.

● Make sure that the trunk is securely closed

when backing up.

● Underneath the bumper and the corner areas

of the bumper cannot be viewed on the Rear-
View monitor because of its monitoring
range limitation.

● Do not put anything on the rearview camera.

The rearview camera is installed above the
license plate.

● When washing the vehicle with high-

pressure water, be sure not to spray it
around the camera. Otherwise, water may
enter the camera unit causing water conden-
sation on the lens, a malfunction, fire or an
electric shock.

● Do not strike the camera. It is a precision

instrument. Otherwise, it may malfunction
or cause damage resulting in a fire or an
electric shock.

CAUTION

There is a plastic cover over the camera. Do not
scratch the cover when cleaning dirt or snow
from the cover.

REARVIEW MONITOR

4-24

Monitor, climate, audio, phone and voice recognition systems


01/12/10—pattie

-------------------------------------------------------------------------------------------------------------------------------------------------------------

HOW TO READ DISPLAYED LINES

Guiding lines which indicate the vehicle width
and distances to objects with reference to the
bumper line

A

are displayed on the monitor.

Distance guide lines:

Indicate distances from the bumper.

● Red line

1

: approx. 1.5 ft (0.5 m)

● Yellow line

2

: approx. 3 ft (1 m)

● Green line

3

: approx. 7 ft (2 m)

● Green line

4

: approx. 10 ft (3 m)

Vehicle width guide lines

5

:

Indicate the vehicle width when backing up.

Predicted course lines

6

:

Indicate the predicted course when backing up.
The predicted course lines will be displayed on
the monitor when the selector lever is in the “R”
(Reverse) position and the steering wheel is
turned. The predicted course lines will move
depending on how much the steering wheel is
turned and will not be displayed while the
steering wheel is in the neutral position.

HOW TO PARK WITH PREDICTED
COURSE LINES

WARNING

● Always turn and check that it is safe to park

your car before backing up. Always back up
slowly.

● Use the displayed lines as a reference. The

lines are highly affected by the number of
occupants, fuel level, vehicle position, road
condition and road grade.

● If the tires are replaced with different sized

tires, the predicted course line may not be
displayed correctly.

● On a snow-covered or slippery road, there

may be a difference between the predicted
course line and the actual course line.

● If the battery is disconnected or becomes

discharged, the predicted course lines may
not be displayed correctly. If this occurs,
perform the following procedures.

– Drive the vehicle on a straight road for

more than 5 minutes.

● The displayed lines will appear slightly off to

the right because the rearview camera is not
installed in the rear center of the vehicle.

● The distance guide line and the vehicle

width guide line should be used as a refer-
ence only when the vehicle is on a level
paved surface. The distance viewed on the
monitor is for reference only and may be
different than the actual distance between
the vehicle and displayed objects.

● When backing up the vehicle up a hill, ob-

jects viewed in the monitor are further than
they appear. When backing up the vehicle
down a hill, objects viewed in the monitor
are closer than they appear. Use the inside
mirror or glance over your shoulder to prop-
erly judge distances to other objects.

The vehicle width and predicted course lines are
wider than the actual width and course.

SAA1896

Monitor, climate, audio, phone and voice recognition systems

4-25


01/12/10—pattie

-------------------------------------------------------------------------------------------------------------------------------------------------------------

1. Visually check that the parking space is

safe before parking your vehicle.

2. The rearview of the vehicle is displayed

on the screen

A

as illustrated when the

selector lever is moved to the “R” (Re-
verse) position.

3. Slowly back up the vehicle adjusting the

steering wheel so that the predicted
course lines

B

enter the parking space

C

.

4. Maneuver the steering wheel to make the

vehicle width guide lines

D

parallel to

the parking space

C

while referring to

the predicted course lines.

5. When the vehicle is parked in the space

completely, move the selector lever to the
P (Park) position and apply the parking
brake.

DIFFERENCE BETWEEN PREDICTED AND
ACTUAL DISTANCES

The distance guide line and the vehicle width
guide line should be used as a reference only
when the vehicle is on a level, paved surface.
The distance viewed on the monitor is for
reference only and may be different from the
actual distance between the vehicle and dis-
played objects.

SAA1897

SAA1898

4-26

Monitor, climate, audio, phone and voice recognition systems


01/12/10—pattie

-------------------------------------------------------------------------------------------------------------------------------------------------------------

Backing up on a steep uphill

When backing up the vehicle up a hill, the
distance guide lines and the vehicle width
guide lines are shown closer than the actual
distance. For example, the display shows 3 ft
(1.0 m) to the place

A

, but the actual 3 ft

(1.0 m) distance on the hill is the place

B

. Note

that any object on the hill is further than it
appears on the monitor.

Backing up on a steep downhill

When backing up the vehicle down a hill, the
distance guide lines and the vehicle width
guide lines are shown further than the actual
distance. For example, the display shows 3 ft
(1.0 m) to the place

A

, but the actual 3 ft

SAA1899

SAA1900

Monitor, climate, audio, phone and voice recognition systems

4-27


01/12/10—pattie

-------------------------------------------------------------------------------------------------------------------------------------------------------------

(1.0 m) distance on the hill is the place

B

. Note

that any object on the hill is closer than it
appears on the monitor.

Backing up near a projecting object

The predicted course lines

A

do not touch the

object in the display. However, the vehicle may
hit the object if it projects over the actual
backing up course.

Backing up behind a projecting
object

The position

C

is shown further than the

position

B

in the display. However, the posi-

tion

C

is actually at the same distance as the

position

A

. The vehicle may hit the object

SAA1923

SAA1924

4-28

Monitor, climate, audio, phone and voice recognition systems


01/12/10—pattie

-------------------------------------------------------------------------------------------------------------------------------------------------------------

when backing up to the position

A

if the object

projects over the actual backing up course.

HOW TO ADJUST SCREEN

To adjust the Display ON/OFF, Brightness, Tint,
Color, Contrast and Black Level of the RearView
monitor, push the SETTING button with the
RearView monitor on, select the “Display” key
on the screen and select the item key and
adjust the level using the INFINITI controller.

Do not adjust the Brightness, Tint, Color, Con-
trast and Black Level of the RearView monitor
while the vehicle is moving. Make sure the
parking brake is firmly applied and the engine
is not running.

The display of the predicted course lines can be
set to ON or OFF. For details, see “Camera
settings” earlier in this section.

OPERATING TIPS

● When the selector lever is shifted to the “R”

(Reverse) position, the monitor screen auto-
matically changes to the RearView monitor
mode.

● It may take some time until the RearView

monitor is displayed after the selector lever
has been shifted to “R” from another posi-
tion or to another position from “R”. Objects
may be distorted momentarily until the Rear-

View monitor screen is displayed com-
pletely.

● When the temperature is extremely high or

low, the screen may not clearly display
objects. This is not a malfunction.

● When strong light directly enters the cam-

era, objects may not be displayed clearly.
This is not a malfunction.

● Vertical lines may be seen in objects on the

screen. This is due to strong reflected light
from the bumper. This is not a malfunction.

● The screen may flicker under fluorescent

light. This is not a malfunction.

● The colors of objects on the RearView moni-

tor may differ somewhat from those of the
actual object.

● Objects on the monitor may not be clear in a

dark place or at night. This is not a malfunc-
tion.

● If dirt, rain or snow attaches to the camera,

the RearView monitor may not clearly dis-
play objects. Clean the camera.

● Do not use alcohol, benzine or thinner to

clean the camera. This will cause discolora-
tion. To clean the camera, wipe with a cloth
dampened with diluted mild cleaning agent
and then wipe with a dry cloth.

● Do not damage the camera as the monitor

screen may be adversely affected.

● Do not use wax on the camera window. Wipe

off any wax with a clean cloth dampened
with mild detergent diluted with water.

Monitor, climate, audio, phone and voice recognition systems

4-29


01/12/10—pattie

-------------------------------------------------------------------------------------------------------------------------------------------------------------

Open or close, and adjust the air flow direction
of ventilators.

: This symbol indicates that the ventila-

tors are closed.

: This symbol indicates that the ventila-

tors are open.

WARNING

● The air conditioner cooling function oper-

ates only when the engine is running.

● Do not leave children or adults who would

normally require the support of others alone
in your vehicle. Pets should not be left alone
either. On hot, sunny days, temperatures in
a closed vehicle could quickly become high
enough to cause severe or possibly fatal in-
juries to people or animals.

● Do not use the recirculation mode for long

periods as it may cause the interior air to
become stale and the windows to fog up.

Start the engine and operate the automatic
climate control system.

Front

SAA3142

Rear

SAA3012

VENTILATORS

AUTOMATIC CLIMATE CONTROL

4-30

Monitor, climate, audio, phone and voice recognition systems


01/13/10—tbrooks

-------------------------------------------------------------------------------------------------------------------------------------------------------------

When the “STATUS” button is pushed, the
automatic climate control status screen will
appear. (See “HOW TO USE STATUS BUTTON”
earlier in this section.)

You can individually set the driver and front
passenger side temperature using each tem-
perature control button.

Models with navigation system

SAA3143

Models without navigation system

SAA2987

Monitor, climate, audio, phone and voice recognition systems

4-31


01/13/10—tbrooks

-------------------------------------------------------------------------------------------------------------------------------------------------------------

1. “

” front defroster button

2. “

” rear window defroster button

(See “REAR WINDOW AND OUTSIDE
MIRROR DEFROSTER SWITCH” in the
“2. Instruments and controls” section.)

3. “OFF” button for climate control system

4. “

” fan speed decrease button

5. “

” fan speed increase button

6. “AUTO” automatic climate control ON

button

7. “

” air intake control button

8. “

” air recirculation button.

9. “CLIMATE” button

10, 11. Temperature control button

(driver side)

12. “

” manual air flow control button

(driver side)

13. “

” manual air flow control button

(passenger side)

14, 15. Temperature control button (passen-

ger side)

AUTOMATIC CLIMATE CONTROL
(Type A)

Automatic operation

Cooling and/or dehumidified heating (AUTO) :

This mode may be used all year round. The
system works automatically to control the in-
side temperature, air flow distribution and fan
speed after the preferred temperature is set
manually.

1. Push the “AUTO” button on. (The indicator

on the button will illuminate and AUTO will
be displayed.)

Type A

SAA2952

4-32

Monitor, climate, audio, phone and voice recognition systems


01/13/10—tbrooks

-------------------------------------------------------------------------------------------------------------------------------------------------------------

2. Push the temperature control button

(driver side) to set the desired tempera-
ture.

● The temperature can be set within the

following range.
– For U.S.: 60 to 90°F (16 to 32°C)
– For Canada: 64 to 90°F (18 to 32°C)

● The temperature of the passenger com-

partment will be maintained automati-
cally. Air flow distribution and fan speed
will also be controlled automatically.

3. To turn off the climate control system,

push the “OFF” button.

A visible mist may be seen coming from the
ventilators in hot, humid conditions as the air is
cooled rapidly. This does not indicate a mal-
function.

Dehumidified defrosting or defogging:

1. Push the front defroster “

” button.

(The indicator light on the button will
come on.)

2. Push the temperature control button to

set the desired temperature.

● To quickly remove ice from the outside of the

windows, push the fan speed increase

” button and set it to the maximum

position.

● As soon as possible after the windshield is

clean, push the “AUTO” button to return to
the auto mode.

● When the front defroster “

” button is

pushed, the air conditioner will automati-
cally be turned on at outside temperatures
above 23°F (

⫺5°C) to defog the windshield,

and the air recirculate mode will automati-
cally be turned off.

Outside air is drawn into the passenger
compartment to improve the defogging per-
formance.

Manual operation

Fan speed control :

Push the fan speed increase “

” or

decrease “

” buttons to manually control

the fan speed.

Push the “AUTO” button to return to automatic
control of the fan speed.

Air recirculation :

Push the air recirculation “

” button to

change the air circulation mode. When the
indicator light illuminates, the flowing air is
recirculated inside the vehicle.

The air recirculation mode cannot be activated
when the air conditioner is in the front defrost-

ing mode “

”.

Outside air circulation :

Push the outside air circulation “

” button

to change the air circulation mode. When the
indicator light illuminates, the flowing air is
drawn from outside the vehicle.

Automatic air intake control :

To set the automatic control mode, perform one
of the following operations.

● When the outside air circulation mode is on,

push and hold the outside air circulation

” button for more than 2 seconds.

● When the air recirculation mode is on, push

and hold the air recirculation “

” but-

ton for more than 2 seconds.

When setting the automatic control mode, both
indicator lights will blink twice indicating that
the system is in the automatic control mode.

Monitor, climate, audio, phone and voice recognition systems

4-33


01/12/10—pattie

-------------------------------------------------------------------------------------------------------------------------------------------------------------


Content      ..     10      11      12      13     ..